Tuesday, October 30, 2012

Bargain!

How about a post that doesn't require me to wrestle with my card reader problems, because the stuff it's about isn't in my house yet!? Yay!

I've been holding off on ordering the bunk bed for Milo and August's room, but I checked Target's website the other day and discovered that the set I was eyeing was on clearance.

It's the "Wrangler Bunk Bed" in espresso. The material is listed as "wood composite," so it's not the nicest bed in the whole world or anything, but it looks good in the picture, and the one review on the site has positive things to say.

The two other bunk beds I considered were this black metal one, also from Target:


This is pretty much exactly like the loft bed Milo sleeps in now, only bunk beds. It's on clearance for $107, so it's main selling point was price. But I really wanted something that at least looked like wood for the forest room.

And then I thought about this one from Ikea:


The price ($159) is good, and it's real pine....but I would have to paint or stain it, and I already have a pretty big line up of things waiting to be painted or stained.

So when the Wrangler, with its awesome cowboy name, went on clearance I was sold. It's marked down to $169 from $199, so not a super dramatic price change, BUT! Target.com was also having a sale wherein you got 15% off if you spent over $125. And on top of that I could use my Target card for 5% off and free shipping. So my final price after tax was $146.87. Cheaper than the Ikea bed! And close enough to the cost of the metal bed to make me feel good about paying a little more for the one I wanted.

And on top of that, I can still Craigslist the loft beds. The metal one is almost brand new is for sale on Target's website right now for $150, I think (it was on sale when we bought it, so we didn't pay that much). I'm thinking I'll try listing it for $90 or so and see what happens. And then maybe $75 or so for the one with the slide. It's older, but it's still in pretty good shape...and it has a slide! If I actually get close to that for them, I'll be breaking even on trading them in for the bunk bed.

Saturday, October 27, 2012

Weekend projects/updates/previews of exciting things to come

This weekend was supposed to be the weekend for starting the tile in the master bathroom. But, after having a few people over for some backyard firepit fun last weekend for Dave's birthday, we decided that replacing the rickety old back porch steps before we have people here for Thanksgiving was a higher priority. Safety first! Nasty germy carpet second.

Dave rebuilt the front steps at our old house shortly before we moved, so he has some experience.  But  he went into this a little nervous anyway. For one thing, that step building project at the old house did not go entirely smoothly. For another thing, this is a longer flight of stairs. For one more thing, this stair building project requires tearing out the old, falling apart brick landing and figuring out how to have the stairs land nicely on the unlevel ground underneath. Whoever built the old stairs dealt with the uneven landing by sticking a little block of wood under one of the stringers. Not so stable. I envisioned emergency room trips and/or lawsuits every time someone walked down those steps.

So far things are going smoothly, though, and Dave's in much better spirits now than he was before he started this morning. Demolition went well, and tearing out the old brick landing turned out to be something that could be done with bare hands, so old and decrepit was it. And now we have a big pile of bricks that we can use to further beagle proof that back fence! We spend a lot of time thinking about beagle proofing fences around here. We live one house down from a very busy road, which The Beagle has actually run across on one of her little adventures. This, dear little Fiesta, is why I did not want a beagle! She's lucky she's irresistible. I am used to dogs that I wouldn't be able to lose if I tried.

Not sure how long the full step building project will take. Dave is hoping to finish tomorrow, but I suspect that's being a little optimistic. But here's a preview:


You can still see the block of wood they attached to the bottom of the steps on one side for leveling purposes! You can also see a little bit of what a giant disaster the whole deck/screened porch is. I'm not sure when that's all getting tackled. I get overwhelmed just thinking about it, and I'm not even sure where to start. Well, I guess we're starting with new steps. I think if we do that and then either replace or reattach the railing on the deck (not shown) then it will all at least be safe, if still incredibly ugly.

Other weekend plans involve tackling some of the little projects that we've been meaning to get around to for forever. I would like, for example, to hang a few more pictures and do some little painting projects so that I can finally call the library done....enough for now. So I'm mostly working on that today.

I'd also like to start working on the little counter/desk area in our kitchen, next to the garage, and turn it into a "command center" as people say. I feel silly saying command center. But, you know. This is what it looks like now:


And that's not even showing you the mess inside that cabinet there. I'm trying to think what all I need to make places for....I'm thinking calendars, menus, coupons, incoming mail, small tools we use a lot, reusable grocery bags.....and probably not so much cans of primer and shoes (although, to be fair, the shoes belong to a visiting kid, so they don't stay here all the time).  I am pinning things in preparation!

What exciting projects is everyone else up to this weekend?

Friday, October 26, 2012

Grain-free, gluten-free, low-carb chocolate muffins that kids like

My first recipe post!

Our baking needs around here are pretty....specific. So I find myself adapting recipes to the point of unrecognizability more often than just using them as is--at least with baked stuff (which is pretty much all I do. Dave is the cook; I am the baker). We are all glutenless, for various reasons that mostly boil down to a lot of autoimmune stuff and things just going more smoothly health and behavior-wise when we keep it that way (no one, as far as we know, actually has celiac disease). And, owing to a personal history of gestational diabetes and a family history of type II diabetes, I try to keep carbs low for myself. And then I just prefer grain-free over not, though the kids wind up with plenty of grains in their diets, really.

So coming up with things that I can eat AND the kids like is sometimes challenging. But I made these muffins last night, and they're a hit with the whole family (even muffin skeptic, Ari). I've been toying around with the recipe for awhile, and I think I finally have it how I want it, so I'm recording it for posterity before I forget how I made it. The result is a not too sweet but very chocolately muffin with a nice, non-crumbly texture. It would be REALLY good topped with the chocolate buttercream I have leftover from Dave's birthday cupcakes, but I'm trying not to go there. For the BABY.

Food photography is not my thing. But this is what they look like:


Uhh, like chocolate muffins. The recipe is very, very loosely adapted from a King Arthur flour recipe. So loosely that I wasn't sure I should even mention it.

Here's what you need:
Makes around 16 muffins. Inconvenient, I know. That's just how it turned out.

2/3 cup cocoa
1/2 cup + 2 tablespoons coconut flour
3/4 cup tapioca starch
1 1/4 cups erythritol
1 tsp baking powder
1 tsp baking soda
3/4 tsp salt
1 bar (more or less) 85% cocoa chocolate, chopped
3 eggs
1/2 tsp stevia
1 cup whole milk
2 tsp vanilla
2 tsp vinegar
1 stick butter, melted

Preheat oven to 400. Prepare greased muffin tins or use silicone muffin cups (I LOVE my silicone muffin cups, btw).

Mix cocoa, coconut flour, tapioca starch, erythritol, baking powder, baking soda, and salt together in a large mixing bowl.

In a smaller mixing bowl, whisk eggs and then mix well with other liquid ingredients. Pour liquid mixture into dry ingredient bowl and mix. Fold in chopped chocolate.

Fill muffin tins around 3/4 of the way full and bake for 20 minutes or until a toothpick comes out clean.

I am figuring, very roughly, that these come in at around 7-8 grams of carbs per muffin, assuming you zero out the erythritol. The tapioca starch is by far the biggest source of carbs. I use Ener-G brand, which, the nutrition info says has 63 grams in 3/4 cups, or just under 4 grams per muffin. The milk and eggs and chocolate all add a bit more. Most of the carbs in coconut flour are fiber, so another small amount of net carbs from that. And I'm probably forgetting something, but that's what I'm coming up with.

A few notes on ingredients:

Coconut flour/tapioca starch: coconut flour is my go to flour these days. Combining it with the tapioca starch makes it hold together better, keeps you from needing to use a gazillion eggs like in a lot of coconut flour recipes, and just kind of gives things a more "normal" taste and texture. I don't think you taste coconut at all in this recipe, but I may just be used to it. Cocoa does a good job of masking it, though.

Erythritol/stevia: my favorite fake sugar combo. Both because I like the way it tastes and because I haven't found anything too scary about erythritol. Maybe there'll be a study soon saying it makes lab rats grow an extra head, but for now I feel fine about eating it and giving it to the kids.


Homeschool.....Friday!

Back before I bailed on the old homeschool blog, I announced big plans for a post about all the not-at-our-house stuff we do this year. There is...a lot. Here's what that schedule looks like right now:

Monday: classes at LEO in the morning. Ari's taking a logic class, and Milo and Gus are taking science.

Tuesday: Spanish in the morning (tutor comes here to do a class with my kids plus our friends who live nearby). Milo and Gus have lego robotics at a friend's house in the afternoons. Every other week, Ari has physics at LEO. Gus has tap from 4-5. And until next month, Gus has rehearsals for A Christmas Carol (he's Tiny Tim!) in the evenings. Tuesdays are....busy.

Wednesday: Ari has a Manga class in the afternoon, and the other boys hang out at the playground with friends while that's going on. Fiesta has obedience class in the evenings, and a kid generally comes with me to that.

Thursday: Milo and Gus have a boy's club they go to every other week. Milo has guitar in the late afternoons. Gus has rehearsal again. And Ari is blissfully unscheduled all day!

Friday: a bit in flux right now. We often get together with friends.

Saturday: Ari and Milo have archery practice in the mornings, although that's about to go on hiatus until after New Year's.

Sunday: Gus has rehearsal in the afternoon, and Ari has math club (at our house, coached by Dave).

Phew! Uhh....it makes appreciate our time at home more? Well, it does. I know that it is fashionable to wax philosophical about whether kids are overscheduled these days and should be spending more time building fairy houses in the woods instead and all that. This is just sort of how our year has shaped up, free of philosophy-based planning. The kids seem completely fine with it; I would like more of our evenings back....but I'm the one who went and scheduled Fiesta's obedience class smack in between Christmas Carol rehearsals.

August's theater career takes up more of the week than anything else, and he's our token extrovert, so he handles it well. He did a drama camp the summer he was five and fell completely in love with acting. So he's been involved in one play or another more often than not since then.

A Christmas Carol is the first play he's done that's not strictly children's theater. The cast is a mix of kids and adults, and he's the youngest one (though not the smallest; he makes for a rather tall Tiny Tim). He did another wintry-themed play last year at the same time, and I'm kind of loving how going to see Gus in a seasonal play is becoming a thing we do for Christmas. A Christmas Carol opens the day after Thanksgiving this year, so Dave's parents will be in town and able to see him on stage for the first time.

Here are some cruddy iphone pictures from the day they took publicity photos (hoping I'll be able to get some copies of the ones that were taken with a real camera and from a better angle).

With the carollers (he's on the front row, second from the right):


And with the whole cast (bottom right) (with the photographer's arm in the foreground):


Tuesday, October 23, 2012

House Tour: Milo and August's Room

Blogging goal for the....week? Next two weeks? ....is to finish up a house tour series--one of those ones wherein I show the rooms we haven't touched as well as the ones we've whipped somewhat into shape. And the ones like today's, which are sort of in between. (This will be an easier goal to accomplish if my *#$%^^^ing card reader would cooperate. I think that the card reader KILLED my old memory card. And I think the new card reader is already screwed up. I hate them. I got today's pictures by using the card reader that's built into the upstairs computer, the one that is mostly for kids to play Minecraft on, but that is a pain to do. I want a functioning card reader down here! Damnit).

Kid rooms were the first ones to get painted when we moved in, but now they're kind of in stasis. Yet I feel like they could be finished (or, you know, finished enough for now) without a whole lot of time or effort; it's just a matter of getting around to stuff. So maybe these posts will motivate us to get around to stuff.

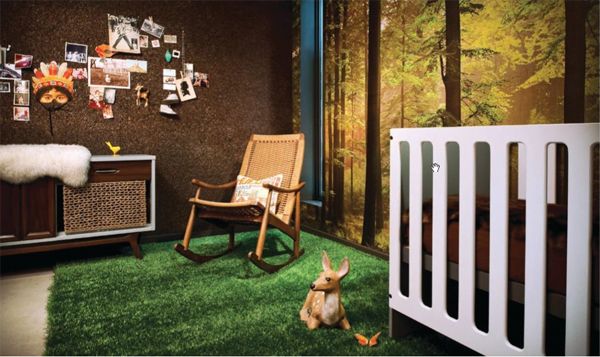
When I saw this room:


featured on The Lettered Cottage awhile back, I knew I needed a forest room somewhere in the new house. And, fortunately, Gus and Milo were as into it as I was, and agreed to be the lucky forest room residents.

Here is what we have so far:


The bed is a "junior loft bed" from Target's web site. It looks like they're not selling it anymore, but have one that's basically the same except silver instead of black. It was on sale for just over $100 when we bought it, IIRC. The comforters are also from Target--Room Essentials Tulip Comforter--last I saw it's on clearance in the stores right now (not on the website); it wasn't when we bought them, so it looks like we paid around $20 each for the comforter/pillow sham sets. And the bed making is Dave's doing....I'm too pregnant to climb up there and do it, even for blog photography purposes. The paint, like in the kid bathroom, is Martha Stewart's Saguaro Green. Curtains are from Target (I know they're pulled out of the way so you can't really see them, and I just bought one panel per window for cost cutting purposes. They're brown and stripey). We used shelves we already had for the under bed toy/book storage...the one with the baskets is from a garage sale, orginally, and the other one is from Target. More on the wall mural later.


I'm still in love with this light fixture. We took down the old, builder grade ceiling fan and put this up. Gus is not  supposed to have fans in his room because of his dust mite allergy, plus this is pretty and the fan wasn't. I'm pretty sure that we got this at Lowe's and that it was right around $100, but I can't find it now. It looks an awful lot like this one that sells for $270 at Lighting Showroom, though, so it looks like we got a decent deal on it.


Gus' side of the room. We've had this loft bed for years....in our old  house we had a mattress on the floor under it and used it as bunk beds. It originally had a slide and a tent on top. We still have the slide in the garage, but there's not really enough floor space for it here. 


Both kid bedrooms are pretty much the same size--around 12 by 13, I think. We opted for this to be the shared room because it has two closets in it. And because there's not a whole lot of wall space left after the beds are in there (and we didn't want to cover up too much of the wall mural), we opted for
storing all the clothes in the closets instead of having dressers. So each closet has one of these shelves for non hanging clothes, with cubbies for shirts, pants, etc., and then the bins that slide out for pajamas and underwear/socks. Oh, see those little wooden balls on a cord? Those are strings of lights that we haven't gotten around to hanging up yet.


A very exciting picture of the wall of closets. We may take the doors down and put curtains up here, because no one likes bifold doors, right? Although these work fine for the time being.

Under bed storage.

Okay, so! Future plans! Even though we just got the one loft bed, I've talked the boys into a regular bunk bed instead. I'm just not thrilled with how the two beds take up so much space in the room. If they were regular twin beds instead of loft beds, I'd be fine with how they look but not with how little space would be left for toys. I did float an idea to do twin beds and keep the toys on shelves in the hallway outside (where there's a lot of unused space), but they didn't go for it.

So we're planning to sell the loft beds and buy a basic set of wooden bunk beds, which will go on the wall opposite the windows. They really want a desk, so I'm thinking that will go between the windows, and then we'll consolidate toys (and probably bring most of the books down to the library--fewer books is also a good thing with a dust mite allergy) and have a corner for toy storage.

There's not really a whole lot of wall space left with the wall mural plus bunk beds plus the two windows plus the closets, but we bought this at Ikea the other day anyway, in hopes that we can find somewhere to hang it:

Why, when I type it all out, it sounds so simple! The loft bed/bunkbed switch is so easy (and I'm guessing we can sell the loft beds on Craiglist for more than half of what the bunk beds will cost), but I think it will really make the room look a lot bigger. And give us an excuse for a toy purge, since blocks and legos are about the only things that get played with these days anyway. And Snap Circuits. And board games, but they live downstairs.

About the wall mural: in case anyone is out there thinking, "I want MY house to look like a dentist's office from 1984, too!" This was from Amazon, and it came in 8 big panels with a packet of glue to mix up. We lined them all up on the floor in our bedroom first, then Dave hung them up and smoothed them out while I got the glue mixed and applied to the next panel. It was kind of a pain, and the finished project is far from perfect (as far as wrinkles and things lining up perfectly), but it was fairly quick (it took maybe 2 hours all together) and the kids are happy with it. It definitely makes the room more...interesting than it would be otherwise. I'm a little terrified at the thought of ever trying to get it off the wall, but with luck it will be awhile before they get tired of it.

Sunday, October 21, 2012

DIY Chalk Paint: A First Attempt


Update: Psst....another chalk painting attempt, with a more exciting project here

A post about chalk paint is sort of a rite of passage if you want to blog about your house, right? At least that is the impression I got from reading 80 gazillion blog posts about chalk paint in preparation for this project.

But, truthfully, I had not even heard of chalk paint (or at least I hadn't paid any attention to it; I'm sure I must have come across some of those posts at some point in the past) until a month or two ago, when my friend Kristi started talking about it. And then painted her bathroom cabinet with some she made herself. And it looked really great. And I have a lot of furniture around here what needs painting. So I could ignore it no more.

One can buy Annie Sloan's chalk paint, and, word is, it's awesome. It's also around $37 a quart and comes in a limited range of colors. So there are lots and lots of tutorials all over the internet for making your own knock off chalk paint. You can make it either with non-sanded grout or with plaster of paris. I opted for the latter and used this tutorial from I Heart Naptime as my guide.

The test object: our Norden table from Ikea that we use as a chess table in the library:


Why chalk paint? I actually wasn't planning to go with chalk paint for this at first. It seemed like such a tiny, simple little project that I wasn't sure it was worth it. But then I figured that a tiny, hard to mess up project was actually the perfect place to experiment. And the big advantage of chalk paint is supposed to be that you don't need to sand or prime first. Since it was bare wood, I doubted I'd be able to get away without primer otherwise, so it wouldn't really be any more work.

Last night Dave was brewing beer with a friend all evening, and two of three kids were off at a sleepover, so I had nothing to do but deal with that table. Sorry for the lack of pictures of the first part of the process. It was dark; I hate the flash....what can I say?

I recreated the scene the next morning, though. Well, a little bit:


I bought the plaster of paris and finishing wax at Home Depot yesterday. And for the paint, I used one of the reject samples from the dining room/library paint selection. Not the one pictured; I accidentally threw it away before I could either take a picture of it or note the color. I hope no one is super in love with the color, because I have no idea what it's called. It's flat paint, by the way. I found remarkably little information on what kind of paint to use. What I did find said anything will work okay and end up with a flat finish regardless.

The I Heart Naptime recipe calls for 4 tablespoons plaster of paris, 2 tablespoons of water, and 2 cups of paint. The paint samples are just under one cup (7.75 oz), so I halved the amounts of water and plaster of paris. Which made for a very tiny amount to work with. I mixed the water (cold water. Some things I read said to use warm or hot water, but Kristi told me she found the hot water harder to work with. I didn't have any trouble with cold) and the plaster of paris in an old yogurt container until all the lumps were gone. Then I poured the mixture together with the paint and mixed some more.

Then I started painting. And all went smoothly. The paint was really easy to work with. I am trying to thinking of something remarkable or at least slightly....unusual to say about it, but it was just kind of like...painting. I let it dry for less time than I was supposed to--maybe an hour and a half--then put the second coat on. Here's what it looked like the next morning:


It has a little bit....uhh, chalkier finish than regular paint. You can, in fact, at least according to all the blog posts I read, actually write on it with chalk. To take the edge off the chalkiness, most people finish it with wax. I was no exception. The Minwax I bought was kind of a pain to work with--very hard, didn't want to come out of the container, and extremely stinky. Word is there are better, softer waxes one can buy online.

I also began to understand why most chalk painted furniture gets distressed, as I managed to chip the paint in two places before I got the wax on. Apparently, it's a little hard NOT to distress chalk paint. I'm curious how it will hold up to kid chess use.

Here it is after the wax; I don't think the change is that dramatic, either in pictures or in person. I might have been too skimpy with the wax. But, you understand, I hated the wax.


Note that the dogs have shredded all the paper and cardboard I put under the legs to catch drips.

And here it is back in its place, with all its stuff on it again:


So I'm happy with how it turned out. The painting was trouble-free. I like the color and how it is unobtrusive against the wall but not exactly the same color, and how I put that paint sample to good use. I hate to waste $2.99 if I don't have to.

Next up in Adventures in Chalk Painting: the dresser for the nursery. And our headboard. I bought a light gray to use for both of those.
Linking with: HookingupwithHoH

The Shabby Nest

Thursday, October 18, 2012

There is a room that needs even more help than our bedroom...

And it's our bathroom. Remember?


In fact, Dave and I were talking over a pre-baby priority list for the master bedroom/bathroom, and we agreed that the tile in the master bathroom should really be the top priority. It is both the biggest job and the nastiest. To that end, Dave is planning to go to Floor and Decor's free class on tiling Saturday. For we have never tiled anything before.

In addition to being a decorating catastrophe, the master bath is GINORMOUS. Like just over 20 feet long and maybe 10 or 11 feet wide. I'm a little mystified by it, actually, because the house was built in the mid 80's, which I thought was a bit before the time of ridiculously sized master baths. I would, to be honest, have preferred a modestly sized bathroom (and closet. I haven't even shown you the closet. If my house were on House Hunters, no wife would be able to make the obligatory, "but where are you going to keep YOUR clothes, sweetie?" joke about MY closet) and a fifth bedroom in about half of the square footage here. Especially what with being pregnant and my very frequent middle of the night trips all the way across those 20 feet to pee.....I wouldn't mind a slightly less cavernous bathroom.

But I realize that whining about how my bathroom is too big is A. annoying and B. useless. So I'll stop. But what I was getting at is that it's going to take a lot of tile to cover that sucker. We'll leave the hex tile that's at the end, so I'm estimating roughly 120 square feet leftover that needs tile. This means anything that costs more than $2.50 or so a square foot is right out.

I really love the way this gray plank tile looks here:


I'm not having much luck finding anything super similar for a reasonable-to-us price, but I am eyeing this:

"Adirondak Grey Ceramic Tile" from Floor and Decor. I like it online at least, and it's only $1/square foot. 

Ever since I got gray tile in my head for the floor, I've pictured a gray-green for the walls. I think I can get away with it with the Newburg Green in the bedroom. Maybe Benjamin Moore's Glazed Green. Although I can't find any examples of it in a room online, so maybe it's not anything special. But something along those lines. 

Originally I was planning on beadboard for the bottom half of the walls, but now I think it might be overkill with the board and batten in the bedroom. 

I would love to do a big overhaul of the bathroom someday--with an updated tub and a bigger shower and new sinks and all.....but that's a long way off. So for now we'll settle for tile and paint and a few other small changes.


That light fixture, for one thing. And the fixtures. Normally we'd frame out the mirror to make it look pretty, but the mirror itself has some big spots where the finish is rubbed off, so it will probably need to go. And then see those cabinet doors? They are kind of weird and slatted and they don't close right on top of that. I'm not sure what to do about them. I don't think there's any way to make the one on the right close correctly, thanks to a weird shelf thing next to the tub, so I'm thinking of maybe taking the doors off and putting curtains there for now. This bathroom suffers from the same "everything is white except the beige countertop" issue that the kids' bath has, so eventually I'd like to rip that sucker out and maybe put in pedestal sinks with a little cabinet in between (there's also a linen closet in here, so there's no lack of storage).


Yes. I think we can change out ALL the light fixtures.


And say goodbye to the brass towel racks.


The shower door's not in good shape, so I'm thinking take it down and put a shower curtain up. And change out the fixtures in there, too. 

And then we'll have a passably pleasant master bath! 

Wednesday, October 17, 2012

Wherein I take craftiness to new (for me) levels

Remember when I posted about my anatomy flashcards last week and said that they were kind of a rough draft? I knew I wanted them to look more vintage-y (or, for this set, since they're supposed to be Halloweeny, more old and spooky). I thought this would probably mean buying some sort of specialized card stock, so yesterday I googled stuff like "vintage look cardstock." I found some expensive things that looked...sort of like what I wanted. But my googling turned up something even more interesting:

Did you know that crafty people use their crafty powers to make things look old all by themselves?! I think those crafty people might be on to something after all! And even though I don't have a craft room or even a craft closet (or even a craft drawer), I already had everything I needed to accomplish the old and spooky look for myself.

Here is my supply list:

1. a cup of tea
2.small paintbrush

And if I hadn't had a paintbrush, I could have used a rag or a sponge or a paper towel or, like, an old sock.

I used this tutorial from Missparty.net as my guide, but then I just kind of winged it. Looking back through it, I see that I didn't follow instructions very carefully at all, actually. But it still worked how I wanted it to! That's my kind of craft--the unscrewupable kind!

I made a cup of tea with two tea bags (regular old Publix-brand tea) and let it steep for 10 minutes. Then I got out the little brush we keep in the kitchen for kitchen-type brushing needs, laid out all the flashcards on my counter (if I had white laminate or something, I probably would have put something down first as a precaution against staining, but since my counters are granite and sort of tea-colored to start with, I didn't worry about it). Then I brushed them all over with tea. I went back around the edges with another coat (and this is where I wish I'd taken a little more time, since you can see the edge of the darker stain on some of them....I wish I'd made it look a little more organic, but oh well).


Then I let them dry until it was time to go to bed and I couldn't wait any more, and I hung them back up. 


Much happier with them now. I still want to work on the original document and get them more centered, and then make a template for cutting them out so they're more regular in size, but I'm happy enough with these that I can wait on the next set to worry about that.

Here, for comparison purposes, is how they looked before:


Linked with:
HookingupwithHoH

Chic on a Shoestring's Flaunt it Friday

Tuesday, October 16, 2012

Homeschool Tuesday

I have a homeschooling blog that I did a pretty good job of updating for a pretty long time. But last year, what with all the house selling and moving and all that, things kind of fell apart. We're also kind of at the point in our homeschooling where we've been doing it for awhile, and we're pretty happy with all the stuff we're using/doing, and writing a weekly report like I used to do started to get pretty....boring. So I'm going to try some blog consolidation. I'm aiming for one homeschool/kid activity post a week. I'm calling it Homeschool Tuesday because today is Tuesday, but I may well move the day. Or give up on having a specific day and just do it whenever. This way, I don't feel like I need to write repetitive weekly reports AND I don't have to come up with a new header for the old blog (we changed names when we moved, from Dogwood Forest Creek School to Boxy Colonial Academy, so I needed to update the name of the old blog. But see how well the school name fits in with the existing blog name here? Exciting!)

Here we go!

Last weekend we decided to make a point NOT to spend the whole weekend on regular activities and house stuff. We still did plenty of that stuff, too, but before our Saturday Ikea trip we went to the Chattahoochee Nature Center for Creepy Critter Day. My sister-in-law, Rebecca, works at the nature center and she and my brother gave us a membership for Christmas last year. But, umm, we didn't get around to activating it until Saturday (moving! selling house! so busy!) But we love the nature center, and now we live much closer to it, so we will definitely be trying very hard to get over there more regularly.

They have a  nature exchange there that we've been hoarding stuff for for a long time. So we started off there. Gus showed off the giant pinecone he found in California last spring and some sand from Cape Cod (uhh, two summers ago). He used some of his points to get a piece of quartz and Milo used the points he had from a long time ago to get a piece of obsidian (which is awesome, I understand, because of Minecraft. Somehow or another).

Then we went to see the main event of Creepy Critter Day....the bat presentation! The bat lady sure could talk for a long time about bats. She warned us at the beginning about how much she loved bats and how long she could talk about them. My kids mostly enjoyed it (there were slides!), but I felt kind of bad for the people who had toddlers and preschoolers in there.

The payoff for listening to all the talk about microbats and megabats and which bats live in Georgia and all that came at the end, when the bat lady brought out:


Isn't he cute? For a bat? He's an Egyptian fruit bat, if I remember right. Gus was excited about the bat's cuteness:


After learning about bats, we went outside and started to listen to another presentation, this one about snakes. But the kids were a little restless after bat hour, so we decided to go for a short hike on the boardwalk by the river instead.

Then we went to Ikea. But we'll be back soon. We're hoping to go to Halloween Hikes there. And Gus is thinking of having his birthday party there this year. And they have homeschool days one Monday a month....we haven't been able to get there yet this year because we had classes, but we've rearranged things now, so we might be able to make it next time!

Monday, October 15, 2012

Master Bedroom: shameful before pics unveiled!


Hey--I hit 1000 pageviews yesterday! So that's pretty exciting. Although it would be even MORE exciting if more people were leaving me comments. Hint, hint. But even if you don't leave me a comment, I'm very excited to have all you people who were searching for "halloween metal witch plant holder" here to look at my messy bedroom. I'm sorry that I don't actually HAVE a halloween metal witch plant holder to show you. You can take that up with Google.

And now....our bedroom! Before! (I gave myself precisely (I set the timer!) ten minutes to neaten up before I took the pictures. This basically meant enough time to half ass make the bed, neaten the bedside tables, and shove all the junk to the sides of the room).


Now, at this point you might be thinking to yourself that I have overplayed the "shameful" thing. "I mean, sure," you are saying, "the curtains don't match anything, and you don't seem to have gotten around to replacing that bed skirt that one of your dogs ate the corner of, and that toile pillow is SO 2001, and you forgot to put your stepstool away, and that wall color is kind of pukey....but it could be worse."

So I present to you.....the other half of the room:


I left this one bigger, so you can see the junk collection in all its glory. Let's see: FOUR (count 'em!) laundry baskets filled with clothes that need to be put away. Boxes and bags of baby stuff that has nowhere to live yet. All the bookshelves we moved up here from the library when we got the Billy shelves. Crib mattress and crib, waiting to be assembled. Frames that weren't the right size that need to be returned to Target. Baby's dresser that needs paint and whale drawer pulls. Box of clothes for Goodwill. Not one, but TWO nice old trunks that need to go....somewhere.

Alright, so now we need to go from this to that lovely mood board I posted yesterday before January. Preferably well before, since things like Thanksgiving and Christmas tend to fill up a lot of pre-January time. Let's see what we have to work with. The black dresser is staying. I think some black will work fine with the Newburg Green. The headboard:


is staying, too, but it's going to need paint, since it's cream and there's going to be tons o' white in the room. I'm thinking a very light gray. I might even try my hand at making chalk paint (my friend Kristi just made some and used it on her bathroom cabinet, and it looks GREAT). Bedside tables are staying, too:


I've had these forever, but they used to have these canvas....skirt-like cover things on them. But those were in pretty rough shape, so I pulled them off, and....now I like them better! They need matching baskets for the shelves, though. Maybe something that closes, even, so you can't see all the junk.

So pretty much all the master bedroom furniture is staying the same. Now let's look at the other side of the room:


Oh, look, it's a beagle! A beagle who doesn't get to be on carpet very often and thus very much enjoys it when she gets the chance. The Beagle is staying.

This is the dresser that was Dave's and Dave's dad's and all three of our boys at some point or another. Now it's going to get a new paint job (maybe light gray again) and new drawer pulls.


I got this shelf at a yard sale before Ari was born, I believe. It's going to get a coat of paint and stick around, too.


One of the two trunks. I think this one might come downstairs to replace our very beat up coffee table. At least until the baby starts walking. It has some sharp edges.


And here's a pretty Victorian trunk that I got at a flea market in Massachusetts maybe 10 or 12 years ago. It's really pretty on the inside, too. Someday I'll move that laundry basket and open it up and show you! I have no idea where to put it.


Then there are all the bookshelves....back when there was going to be a wall dividing the two parts of the room, the master bedroom side of said wall was going to be lined with these (painted, maybe framed out for a built in look) shelves. Now I don't know what will happen to them. They may end up down in the basement for the time being (shh! dont' tell Dave. He's not happy at the thought of moving them all down two flights of stairs, so soon after moving them UP one flight).

Which wall should the board and batten go on? I'm thinking it won't work on the wall with the headboard--woodwork overkill! But it makes me kind of sad to put it on the opposite wall, where you won't see it when you come in.