Showing posts with label baby. Show all posts

Wednesday, September 18, 2013

The Ikea Crib Eight Months Later: A Bit of Babyproofing


Abe's crib is the Sundvik crib from Ikea. As I've mentioned before, this selection was motivated primarily by price. The crib is $119, and I like the way it looks just fine. It has clean simple lines that fit in well with the nursery. It's not flashy or exciting, but it does its job without drawing attention to itself.

I wasn't interested in spending more on a crib for a few reasons:

1. Cribs rarely excite me, no matter how much they cost. I just....don't care that much about cribs. They aren't like chairs. I love chairs.

2. I had no idea whether Abe would actually USE his crib much at all. Ari loved the crib. Milo hated sleeping, but didn't much care where he was doing it. Gus HATED the crib with a fiery passion and slept in bed with us until he was three. So, you know, I'm pretty open minded about baby sleeping arrangements. I just want everyone to sleep; I don't care where it happens.

3. Even if babies sleep in cribs, they don't do it for very long, relatively speaking. Abe's my last baby; he and some kid from Craigslist are the only ones who are going to use this thing. I'd rather save my money for something that will stick around longer.

So those are all my reasons for buying the crib to start with.

When we put the crib together, my only concern, looking forward, was that the directions made it look like we'd pretty much need to take the whole damn thing apart again to lower the mattress down once Abe started pulling up on things. But, of course, at the time, that seemed too impossibly far off to even worry about.

But then, somehow, he got bigger. Big enough to start trying to pull up on things. So, a few weeks ago, we had to undertake the daunting task of lowering the mattress. I thought I would report back on this process to make my Ikea crib analysis complete.

Turns out it was pretty easy.

We didn't have to take the whole crib apart; we just had to take one end off and then slide the bottom that the mattress rests on out and put it back in the lower position. Like this:


When we went to this, we learned that we had brilliantly thought to store the instruction manual AND the allen wrench under the mattress so that we'd be able to find them when the time came to lower the mattress:


Our minds were so sharp back before we had a fourth kid!

We opted not to put them back under there once we lowered the mattress, by the way, lest Abe somehow figure out a way to pry up the mattress while sitting on it and pull the choking hazard tools out from under there. Better safe than sorry. (note to future self: they're in the top drawer of Abe's changing table/dresser)


We turned it on its side like so.


Unscrewed all these little things.


And put the bottom back in at the lower position (there are only two positions). This part--fitting the little things into the little thing places--was the hardest part. But not bad. I would say the whole process took the two of us 20 minutes? With a baby crawling around distracting us.

The sad part is that we had to retire the crib skirt I made to match the curtains. I was going to just use heavy duty double sided tape and tape it farther back on the mattress board...but once the board was lowered the gap between it and the side of the crib was too tight to wiggle the fabric through. I might have been able to do it had I been willing to spend more time and get more frustrated. Instead, I'm thinking of making a couple of pillows or something.

I took this picture of it all folded up to commemorate it:


So my take on the crib after eight months of use and after the arduous mattress lowering? Yep, still good with it. And I can even still reach to put Abe down when he's asleep. I was worried I'd have to just drop him the last half a foot or so. And that might wake him up. But no! My arms are just long enough!

Just in time!


(okay, I stood him up there. But this was maybe a month ago. He's pulling up on everything now)

Monday, August 12, 2013

The Lazy Parent's Guide to Cloth Diapering


Back before my now 12 year old, Ari, was born, I would tell people we were planning to use cloth diapers and encounter skepticism. "That won't last!" older, more experienced parents would tell me. Naturally, I took this as a challenge.

So, from the beginning, failure wasn't an option. Admitting defeat is not something I'm good at.

In light of this, it was a relief to discover that....cloth diapering really isn't that big of a deal.

I mean, I never knew any different. We put Ari in cloth as soon as he came home from the hospital, and never looked back. When Abe came along, he spent a couple of weeks mostly in disposable diapers because he was so relatively tiny that he seemed to be drowning in all the cloth diapers I had. I was utterly horrified by how much we spent on disposable diapers and how much trash we generated during those couple of weeks.

Plus cloth diapers are cuter.

There is a LOT of information out there in internet land about cloth diapering. One could get overwhelmed.

My way is not overwhelming. This is not to say that it is the only way or the best way, of course....but I've put diapers on four baby bums at this point, and they all still seem okay, so....this is the non-overwhelming, uncomplicated, lazy "system" that works for us.

Advance warning: There will not be a bunch of pretty pictures of neat stacks of beautiful diapers, because my method involves messy piles tossed in a drawer. This is too bad, because I really like neat stacks of beautiful diapers. But they tend to make me want to buy more diapers, so it's just as well.

Okay, without further preamble, here's how we do diapers around here:

1. All pocket diapers, all the time: I've messed around with other options, but I always come back to pocket diapers. I was fortunate enough to have my first baby right around the same time pocket diapers were hitting it big, so I've always been able to rely on them. The idea is you have a waterproof outer layer and a fleece inner layer, and then a pocket in between into which you stuff an insert. The fleece wicks the moisture away from the baby into the soaker in the middle. When you change the baby, you pull the insert out and then toss both parts in your diaper pail.

I like pocket diapers because they keep babies dry. A wet baby is a sad baby, in my experience. Now you might say, "oh, but I will change the baby the second the pee touches him, so it doesn't matter what kind of diaper I use!" But sometimes babies pee when they sleep. And, if they are like my babies, this can wake them up if they're not wearing a diaper that magically wicks the pee away from their skin. And things that wake up sleeping babies are BAD things. Evil things. So we can see, through basic logic, that non-pocket diapers are evil. Or, well, anyway, I like pocket diapers best.

I've used Fuzzibunz with all 4 of my kids, and I still love them lots. But there are plenty of other brands these days, too, and most of them are fine. I was very, very lucky to get almost all of Abe's diapers as hand me downs from friends this time around (I even have some that I used for a couple of my kids, passed on to friends, and have now gotten back for Abe), so I've bought very few new diapers for him. Some of the brands I have in rotation at the moment are Fuzzibunz, Green Acres Designs, Blueberry, and Swaddlebees. You can get sized diapers or one-size diapers that adjust with an elaborate system of snaps to fit newborns through toddlers. I like sized diapers because they're generally trimmer fitting, but you save money by getting the one size and not having to buy new diapers as the baby grows.

2. One diaper pail, two waterproof liners: I have a metal step trashcan that I bought at Target as my diaper pail. I have two waterproof bags that I use in it. One of them I've had since one of the other kids was in diapers; the other is this Planet Wise Diaper Pail Liner. When the pail's full (every 2-3 days, usually) I dump the diapers and the bag in the washer and put the other bag in the pail.

3.  Wash them pretty much like regular clothes, only hotter: I'm going to talk about poop for a minute here. Right now Abe's still eating almost no solid food to speak of, so his poop is not very solid. Once it is, I'll dump anything dumpable out in the toilet before I put the diaper in the diaper pail. Here's how I wash diapers:


(that tile? In my laundry room? We did not pick that out. It came with the house. Complete with broken parts and sparkly star stickers.)

The only thing I do differently from any other load of laundry is a pre soak and washing on hot. I use regular detergent. If I notice things getting stinky, I toss some vinegar in the next time I wash diapers. The end.

Then--and here's something I do differently (and more lazily) now than with my first couple of babies--I put them all in the dryer. I used to hang my diapers to dry. But then I noticed that the care instructions for Fuzzibunz actually tell you to put them in the dryer. So I tried it. And it was all fine. So I kept doing it. And, as I've mentioned, some of those diapers have made it through four or five kids in two different families now and are still hanging in there.

4. Sort them and toss them in a drawer: Sometimes, if I'm feeling really ambitious, I put the inserts in the diapers when they come out of the dryer, before putting them away. Lots of times I don't. Our nursery dresser/changing table has a big drawer in the middle divided into three sections. One section gets diapers, one gets stuffers, one gets wipes, the extra diaper pail bag, whatever I can't fit in the other two sections. It looks like this:


See? Nary a neat stack of diapers to be seen. But it works! It takes me less than five minutes to sort through the laundry basket and put them all away. I've actually timed it.

I have a little basket that I put a few diapers and wipes in to keep in the downstairs bathroom. I have a smaller waterproof bag for down there that I put the dirty diapers in and then bring up when it's full:


(I have a cover for that changing pad, but it was in the laundry)


5. Baby wash cloths from Target: you can buy really adorable cloth wipes on Etsy or wherever. Or you can make your own. Or you can buy a few packs of baby wash cloths on clearance at Target and call it a day:


(I have a cover for that changing pad, too. It's kind of nice, even. Minky. Too bad you can't see it).

I wet these with....umm, water. And that's that.

So there you have it. My secret to amazing my extended family with my cloth diapering longevity despite not having much of a work ethic when it comes to laundry! And I did some very official figuring, and concluded that we've spent one billion dollars less than we would have with disposables and single handedly saved the world by using cloth. You're welcome. (I am kidding, by the way. Everyone knows the cloth diapers have to be made from 100% organic hemp to really save the world. Also not using the dryer helps).

Post contains affiliate links

Linking with:
Inspiration Exchange
Give Me the Goods Monday
Inspiration Gallery
The Creative Connection
The Shabby Nest's Frugal Friday
Inspire Me Please
Link Party Palooza
Classy Clutter's Spotlight Saturday
Monday Funday

Tuesday, June 18, 2013

Abe at Five Months


Five months sounds SO big; so much older than four months. Sniff, sniff. And this past month seemed to fly by, probably partly because we were out of town for a week of it. Another rainy 17th to make photography challenging. I took a million or so pictures, but the vast majority were out of focus, owing both to the bad light and the wiggly baby.

Abe had his four month check-up a few weeks ago, and he was in the 70th percentile for weight and......20th for height. Fat little peanut! My other babies have all started out way up in the 90-100th percentile for height and then mostly just stayed there, so it's a new experience having a little guy who still fits in his 3-6 months stuff at 5 months.

He's starting to be able to sit up for short periods, particularly if you give him something to hold onto, which makes for a little variety in photography. He's sitting unsupported in that picture up there, with the big seal to hang onto for emotional support. When he's upset, he'll usually calm down immediately when he hears music. Balls are his favorite toys. He spends a lot of time staring intently at his brothers, ready to flash a giant grin at them as soon as they look at him. He still takes a lot of 20-30 minute naps, but sometimes he'll mix it up with a good 2 hour one, so I'm still hopeful he'll start to appreciate long naps more soon. No signs of creeping or crawling yet, which is probably just as well since there are no signs of the kind of babyproofing around here that that will necessitate either. Nothing new to report on the teething front: much drool, no teeth.

I had a grumpy (he's had a bit of a cold) baby to contend with on top of the bad light, so....well, here's what I managed to get:


Obligatory seal picture. Also, the white t-shirt is back! I found it! Still fits pretty well.


The saddest baby in the world.


It was Ari's month for solo pictures, but I wasn't thrilled with any of those, either. But I got some nice ones at Disney, so it all works out.

Tuesday, January 8, 2013

All Baby, All the Time

I have a big board and batten post to write up as soon as we finally get around to caulking it. This is a busy week, with starting back up with school/work, Dave's tutoring three nights this week, I'm going out with friends, we're hoping to see Les Mis before the baby is born, etc. Also, I'm nervous about caulking. I'm afraid we'll make it look worse instead of better.

Anyway, here is a preview:


Those paper lanterns aren't staying in the crib. Although they make it look kind of festive.

While I still can't quite believe I'm actually going to have a baby very, very soon, I think we're....mostly ready. Look, I even put baby stuff in the new dresser:


Now the baby will be able to wear diapers! The dresser has these little wooden dividers in it, which I find very handy. Even though this drawer is totally stuffed (and I have more diapers that don't even fit), I have bought not a single one for this baby. All stuff I saved plus stuff handed down from friends. Also handy.

Dave and I keep having conversations like this:

Dave: Are we really ready? I feel like we're not ready.
Me: Well, every time I walk past the hospital bag, I shove something else in there.
Dave: I'm not sure that means we're ready.

But we have a car seat and diapers; what else is there, really? Right?

And, finally, I think the what should the baby wear home from the hospital puzzle is solved, depending on how big he is anyway:


My ridiculously talented friend MADE THAT! And gave it to me for the baby! It is very exciting. Here's her facebook page: http://www.facebook.com/shoptoadallyscrumptious

So there you go. Some stuff that's going on.

Friday, December 21, 2012

DIY Mobile: a tutorial with many pictures


Warning! This post will contain approximately 4 million pictures because 1. tutorial! and 2. mobiles are fun to take pictures of.

If one is in search of a mobile for one's baby's nursery, one can do a quick Etsy search and find many beautiful and pricy mobiles to choose from. Quite a few of them are made out of colorful circles such as the ones you see above. They looked, to me, like the sort of thing I might be able to make myself. And I could. Although, after actually buying all the materials and putting the thing together, I understand a bit better why people charge $50 and $60 for them on Etsy, I have to say. It wasn't particularly difficult to make, but it was tedious and time consuming, and I was a bit surprised at how much I wound up spending on materials.

First I looked around for tutorials online and pinned a couple. I liked the look of this one from E Tells Tales:


....but I also liked this one from Dan and Brit:


and it had the added advantage of looking a little less complicated to make. So I used it as my main inspiration/basic template. 

First up a trip to Hobby Lobby for materials:


I used a 40% off coupon for the circle punch. I briefly contemplated just tracing something and cutting out all the circles by hand, but that seemed like an awful lot of work, so I sucked it up and spent....maybe $14 or so after the coupon? (I should save receipts!) on the punch that makes perfect 3 inch circles for you. I have no idea when I'll ever use it again, but I guess I should try to find another circle intensive project now, since I have it. 

Other materials:
*double sided tape (I saw a lot of tutorials where people sewed their cardstock together, but I'm all about tape. Like Ramona Quimby, I feel that there isn't much scotch tape can't do)
*embroidery hoop: you just use the inside circle from this
*some kind of string or thread: most people seem to use fishing line, but I got this thick thread instead
*cardstock: I picked three different colors....how much  you need depends on how long and full you want your mobile. I wound up using 7 sheets of each color
*ribbon (for hanging from ceiling)
*spray paint (not pictured)--assuming you want to paint your embroidery hoop to match. I used some gray I already had.
*glue gun (also not pictured)

Then you start punching out circles. I was not a perfectionist at all about my circles. I sort of prioritized maximizing the cardstock (I was surprised how much the cardstock cost when I bought so much....I think I spent around $15 on it all together) rather than perfect circles. So a lot of them have a little chip missing. Which you'll notice in the pictures but, which, since they have two sides, doesn't really show when you look at it all hung up from a slight distance.

When you're tired of punching out circles and want to do something else for awhile, you can start making your strips of circles:


First you cut a length of string (as long as you want! It's your mobile! I did them long enough to put 7 circles on each, with just a little space between each circle). Then put down a circle under the string, with a piece of double sided tape running down the middle.


And then put another circle on top of the bottom one, to hide the string.


Eventually, your strands will look like this.

So you keep going until you have a million strands. Or, in my case, I think I wound up with something like 18. It just depends on the size of your embroidery hoop and how far apart you put the strands. I initially thought I'd put them farther apart, but then I liked the look of them really close together with some overlapping, so I wound up back at Hobby Lobby buying more cardstock.


Once you have all your strands ready (uhh, or really anytime) spray paint the embroidery hoop if you're going to do that. 

And once it's dry, start attaching the strands. 


I just positioned the string from the strand where I wanted it and then attached it with a little dot of hot glue. I was nervous it wouldn't hold well enough (as is evidenced by the unnecessary masking tape in that second picture), but so far, so good. Hot glue is amazing. Also--two hot glue projects, and I've only burned myself once! 

This part, honestly, is kind of a pain. It's not hard, really, but there are just so many strings and circles everywhere trying to get twisted up (although they untwist surprisingly easily), and I had to hold the hoop in place while the glue dried before I could turn it and do the next strand. But I got there eventually. It might have taken me a few days. I didn't measure the spacing between the strands. Had I spaced them out farther, it probably would have been a good idea, but since I was going for the overlapping, crowded look, it didn't really matter. I just eyeballed it. 

Eventually, things will start to look like this:


When you FINALLY have all your strands attached, you're ready to attach the ribbon. More hot glue!


I put a little dot on the inside, then wrapped around and put another dot on the outside of the hoop. Then crossed the ribbon over and did the same thing on the other side. Then used another ribbon going the other direction and did the same thing. Hold on....a picture might be helpful here:


So the strings made kind of an X at the top where they intersected and attached to the ceiling. 

And you're finished! Screw a hook into the ceiling and hang that sucker up! And then take a whole bunch of pretty pictures from a million different angles to show off your handywork!


Thursday, December 20, 2012

Babies and their accessories: specifically slings and clothes

I know everyone else is still posting about Christmas, but I am done with that! Moving on! Mostly because I have a post Christmas deadline looming, and a half finished nursery staring at me every time I go in my bedroom.

I'm still kind of impressed with how much we've gotten done in the past couple of weeks, but I keep adding more things to the list, so that it never really shrinks as much as I would like for it to. Plan is for board and batten to go up this weekend (it strikes me as a little crazy to try to do this the weekend before Christmas, but I think we're going to anyway. Try, that is. We'll see what happens). I have the mobile pretty much finished, but I have to go buy a hook to hang it with before I can take pictures. We put the crib together last night, but it doesn't really merit its own post. It's just a crib. It will look nice with board and batten behind it and a mobile and whale hung near it, though. And I've got a couple of other projects coming up that I'll keep as SURPRISES for now. Everyone loves surprises, right?

At any rate, my hope is to roll out posts about a few more nursery projects in the next couple of weeks AND be able to do a big whole nursery post before there is a baby to live in it. I need to hold him in a couple of extra days and make him an Aquarius and then that will be more doable. I tend to make 9 1/2 pound babies, though, so holding him in might not be the best idea.

Anyway, so TODAY I thought I might stall some more on posting about actual projects by doing a post about baby STUFF. I know that this sort of thing is done, because it seems like every blogger in the whole world is pregnant right now, and I've seen many such posts.

Even though I already have three kids, the youngest one is seven, so I don't have too much baby stuff still lingering around from his infancy. We didn't know if there'd be a fourth, so all except the MOST SPECIAL things left long ago.

Fortunately, I held onto my Kangaroo Korner Adjustable Fleece Pouch. I walked Gus to sleep in that pouch every night for months, so I held onto it mostly for sentimental reasons. And it's very lucky I did because....they don't make them anymore! The horror! I'm not sure I could handle having a winter baby without my Kangaroo Korner Adjustable Fleece Pouch. Here's what it looks like, with a baby all snuggled up inside:


Only mine is light brown instead of white. If you don't already have a Kangaroo Korner Adjustable Fleece Pouch, then I'm really sorry. You should probably just have all your babies in the summer. Or look on ebay or something.

I also saved my Maya Wrap, but mostly just because I never got around to ebaying it. But, still, looks like they're crazy expensive new now, so this is probably a good thing.

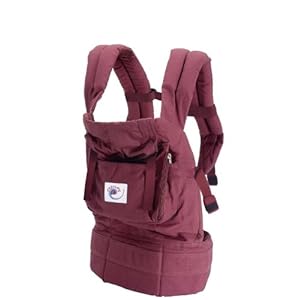
And I saved my Ergo, too, but it was in the basement/garage of our old house, and there was this particularly rainy fall a few years back, and....it didn't fare too well. I have a new on my Amazon wish list now, though (not this color. I can't remember which color. But not this one):


Really, those three would be plenty of baby carriers. But why have plenty of baby carriers when you could have too many baby carriers? Am I right?

So when I found a Moby Wrap:


....at Goodwill, back when I was newly pregnant, for something like $4, I snatched it up. It looks brand new, in its handy carrying case, complete with instructions. Which I should probably take a look at at some point soon.

In addition to lots of things to carry the baby around in, I have lots and lots of things to dress the baby in. This despite having bought, by my calculations, precisely four items of clothing new. The rest is all hand-me-downs (from my kids, but mostly from other, closer in age, friends' kids) and from thrift stores.

So the big question is....what should the baby wear home from the hospital?! For all babies past, I bought a specific outfit for this occasion. I didn't (or at least haven't) this time....for one thing, I have SO MANY CLOTHES. For another thing, we live 5 minutes from the hospital now. I know that this makes no difference, really, but for some reason it feels weird to buy a special outfit for a 5 minute drive whereas it felt perfectly reasonable for a 25 minute drive. Anyway. Here are a few options:


This is the outfit Gus wore home, actually. So probably I shouldn't use it, because in 20 years I might get the pictures all mixed up (unless this baby comes out with a moustache or something). But it's still so cute! It has fat squirrels on it! I was also pleased to note, when I pulled it out, that it's a 3 month size, but it still fit my giant August (all 9 lb, 5 1/2 oz of him) just fine when he was 2 days old. So this baby should get to wear it at least once (unless he weighs 12 pounds. Which he'd better not).


The little brown overalls are one of the only things I bought new (onsie is from the thrift store). I really like knit overall things on babies. I wonder what he's going to keep in those little pockets?


This one looks very cozy, no? It's fleecy! It has an elephant! If the heat breaks in our car, we should go with this one. But I don't anticipate that.


This one is from Janie and Jack (by way of the thrift store), so it's FANCY! If the baby wears this one home, all the nurses will think we're fancy.


And here are two of the other things I bought new: pilot hats from Etsy. I love baby pilot hats. Especially ones with seals and owls. When babies are little, their hands don't work well enough for them to get their hats off! Especially the ones that tie! And that's another reason to have a winter baby. Along with the fleece pouch.

Okay, there you have it. Feel free to cast your vote for baby's first outfit! And next time...an actual post about doing stuff in our house!