Foyers are kind of weird. Our old house didn't have one; you just walked right on into the living room. I've talked before about how one of my qualms with colonials is that they tend not to use space as efficiently as they might, what with their hallways and such (we have a super wide hallway upstairs, which I intend to eventually get around to making pull its weight somehow or another). Our foyer is as big as a decent sized kid bedroom, so it's important to me that it not be just dead space. One redeeming feature is that the big arches make it feel very open to the library and the dining room on either side...visually at least it's kind of like one big long room.
So anyway, one of the ways the foyer is making itself useful these days is by housing its new bench and coat rack. Here is it all beautiful and posed for pictures:
....and this is how it looks now:
Not so bad, I've got to say. Of course, come winter it will fill up a lot more with coats again, but it's a HUGE improvement over before.
Okay, so then I drew squirrels on the wall opposite the door.
And my plan for after that was to take a dresser that was sitting unused up in the guest room and paint it with chalkboard paint. Because I've never painted anything with chalkboard paint, and I feel left out. Also, I thought it would be fun to be able to write on the drawers. Like a welcome message for visitors. Or labels telling the kids what to put in each drawer (nerf guns here! hats and gloves up here!). Or for the kids to draw on.
We bought the chalkboard paint and started carrying the drawers from the dresser downstairs.
And then Dave called me over to show me that....the hardware doesn't come off! I was horrified. Why would someone do such a thing? There are no screws or nails coming out on the inside of the drawers. I'm still not exactly sure what the deal is....I'm guessing it's somehow INSIDE the front panel? I've never liked this dresser. It LOOKS pretty, but it's really poorly made, and the drawers don't open and close easily. So, my plan thwarted, I gave it back to my mom (who gave it to us when we first moved back down here for Ari's room) to sell at her shop to someone who wants a red dresser.
I suppose we could have tried a little harder to either get the hardware off somehow or carefully paint around it. But I was mad at the dresser and didn't want to.
Okay! Plan B!
I know that the way you're supposed to get good deals on Craigslist is to stalk it faithfully for weeks or months until you find just what you're looking for. But what I usually do is say, "hey! we need a new dresser!" and then go check it right then and there. This actually works pretty well if you want something very pedestrian like a dresser, because there are gazillians on there at any given time. I found one I liked the looks of about 20 minutes away for $65, and Dave called to get the address and went to get it right then.
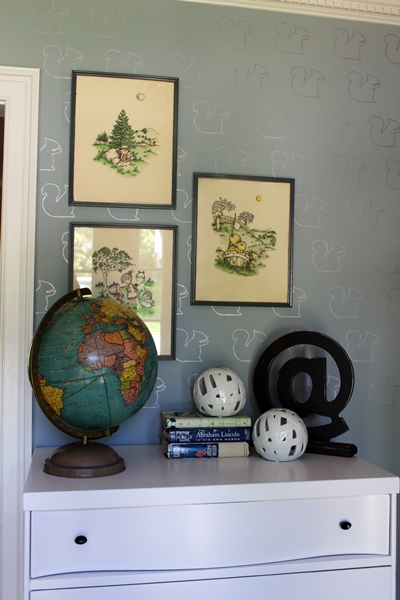
I love my little impulse buy dresser. It has a curvy top drawer and fun mid-century-ish legs and original hardware. In the Craigslist picture, it looked like it also had a really nice, shiny, lacquered finish. But it doesn't. The guy selling it refinishes lots of furniture, I guess. He appears to have done a nice job repairing it, but his paint job consisted of spraying it with flat white paint and....that's it. No kind of protective coating at all, and up close it looks less than perfect. So I don't know if I'll leave it that way forever. I don't want to chalkboard paint it, though. Anyway, it's good enough for now.
Those pictures up there are Joan Walsh Anglund prints I picked up at a thrift store awhile back (and spray painted the frames). Not sure about them here. I'm thinking maybe just one big print centered would be better--something more modern. Or a mirror. Or nothing! The squirrels could speak for themselves. I am taking votes: please tell me what to do!
I don't know yet what's going in all those drawers, but I'm thinking the aforementioned nerf guns (which wind up all over my house) and hats and gloves for starters.
So there you go--a functional foyer! Earning its keep! Here's the whole thing at once:
Do you notice anything still a little...unfinished about our foyer?
Yeah....that line between the blue and yellow was our brilliant solution when we realized there was no way we could paint the stairwell ourselves. That's when we started to understand why that yellow paint was EVERYWHERE when we moved in: once you start painting one color, it's pretty hard to stop.
And here's how it typically looks: count the living creatures sneaking into the picture!
Oh, you can also see our foyer light fixture for the first time ever in that one. I kind of like it. I should clean it sometime. All those little prisms...sigh.
Things have been kind of slow going lately with house stuff. The school year's wrapping up for Dave, so he's crazy busy. And Abe has taken a liking to a 3 or 4 fifteen minute naps a day schedule. But Dave will be home for the summer in a couple of weeks (or not. Things are a little up in the air there. For reasons I cannot yet divulge, but if anything interesting comes of them, I will).
Tuesday, May 14, 2013
Saturday, May 11, 2013
Homeschool Stuff: Science Edition
Every time I sit down to write this post, I.....don't do it. I have no idea why. It may be because it requires pulling pictures off of my phone, and I hate doing that. But not for any particular reason. So anyway, if you're reading this, I actually managed to write the whole thing this time. Yay!
Okay, so they have this stuff, and once a decade or so another drop of it falls. Exciting! But it sort of is, because you can go watch the livecam on their website! And, if you're lucky, you'll be staring at it when the pitch drops, which everyone expects to be ANY DAY NOW! (This is why putting this entry off so long has been so dangerous. The pitch might drop while I'm typing). We check on the pitch a lot.
The thing about procrastinating is that I now have WAY MORE STUFF to write about than I did back when I first thought about writing it. We keep doing science-y things. So this is just a collection of resources we've enjoyed/things the kids have done/etc.
1. Radiolab: We all love Radiolab. It's a radio show (but we have the app and listen to episodes from there, not actually on the radio); in each episode there's a theme and then a bunch of stories related to that theme. Like This American Life only science-y-er. Usually. Sometimes not very sciencey. The website says, "Radiolab is a show about curiosity. Where sound illuminates ideas, and the boundaries blur between science, philosophy, and human experience.
" Doesn't that sound fun? It was in an episode of Radiolab--the one about Speed--that we learned about #2.
2. Pitch Drop Experiment: Radiolab told us about one of the longest running science experiments in the world:
The first Professor of Physics at the University of Queensland, Professor Thomas Parnell, began an experiment in 1927 to illustrate that everyday materials can exhibit quite surprising properties. The experiment demonstrates the fluidity and high viscosity of pitch, a derivative of tar once used for waterproofing boats. At room temperature pitch feels solid - even brittle - and can easily be shattered with a blow from a hammer. It's quite amazing then, to see that pitch at room temperature is actually fluid!In 1927 Professor Parnell heated a sample of pitch and poured it into a glass funnel with a sealed stem. Three years were allowed for the pitch to settle, and in 1930 the sealed stem was cut. From that date on the pitch has slowly dripped out of the funnel - so slowly that now, 83 years later, the ninth drop is only just forming.
Okay, so they have this stuff, and once a decade or so another drop of it falls. Exciting! But it sort of is, because you can go watch the livecam on their website! And, if you're lucky, you'll be staring at it when the pitch drops, which everyone expects to be ANY DAY NOW! (This is why putting this entry off so long has been so dangerous. The pitch might drop while I'm typing). We check on the pitch a lot.
This guy has been watching the pitch for DECADES, but he's always missed seeing it drop. We're rooting for him this time.
3. Apple Pop Up Museum: We went here a few weeks ago. It was only open for the weekend, but now the website is saying it's going to be open again May 18 and June 8. So if you're anywhere near Roswell, Ga, you can go check it out. I'm not exactly sure what the deal is with it--I'm assuming they're hoping it will be a traveling exhibit in the future. We kind of stumbled across it on some homeschool list or other the day before it opened and decided to check it out.
We were impressed; it was really well done. The museum is all about the history of Apple, with different rooms explaining different aspects of/phases of its history. And then, once you got through the museum, there was a Vintage Computer Festival going on (I'm guessing that won't be happening for the additional dates), where people had displays of old computer stuff (hello Vic20! It's been so long!), there were speakers throughout the day, an ongoing soldering workshop that the kids did, AND....you could play really old video games, like Pitfall and Pong. Ari played Pitfall for a long time.
Here are pictures:
Dave explaining floppy disks
Pitfall!
Soldering!
4. Ari and Lula's Presentation: Ari and his friend Lula (and some other kids) take a class on the history of science at our local homeschool center. For the final class next week, they had to come up with some kind of demonstration or experiment related to something they've studied this year. The experiment they decided on is pretty simple: basically, they set up a cup with a playing card and coin on top of it, then yank the playing card out. The coin falls in the cup, and that demonstrates inertia (Isaac Newton!)
But then they also wrote a script for themselves, explaining the experiment, and it's HILARIOUS. So I thought I would share (it's color coded; Ari says the parts in red and Lula says the parts in blue. Purple is for both):
Hello.
Science is weird.
Inertia is science.
Inertia is weird.
Inertia was discovered by Isaac Newton. Inertia basically means that stuff likes to stay where it is and keeps going if it already is. Here, children, is an example.
(I'm guessing this is where they actually do the demonstration)
Why does that happen?
INERTIA!!!
So, the coin's like, "I wanna stay here." And the creepy card's like, "I'mago, bye coin." And the coin's all, "Oh, wait. That's cool dude. I'll just stay right here." And then gravity's like "Come down and join the club." And the coin's like "Yeah, 'k. I'ma gonna go down now. B-bye card!" And then it like, goes down. Cause gravity. So, basically inertia made the coin stay there, and gravity made it go like, down. So, yeah. Inertia!
I think that this might demonstrate (even more clearly than in demonstrates inertia) that my kid (and Lula, too, apparently) cares more about humor than the history of science. But, hey, I'll take it. How often do you get to combine history, science, AND comedy writing?
So there you have it: a post many weeks in the making for some reason.
Wednesday, May 8, 2013
Pinterest Challenge: Squirrel Wall! Or, Okay Whimsy: Simmer Down Now

Is it just me, or was the last Pinterest Challenge like a week ago?
Pinterest challenge hosted by: Katie at BowerPower, Sherry at Young House Love, Emily at Sparkle Meets Pop, and Renee at Red Bird Blue
At any rate, for the last Pinterest Challenge I redid Ari's desk. Everything went very smoothly, I was very pleased with the end result--whoo hoo! I'm awesome at Pinterest Challenges! Or....beginner's luck? Things were a little different this time.
This time around, I again knew exactly what I wanted to do. Ever since I saw the sheep wall that Cassie at Primitive and Proper made:
....I've been completely in love with it and longed for sharpie-d animals of my own.
Then I realized that I'd never actually pinned the sheep wall. I guess I loved it SO much that I knew I would never forget about it and need Pinterest to remind me. So, I, umm....pinned it real quick like once I saw the Pinterest Challenge announcement. That counts, right?
In case it doesn't, I DID pin this great round up of Sharpie projects from Owen's Olivia, including her very cool Sharpie "wallpaper:"
And I didn't pin this, either, but Stephanie at Sandpaper and Glue was another inspiration, with her recent sharpie wall project:
So, basically, I wanted to draw stuff on my wall with a sharpie. An animal of some sort, preferably.
I ran through a list of animals in my head. I thought whales would be nice, but Dave thought ANOTHER whale room would put our house into whale overload. Chickens? Chickens are nice. But squirrels are kind of my fallback cute animal, so squirrels were our winner.
I ordered some stencil paper from Amazon (I think it was about $6 and came with two sheets: one big, one little). And then I took a look at some squirrels on the internet and came up with a sketch:
Then I had to make him bigger, because it would have taken 4,000 years to fill the wall with squirrels that small.
So once I had my bigger sketch, I turned it over on the stencil paper and rubbed the back all over with pencil to transfer the image. Then I realized we couldn't find an exacto knife anywhere. So I decided to just cut the squirrel out with scissors and do kind of a reverse stencil, tracing around the outside of it.
Tragically, he lost his acorn at this point, because I couldn't cut out that little triangle shaped area. I'm sure he can find another one somewhere.
Here is the wall in the foyer where I decided to put the squirrels:
In the past, it has sported seasonal wall hangings, like the vintage wrapping paper from Christmas and the silhouette bunny and chicken from Easter, but it's never had any permanent adornment.
So then I started tracing squirrels. I had originally wanted a dark gray sharpie, but I couldn't find one. So I went with purple. "I love purple!" I thought to myself.
Dave got out the level and made little marks for me so I'd know where to put the squirrels. This is why Dave and I are the perfect DIY team. The idea of using that level and trying to figure out the perfect squirrel pattern sounds terrible to me. The idea of doing the actual squirrel tracing sounds equally terrible to Dave. Thank goodness I didn't accidentally marry another level-hater.
I put masking tape on the back of the stencil (is it okay to still call it a stencil when it's a backwards stencil?)
After a while, I had a wall full of squirrels:
I tried to love them, I really did.
But it was just....too.much.whimsy.
It looked like I'd drawn squirrels all over my wall with a sharpie.
Which I had. But I had been going for something a little more....classy. Subtle.
For awhile I figured I'd just go ahead and post about them and then paint over them in the near future.
Then I decided I could fix it. I could fix my squirrels! I could tone down the whimsy. I ran out to Michaels and bought a silver oil based Sharpie paint pen. And, yes, I drew over every single one of the damn squirrels. Twice, because the purple showed through too much otherwise. And now I am happier.
Ahh.....bearable whimsy!
Ignore that super cute dresser for now. I'm going to talk about it later.
Also, I know I move that globe around for every "styling" opportunity that comes along, but I think it's actually staying here.
And don't worry, orangey oak bannister: I'll deal with you later.
Oh, and don't stare at the squirrels for too long, or you'll start seeing weird swans instead. Optical illusion wall!
Linking with:
Stone Gable's Tutorials, Tips, and Tidbits
Monday, May 6, 2013
The Nursery Again
I can't really leave the nursery alone.
Really, most of the recent additions have been to make the room more practical for an actual baby to live in. Like this one:
We spend a lot of time hanging out in here while Abe does stuff like this. He's a big fan of tummy time. In fact, he's taken to rolling immediately onto his tummy almost any time you put him down on his back now.
The not at all practical addition is another gallery wall expansion. This might be the last one. Or I might take it higher. Thoughts?
We added in one of his three month pics, the jelly fish from the Georgia Aquarium that I've been meaning to frame for forever, and two more little prints from the Biodiversity Heritage Library, narwhals and a seal. It's a little sad because the narwhals are clearly not in the water where they belong. But I wanted narwhals, and I couldn't find any non-beached ones. And the seal....little known fact: at one point we were 90% sure Abe was going to be named Ronan, which means little seal. That's where the inspiration for the nursery originally came from. And I still love seals, even though I didn't name my baby after them:
I bought two cheap, teal laundry baskets from Target. One of them is actually for laundry (it's over on one side of his changing table), and we keep overflow books that don't fit on the shelf in the other one. Which makes for a nice little reading corner:
(I'm really glad we wound up with that color cover on the rocker, because it's pretty much exactly the same color as spit up).
Abe likes to hold his hands together while sitting in this chair:
When you gonna grow some hair, kid?
On the other side of the room, I moved his lamp over into the corner by the window. It was driving me crazy on the other side of the crib, where it used to be. I thought about writing a post about moving the lamp awhile back, but then I didn't (I'm only kidding. I was never going to write a post about moving a lamp. It takes moving a lamp AND buying laundry baskets to get a post out of me).
And I picked up this little wicker basket at the thrift store and spray painted it aqua to hold all his stuffed sea animals. Someday he might want a teddy bear or something, and I guess we're going to have to let him have one, thematically inappropriate though it will be.
And, in final practical nursery tweaking news, I got this basket half off at Hobby Lobby to hold his rapidly expanding collection of toys:
A few future of the nursery thoughts: when we were making the nursery, I really had no idea how long it would end up staying there. Gus NEVER slept in his crib, and was in bed with us pretty much every night for three years. Ari, on the other hand, was a magic sleep baby who slept through the night super early and always seemed happiest sleeping in his crib. Milo was somewhere in the middle. He loved sleeping with us, but mostly so that he could wake up in the middle of the night and try to get us to spend two hours playing with him.
I had no idea, of course, which kind of baby Abe would be. Had he been a Gus type baby, it wouldn't really have mattered when we moved his crib out of our room, since he wouldn't have anything to do with it anyway. But he appears to be another magic sleep baby, who already rarely wakes up before morning. So, while I'm glad he's in the same room right now and I'm not in a hurry to move him, I do see it happening sooner than I would have predicted before he was born. Maybe first birthday-ish. But I don't envision completely redoing his room until he's more like 2 1/2 or 3 and can offer at least a little input, so, when he moves, it will probably be mostly a matter of recreating his nursery in the current guest room. It's actually a slightly smaller space, but is has an actual 4th wall, so that probably makes up for the space as far as furniture placement and wall hangings and such. So! That's the blog post we all have to look forward to in 9 months or so.
Really, most of the recent additions have been to make the room more practical for an actual baby to live in. Like this one:
We spend a lot of time hanging out in here while Abe does stuff like this. He's a big fan of tummy time. In fact, he's taken to rolling immediately onto his tummy almost any time you put him down on his back now.
The not at all practical addition is another gallery wall expansion. This might be the last one. Or I might take it higher. Thoughts?
We added in one of his three month pics, the jelly fish from the Georgia Aquarium that I've been meaning to frame for forever, and two more little prints from the Biodiversity Heritage Library, narwhals and a seal. It's a little sad because the narwhals are clearly not in the water where they belong. But I wanted narwhals, and I couldn't find any non-beached ones. And the seal....little known fact: at one point we were 90% sure Abe was going to be named Ronan, which means little seal. That's where the inspiration for the nursery originally came from. And I still love seals, even though I didn't name my baby after them:
I bought two cheap, teal laundry baskets from Target. One of them is actually for laundry (it's over on one side of his changing table), and we keep overflow books that don't fit on the shelf in the other one. Which makes for a nice little reading corner:
(I'm really glad we wound up with that color cover on the rocker, because it's pretty much exactly the same color as spit up).
Abe likes to hold his hands together while sitting in this chair:
When you gonna grow some hair, kid?
On the other side of the room, I moved his lamp over into the corner by the window. It was driving me crazy on the other side of the crib, where it used to be. I thought about writing a post about moving the lamp awhile back, but then I didn't (I'm only kidding. I was never going to write a post about moving a lamp. It takes moving a lamp AND buying laundry baskets to get a post out of me).
And I picked up this little wicker basket at the thrift store and spray painted it aqua to hold all his stuffed sea animals. Someday he might want a teddy bear or something, and I guess we're going to have to let him have one, thematically inappropriate though it will be.
And, in final practical nursery tweaking news, I got this basket half off at Hobby Lobby to hold his rapidly expanding collection of toys:
I had no idea, of course, which kind of baby Abe would be. Had he been a Gus type baby, it wouldn't really have mattered when we moved his crib out of our room, since he wouldn't have anything to do with it anyway. But he appears to be another magic sleep baby, who already rarely wakes up before morning. So, while I'm glad he's in the same room right now and I'm not in a hurry to move him, I do see it happening sooner than I would have predicted before he was born. Maybe first birthday-ish. But I don't envision completely redoing his room until he's more like 2 1/2 or 3 and can offer at least a little input, so, when he moves, it will probably be mostly a matter of recreating his nursery in the current guest room. It's actually a slightly smaller space, but is has an actual 4th wall, so that probably makes up for the space as far as furniture placement and wall hangings and such. So! That's the blog post we all have to look forward to in 9 months or so.
Friday, May 3, 2013
Brazilian Cheese Bread (gluten free and grain free)
When we first started forgoing the gluten, I discovered Chebe bread mixes at a local natural foods store. There are a few different varieties, but the original mix is for Brazilian cheese bread, or pao de queijo. The bread's only flour is tapioca starch, so it's naturally gluten free (and grain free. Tapioca starch comes frmo the cassava plant, which is a tuber). And then, when I read the ingredients, I realized that they were mostly just tapioca starch and assorted herbs and spices. You still had to add in your oil, cheese, and eggs. And tapioca starch was for sale on the very same shelf as the Chebe mixes, so buying that instead and finding my own recipe seemed like the most effective way to go.
This is the only recipe I've ever tried. It worked so well and was so easy that I never went looking for another (there are plenty online, with quite bit of variation in ingredients and technique). The only ingredients in this one are egg, oil, milk, tapioca starch, salt, and cheese. I use shredded sharp cheddar, even though I'm sure that's not very authentic, because I always have it around. You toss all the ingredients in the blender together and then pour the mixture into mini muffin tins. So easy!
My kids LOVE these. I made them pretty regularly for awhile, but had nearly forgotten about them until a couple of days ago when one of the kids was reminiscing about them. They're really tasty--chewy and cheesy. I don't consider them particularly healthy; the tapioca starch is, like it sounds, pretty much just straight starch. But the cheese, egg, and milk add in some protein and fat to make them go a little farther in filling up my perpetually hungry pack o' boys.
I ran out of tapioca starch with the batch today and had to substitute in potato starch for the last 1/2 cup or so....couldn't tell a difference.
Here's the link to the full recipe:
Easy Brazilian Cheese Bread at Simply Recipes
Linking with:
Crationary's Friday Link Party
The Inspiration Gallery
The Shabby Nest's Frugal Friday
Tatertots and Jello's Weekend Wrap Up Party
Landscaping On the Cheap (or Free)
When we moved in to the Boxy Colonial last May, the yard was in really rough shape. The bank that owned it had managed to acquire two liens on it in the few months since they'd foreclosed, one of them for never, ever mowing the lawn. It was a complete jungle in the backyard, and, we found out later, it would have been even worse except that neighbors had been taking turns mowing it every once in awhile. The bank was supposed to have the lawn mowed before closing, but they couldn't even get things together enough to do THAT, so they wound up giving us a $250 credit instead. Which seemed like a win for us until Dave actually had to spend hours in the sun mowing that mess. A riding lawnmower was one our first new house investments.
So for the first summer, we mostly just tried to keep things more under control than Bank of America had managed to (should I not mention the name of the neglectful, incompetent bank? Well, I did. It was Bank of America. Everyone already hates Bank of America anyway, right?)
We did make a token effort at dealing with big, weedy area right in front of the house. I've already confessed that we didn't actually trim the bushes or anything, but we did weed and buy a whole bunch of mulch from Home Depot to put down. It turns out, though, that what seems like a whole lot of mulch doesn't go very far once you start putting it down. Before long, you've spent your life savings on mulch and you STILL haven't covered up more than half of the big area in front of your house. So you give up and try not to look at it any more. If you are us. This is why they sell mulch by the truckload.
Fast forward to this spring. That damn weedy area was STILL sitting there right in front of my house! Action was required. Last year my friend Kristi had a truckload of free wood chips delivered to her house by a tree company, so I spent the winter thinking, "I really need to do that, too!" But it wasn't until the weeds started reappearing in the spring that I was motivated enough to actually take steps toward getting my free mulch.
The idea is that when tree companies cut down trees and turn the trees into wood chips, they need a place to unload them, so if you're in the right place at the right time, they're yours for the asking. First I searched Craigslist for "free mulch delivered" and "free wood chips delivered." (It appears that the line between wood chips and mulch is pretty arbitrary). I signed up online for one service that's supposed to match tree companies needing to unload wood chips with people who want them. They have not yet called. I filled out an online form with a tree company that claimed (on Craigslist) to be working in our area. They have also not called.
Then Kristi, source of all information tree-related, told me that tree guys were at her house taking trees down RIGHT THAT SECOND and that she could send them over with some mulch for me (she lives just a couple of minutes away, one of the many things that made this particular house so appealing). So she did, and we wound up with this in front of our house:
That's a lot of mulch.
Here is what things looked like before we started mulching:
So, after all the hedge trimming that went on a couple of weeks ago, and after those flowers bloomed, but, as you can see, there are many weeds. And the remnants of past attempts at mulching.
First we dug out the bushes that were not so much alive anymore:
The other way, aside from the mulch, that we kept the cost of this project to $0 was by using whatever stuff we had sitting around to put down under the mulch as a weed blocker:
We had one roll of the landscaping fabric you see there left over from last year's abandoned mulching project, but mostly we used newspaper and broken down cardboard boxes. Bonus: recycling!
Many wheelbarrow loads of mulch later....
We had this!
(In pretty much any picture of the front of our house, you can spot a dog looking out the window at us. This one is no exception).
And this much mulch still:
Wow. That's an awful lot of mulch. But we have to do the other side of the front porch and then Dave wants to do the whole side of the house. And around the garden bed. And, hell, maybe just our whole front yard. Maybe THAT will kill the dandelions. I'm kidding.
(Nothing will kill dandelions)
Okay, so I'm not going to pretend that our free mulch is just as pretty as the fancy not-free mulch that they dye to look all beautiful and stuff. Ours is just....wood colored. And kind of twiggy:
But I priced that fancy mulch at around $400 a truckload. And I can think of an awful lot of things I'd rather spend $400 on. I think ours looks passably good, and there are no weeds, and that's good enough for me!
At some point I'll post about my future hopes and dreams for that area...which involve a sort of cottage-y look with attractive edibles tucked in (and also me learning how to garden). But I'm good with our free mulch for the moment.
Linking with:
Hookin' Up With House of Hepworths
Crationary's Friday Link Party
The Inspiration Gallery
The Shabby Nest's Frugal Friday
Monday Funday
Tatertots and Jello's Weekend Wrap Up Party
By Stephanie Lynn's Sunday Showcase Party
Subscribe to:
Posts (Atom)


