Showing posts with label sunroom. Show all posts

Wednesday, September 4, 2013

Giant Empty Wall, Part 1: Souvenir Plates


The sun room is probably my favorite room in the house these days; it's certainly the room I spend the most time in. But it has kind of  big problem. A GIANT problem. And that problem is this enormous blank wall:


Whole lotta nothing is what was going on on that wall.

There's still lots of nothing on most of the wall, but we have, at least, made a start at covering the giant expanse of minty blankness. With plates!

(I have a plan for the rest of the wall, too, but it will require a delicate balance of money and patience/time to carry it out).

I've always had a bit of thing for souvenir plates. I mean, really, I can remember sitting around thinking about how great they were maybe fifteen years ago. And they're cheap and easy to find, so there's really no reason why I didn't fulfill this longing for a souvenir plate collection a long time ago.

But I didn't.

Until we started working on the sun room, and I decided that one of the things that big empty wall needed was a souvenir plate wall. I started keeping an eye out for them at the thrift store, and I picked up some that way. Then I got impatient and had to stretch my definition of souvenir plate quite a bit. Like there's one plate that just has a boat on it. Maybe you would want it as a souvenir of a boat ride you went on? Sure you would.

Then I got even MORE impatient and just bought a bunch on ebay. Where they are very cheap. But my previously discussed perspective problems came into play here. See those little tiny plates up there in the first picture? Yeah, I totally expected those to be full size dinner plates. "Why is this big lot of plates so amazingly cheap?!" I wondered. Until the little tiny box got here. Sigh.

So none of these plates were very expensive. Most of them were no more than a couple of bucks at the thrift store. But plate hangers are another story. The plate hangers that you can't even see were the most expensive part of this project.

I thought that surely someone out there had come up with a great free or nearly free method for hanging plates. But most of what I could find (generally involving glue and some sort of hanging hardware) came with cautionary warnings about plates falling down suddenly after months of seemingly secure hanging or stern warnings that the method was to be used only on plates you secretly hoped would fall and break because you'd always envisioned them as part of a mosaic anyway.

But EVERYONE loves these little plate hangers:


All you have to do is get them a little wet to activate the glue on them, then stick them on the backs of your plates and hang them up. They are very easy, none of my plates has come crashing down yet....only problem is that they're around $3-4 each, which makes them more expensive than most of my plates were. But you do what you have to do, right? (I didn't have to buy hangers for all of them, as some of the plates had a spot on the back for hanging them with a wire instead).

I really like the placement and close togetheredness of View Along the Way's plate wall:


So that was the inspiration for how I hung these. I want to add to the wall over time, and have it go up over that window into the kitchen and then keep kind of trailing off toward the other side of the room. Like a plate waterfall. (Reminder to self: check ebay for Niagara Falls souvenir plate).

We didn't do anything crazy like measure or plan where the plates were going to go. It's beginning to dawn on me that maybe the reason I prefer things like plate walls and gallery wall with things hung close together is more because I'm lazy and it camouflages inconsistencies in measurement and not really just because I like the way it looks.

Anyway. Here it is! In progress and all finished (until I get more plates. There, umm, might be more on their way courtesy of ebay right now. I may never be able to stop).


That Vietri plate is one I've had since Boston days. It's hung in three of my kitchens now. And one sun room. From a garage sale. I just thought it was pretty. Also I thought it might be worth money on ebay, but it didn't seem to be, so I kept it. 


Dave's being very careful not to measure anything here. Look! One plate is shaped like a fish! How whimsical!


Wednesday, July 24, 2013

Online Rug Shopping for Dummies


For someone who's owned three houses, I'm a pretty inexperienced rug buyer. Our only rug at our last house was in our living room. It was a giant antique dark red oriental rug...all worn down flat and threadbare in some places, and I loved it lots. Then our dog Oliver got really old and started peeing on it, so we finally had to get it of it.

I've been meaning to buy some rugs for this house ever since we moved into it. But I've been utterly paralyzed with indecision. Some rugs are really expensive. And some rugs are really cheap, but that makes one wonder if they are also really crappy. Also there are SO MANY RUGS. Different colors! Different materials! Different patterns! HOW to decide?

Having a baby who is now old enough to sit and play with toys and who is approaching mobility is what finally motivated me to just suck it up and buy a rug already. Babies can't hang out on your cold, hard terra cotta tile!

Here's how it went down. Rugs USA was having a big 4th of July sale (Rugs USA is one of those sites that's always having a big sale, but the biggest ones are to go with holidays, it seems. And they have USA right there in their name, so that's the biggest sale of all! I just made that part up. I have no idea). They had a bunch of rugs at 75% off, so I started looking around. But every rug I liked seemed to be out of stock.

Frustrated, I went over to Overstock.com and started looking there instead. I found the "Hand hooked Alexa Moroccan Trellis Wool Rug" there, 6' x 9', for around $230. The rug looked very familiar, and I'm pretty sure I've looked at it and considered buying it half a dozen times over the past year. I'd been hesitant about a wool rug with all the dogs and cats; I'd thought about getting an indoor/outdoor rug instead.

But I was so tired of looking at rugs. So I ordered this one. In gray, which, according to a lot of the reviews, would actually be more gray blue. So I was prepared. The reviews also said that the rug looked great, was surprisingly thick, and shed a lot for a long time. But, then, so do all of our animals.

For some reason, after ordering my rug, I felt compelled to go back to Rugs USA one more time.

And there I discovered that they had the exact same rug I had just ordered. Only 75% off.  Which made it around $80 cheaper than what I had just paid Overstock for it.

In a panic, I rushed back to Overstock and logged in to my account....and was very relieved to discover that it was not too late to cancel my order. Phew!

The moral of this story is not that you should order from Rugs USA instead of Overstock (I've had good luck with ordering stuff from Overstock in the past and am a big fan). It's that you should comparison shop very carefully. Because you might save $80 if you do.

My rug took forever to get here. Or, like, 2 1/2 weeks, I think. Overstock, it should be noted, had promised to have it here much more quickly. But waiting an extra couple of weeks was worth $80 to me (Abe did not fall over and get a concussion on the hard tile while we waited, or my perspective would probably be different).

That's my only complaint about Rugs USA. I love my rug. I was afraid it was going to be too pattern-y next to the octagonal tile, but it is, IMO, not. It is indeed nice and thick and seems like great quality for the price. It is definitely at least as blue as gray (Rugs USA calls it blue gray). It does shed a lot. I vacuum it every day, and that is not at all overkill. But I don't mind. Because it's so soft and pretty.

Unfortunately, my baby is now perpetually covered with fuzz.

But that's better than a head injury, right?

Let's look at my new rug again (also my baby):


Linking with:
The Inspiration Gallery
The Shabby Nest's Frugal Friday
Tatertots and Jello's Weekend Wrap Up Party
Monday Funday

Thursday, June 27, 2013

Let there be light! (and also hot water)

Warning: wordy post ahead. And the pictures I DID take for it, I forgot to take until it was dark out, so they suck. Sorry. oh! But then I put WORDS on the pictures to at least make them hilarious for you. HI-larious.

Perhaps the times when I wish the most for unlimited wealth is when something important is broken. Broken things make me panic. They make me want to go hide in my bedroom and throw money at them until someone else fixes them. It's not really rational. It's not even a little bit rational, really; I feel like things must be put completely on hold and that nothing good can happen to me until the broken thing is fixed.

But actually, I can also err in the other direction when it comes to broken things. Sometimes broken things are unessential enough that I cope with them by pretending they don't exist for, say, a year. The light in my sunroom was one of those kinds of broken things. Back to that later.

But the hot water heater is a full on panic sort of broken thing. And ours stopped working last week. That's right: we had TWO broken things in the house at the same time.

The timing was suspicious. It happened the very same day the HVAC guy came out to inspect our furnaces, one of which is right next to the hot water heater in the basement. And then, a few hours later, Ari asked, "why does the water just run and run and not get warm?"

Why indeed? Because the pilot light was out, we discovered. Dave called the HVAC place and they assured us that their guy would never, ever have done anything to the pilot light, but....yeah. Suspicious timing. Dave tried to light the pilot and...no luck. This very same thing had happened before we moved in. The pilot light would come on but not stay on for any length of time. We assumed this had something to do with the gas having been turned off for months or years. Someone or other finally managed to light it, but we couldn't remember if they'd used some special trick or if it had just happened.

In my panic, I pretty much was ready to immediately get a new hot water heater. There was no time to try to fix this one! We needed showers! We needed to wash diapers! We needed to run the dishwasher! RIGHT NOW!

Fortunately, Dave is able to hold himself together in these situations better than I am. He took the following steps:

1. try following the instructions for lighting the pilot light approximately 300 times.
2. call suspicious HVAC people to schedule a service call to calm wife's panic
3. google
4. decide what we need is a new thermocouple; call to cancel service call
5. buy said thermocouple
6. attempt to install thermocouple, only to be thwarted by a stripped screw holding on the panel that hides the old thermocouple (Dave tells me this panel is called the "manifold" and I have no reason to doubt him)
7. get very frustrated
8. try lighting pilot one more time.....it works this time!

Kind of an anti-climactic ending. If the pilot ever goes out again, we might not be so lucky. We think it really needs a new thermocouple. But we can't get that screw out to get to it. The hot water heater's eight years old, though, so we're just hoping the pilot stays lit until it dies completely.

And then there was the light in the sunroom.

I've mentioned this light a few times, but I've never told the whole fascinating story.

When we moved in, the fan and light worked just fine. But then, not longer after, the fan kept on working, but the light stopped coming on. More precisely, it would flash on for a split second when we flipped the switch, then go back off.

This wasn't a huge problem back when the room was Gable the shaggy sheepdog's hangout room, but once we started using it, we wanted some light.

We had an electrician out a few months ago to look at several things, this ceiling fan included. We wound up paying the electrician a hefty service fee and having him do nothing of value, because everything was WAY more than we expected. For this fan, for example, he told us the problem was that it was missing the remote and that he'd be happy to get us a new one....for $180. Umm. No.

Instead, what we did was, every once in awhile, usually when someone was visiting who expressed some interest in electrical troubleshooting (once my father in law; more recently my brother), we climbed up there and tried to figure out what the problem was. Oddly, this never made the light start working again. It all looked fine.

Now, at this point, what with my love for throwing money at broken stuff whenever possible, you'd think we'd just go get a new fan, right? Had this been a hideously ugly fan or a super dated fan or a boring builder grade fan, we probably would have done that a long time ago. Perfect excuse to pick out a fun fan!

But I liked this fan, and I suspected it was relatively pricey, as far as fans go. And, you'll recall, we just gave all of our money to Disney World.

With my brother's troubleshooting assistance, we decided that a new remote was, indeed, the right thing to try, and a quick online search revealed that, as I'd suspected, $180 was an INSANE amount to try to charge us for this remote.

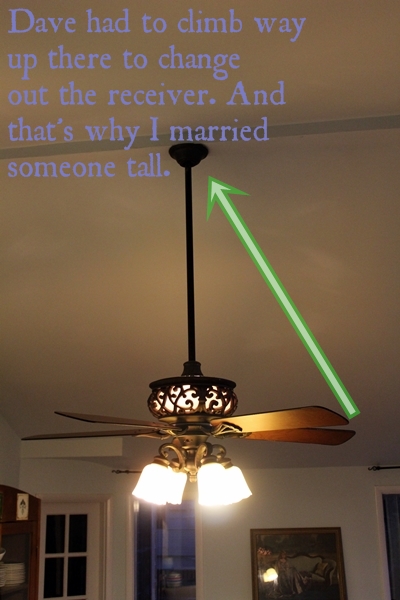
The top of the fan listed a model number, which helped us track it down online:


It's a "Hampton Bay Ponte Vecchio 52 inch natural iron" ceiling fan. See? It's Italian; I was so right about how fancy it is. Italian things are automatically 40% fancier than their American equivalents. It's still for sale on Home Depot's website for $229. So not, like, a ceiling fan a movie star might buy or anything, but on the expensive side for a fan you pick up at Home Depot. And I like it. 

The new remote and receiver (which, on this fan, goes up in the very top, in that part that attaches to the ceiling, rather inconveniently. If the ceiling were any higher, we'd have needed the expensive electrician who probably has a really tall ladder after all) cost not $180, but $30. We got a generic Hampton Bay one; they had a couple of different ones to choose from. Installing it was easy and self-explanatory. We should have done it a long time ago! 


Friday, June 21, 2013

Painting the Sunroom

The sharper eyed among you might have noticed in Wednesday's pinwheel post that the yellow is finally gone in the sun room! But you can't really tell what color it is in that picture, because it's so, so light. It's the lightest I've ever painted a room, ever. Some people are afraid of color; I'm afraid of white walls. And these walls aren't white! But they're closer than I've ever come before.

Dave was startled when I pointed to the color on the card. "THIS one?! Are you sure? It's almost white." But, I mean, it's a sunroom, right? I wanted something cool and light and airy, with the idea that most of the color in the room would come from accessories and whatnot (eventually. We have very few of said accessories and whatnot at the moment).

We started out, as you'll recall, here:


This is before we bought the house. Same yellow paint as everywhere else in the house and a giant leak above the door on the far end there.

We had the leak repaired (and the skylights--suspected source of leak--removed and drywalled over) before we moved in. And then we put a dog crate in it and left it that way for a year:


In the past few months we've made some progress in here. We refinished that big ol' dresser that's up against the windows in that picture. And we moved the dog crate out and some real furniture in so that we could hang out in here.

The next order of business was to finally get rid of both the yellow and all that bare drywall from the leak repair.

My paint selection method was pretty simple: I took the card from the paint I used on the big dresser (or, as Dave would say, credenza), (which was Benjamin Moore's Florida Keys Blue) and picked the lightest color. Which, it so happens, was called Blue Bonnet. This led me to expect it to be more, well.....blue than it turned out to be. It's a really light blue green, but, if pressed, I'd call it green rather than blue. But, then, the Florida Keys Blue dresser is the same way. Most of the time, I'd call it blue, but in certain lights it's definitely green. I'm going with aqua, because that's what I had in my head that I wanted.

This room took forever to paint. It is very big. And we had to paint the ceiling, which is also very big. And three of the four walls are mostly windows, which meant less surface to cover with paint, but also lots and lots of painstaking brush work.

We did primer first, which is not our usual way. But it was clear from the test patch I put on the wall that it was going to take at least 2 coats otherwise, and primer is cheaper than paint. Plus the internet tells me that my paint job will look way more professional with the help of primer, and if the internet says it it must be true.

Two days later, we had this!


It's so light you're not really sure what color we painted it, right? Yes. It's a big, minty box.

You can see the color a little better from this angle, I think:


Here's a beginning stab at colorful accessories and whatnot. That little thrift store lamp (I recognize the shade from Target, but I got it at the thrift store) is the only source of light in the room, still, but we have a plan that might actually work for fixing the fan light. Saving that for another post.


With the dropcloth curtains down (they need to be hemmed and cut into panels before they go back up), you can see what rough shape some of the window are in. I'm scared to hear how much it will cost to replace them.

And, because I don't want to do a whole post about it, I got unlazy enough to move the pinwheels into the dining room and throw together some 4th of July-ish stuff on the buffet in there. I kept bringing in more and more books, so I'm pretending an American literature theme was my plan all along. Mark Twain is heavily featured. I want to switch out the flowers for president cards, but....uhh, well, I haven't yet.


Tuesday, June 11, 2013

The Sunroom has STUFF in it Now!

We've been hanging out in the sunroom nonstop since a few days ago when we finally got it all set up with furniture. I think we would have made it a priority sooner had we realized what a lovely room it was going to be.

The thing that bothers me most about our floor plan is how closed off the den is from the kitchen and the rest of the house. It feels like a big, lonely expedition to go hang out in there, so I never really do unless it's specifically to watch TV. But the sunroom connects to both the kitchen and the den. And it has a doorway and an open window into the kitchen, so the spaces feel very connected. So now it's like the open to the kitchen family room we never had!

Here's what's going on in there (in HERE, because I'm in the sunroom right now!)


Here's another shot, with a cozy family moment involving a jigsaw puzzle:


The leather couch is from my mom. She was replacing this one and offered to us awhile back. It sat in our garage for a long time, then we finally brought it in here, where it sat some more, sort of lonely and unused because it was pretty much the only thing in the room.

I knew I wanted wicker chairs in here and I sort of half-heartedly looked around for some for awhile. Ikea and Target had some for around $100 each that were....okay. Not quite as substantial as I wanted, really, but they would have been okay. And I could usually find some on Craigslist that I would need to spray paint. And spray painting wicker is not much fun.

Saturday I was doing one of my casual "let's see what they have on Craigslist RIGHT NOW!" things and came across the chairs you see up there. The guy said he had won the set with the chairs, loveseat, and coffee table, and was selling the chairs and coffee table (still new in the boxes) because he didn't have room for them. And they were pretty much exactly what I wanted, so here they are! We paid $150 for the two chairs and the table. I don't want the table, so I'm selling it to my mom for $25. The chairs are $200 each on Target's website, so I'm pretty pleased with our post table selling price of $62.50 each. They're much nicer than the $100 ones I was considering.

They were kind of a pain to put together:


But once we did, they looked great and are pretty comfy. And they came with nice neutral cushions that I can fancify with some colorful throw pillows:


The trunk that we're using for a coffee table used to be in our den. But I want a big ottoman with storage for in there, so this came in here.

And, lastly, we went ahead and moved the kitchen table in here, even though we don't have anything to replace it with yet. The sunroom's only a few steps from the kitchen, so it doesn't really matter. Once we have a kitchen table again, I want this one mostly to be for non-eating activities.

There is, of course, much left to do in here. We just bought the paint today and are hoping to start on that tomorrow. And we need to hem all the drop cloth curtains and buy blackout fabric to line them with. It's been fairly cool and/or cloudy so far this summer, but this room is pretty much unbearable for much of the day once we start getting 90 degree sunny days. I'm hoping curtains the block the morning light will fix that (and then we can open them back up in the afternoon when the sun's on the other side of the house).

And that overhead light/fan still doesn't work. So I'm sitting in the dark right now.  So those things are next on the list.

Monday, April 8, 2013

Sunroom Progress: Chunky Dresser Makeover


Awhile back, as some of you may recall, I bought a big chunky dresser for $45 at the thrift store (not on the same Friday night that I bought everything else that's now in my house, but at the same store). Said dresser is unbelievably heavy and still has a stamp on the back dating it to 1974. I'd had some hopes that it might work in our den for a TV stand, but it is, it turns out, far too ginormously long for that. 

So it ended up in the special room in our house where we keep all the things we don't know what else to do with: the sunroom! Only this time we sort of did know what we were going to do with it. We knew, at least, that we were going to paint it and then....put stuff in it. I think maybe craft supplies? Extra dishes? Maybe we'll get really crazy and keep extra dishes and craft supplies in there, because it's just that big. Did people have more clothes in 1974? Maybe it's just that they had smaller closets, so they had to keep more clothes in their dressers? 

Incidentally, Dave does not like calling this dresser a dresser. He really wanted an alternative name, since we won't be using it as a dresser for clothes. I introduced him to "credenza" and he was all over that, but I don't think it is a credenza, even if one defines the term really generously. Although Wikipedia seems as confused as Dave about the definition of credenza. It says that a credenza is "a piece of furniture comprising a central cupboard flanked by symmetrical quadrant glass display cabinets, usually made of burnished and polished wood and decorated with marquetry" ....and then shows two example pictures that aren't anything like that. So I guess Dave can call our dresser a credenza if he wants to.

It started out looking like this:


I've been itching to use some turquoise or aqua somewhere in the house, and the sunroom, with all the light it gets and with its terra cotta tiles, seemed like the ideal location. I spent quite a bit of time online researching the prettiest colors Benjamin Moore has to offer on the aqua to turquoise spectrum, wrote down the names of several top contenders, then got to the store and....couldn't find a single one. I should have written down numbers, too, it turns out. I could have asked for help, but the store was pretty busy, so I just looked at the samples and picked one out right there on the spot. I ended up with Florida Keys Blue. 

It's a little more aqua and less blue in real life than I expected (although in the pictures it looks bluer than in my sunroom. I think. It's hard to tell. Light is a funny thing), but the great thing about Benjamin Moore is that even when colors don't look how I expect them to, I'm still all, "OMG--it's the prettiest color I've ever seen!" Benjamin Moore does not pay me. But they should. 

I agonized for quite some time over how to paint this. I got the paint in semi gloss to leave my options open. Ultimately I decide on mixing plaster of paris in to chalk paint it up, largely because I was feeling lazy and didn't want to sand and prime it first. Also because I knew if I wound up distressing it (which I hadn't decided about yet), I'd want the dark finish to show through rather than bare, sanded wood. I use this recipe from I Heart Naptime. This time I added in a little more plaster of paris, just as an experiment as I've seen other formulas that use a lot more. I didn't notice much difference over other times when I've used it. 

I did two coats of paint (Dave liked it after one coat, with some of the dark stain showing. I kind of did, too. But not enough to stop painting). Then I sanded the edges to distress it, then put a coat of wax on it. 

I only briefly considered swapping out the hardware. I thought it would be hard and/or expensive to find something substantial enough to look right on there, so I just repainted the old hardware with Rustoleum satin nickel metallic spray paint instead. This kept the whole cost, for the dresser plus paint, down around $70 (and we still have plenty of Florida Keys Blue and satin nickel spray paint left over). 

That rainbow striped vase? That I did get on clear-out-the-whole-thrift-store-Friday. 


I think the bottom picture gives the best representation of the real color.

I'm excited about getting a usable sunroom! There have been a couple of other changes in there, too, so I'll have a sunroom update post sometime in the fairly near future. 

Linking with:

Tuesday, March 26, 2013

DIY Baby and Dog Gate Instructions


Special guest blogger today! Dave! The baby gate he made a few months ago is one of my most viewed and most pinned posts. Sadly, when people view it, they see some cruddy pictures of the gate and....no real information about how to make it. We've been meaning to get the how to make it post up for forever now. The other day someone finally commented on the post to ASK how to make it, and that was, it turns out, just the motivation Dave needed to make some pretty diagrams and write it up. So here you go!

Many moons ago, Gretchen posted about a baby gate that I made to keep dogs (mostly Gable) out of the kitchen.  You can read about it here.

Every couple weeks, she asks me when I'm going to write out the instructions on how I built it.  But because I never really considered it complete, and because I'm a big procrastinator, it hasn't gotten done until now.  It's been 95% complete since October, but the hook and eye latch we bought to keep it locked never really worked.  Any toddler would be able to shake the gate with his tiny fists and pop the hook out of the eye.  For that matter, any moderately curious or determined dog could do the same.  Fiesta the Beagle is one such dog.  Fortunately, Gable the Dopey is not.  While he's a big enough problem dog to require us to build a specialty gate to keep him out of the kitchen, he's a dog of routine and appreciates having his own sun room retreat during eating times.  But with a new baby in the house, I knew we would need something a little more secure in the future, so I finally found a suitable latching device.  So now I can explain the whole process.  Lucky you!

So the reason we needed a custom-built gate is because the doorway is crazy narrow, specifically 26.25 inches.  It was formerly part of the kitchen bay window, but was opened up to a do-it-yourself addition of a sunroom by some previous owner.  Since no commercially available gates come in sizes so tiny, I set to work on plans of my own.  The Home Depot had these super cheap untreated 2x2 pine posts - so I bought enough of these to make the following gate:


So in case you don't know, lumber measurements don't actually match their name.  If you buy a 2x2 post, you'd think that you're getting 2 inch by 2 inch posts.  Nope.  It's actually 1.5 inch by 1.5 inch posts.  That means that the skinny dimension of each of those rectangles is 1.5 inches, in case you're keeping track.

The vertical dark gray 2x2s are 35 inches long.  This is the height of the gate and is completely customize-able.  I think I picked that height because it meant I had minimal leftover wood.  It's pretty tall for a gate, but Gable is a pretty big dog, so it works out.  The horizontal light grays are 22.25 inches long.  Add the 1.5 inches on each side for the vertical posts and you get a total gate width of 25.25 inches.  "But Dave, you said the doorway is 26.25 inches wide.  Why is the gate 1 inch too narrow?"  More on that in a moment.  Since the vertical brown 2x2s are contained within the horizontal posts, they needed to be 3 inches shorter than the exterior vertical dark grays, so they come in at 32 inches a piece.

After careful measuring, remeasuring, conferring with Gretchen, and measuring again, I sliced up the posts using the Skil saw and sanded all the pieces with the power sander.  I used fourteen 2-inch deck screws to attach all the pieces together.  I was either smart enough or made enough mistakes in the past to know that if predrilling was important to avoid splitting such narrow pieces of wood.  So each light gray post got five screw holes and each dark gray post got two.  If I were smarter or had made more mistakes in the past, I would have used wood glue as well.  While the screws were holding the posts in place, they made for a nice point of rotation for each of the brown posts.  Instead of taking everything apart to add the glue, I decided to use some finishing nails hammered at 45 degrees to create more points of connection between the light gray and brown.  While that worked OK, the hammering jarred the alignment off on some of the posts.  So you can feel the not-flush adjoining on some of the posts.  It bothers me literally every day of my life.

Now that the gate was complete, I had to attach it to the doorway.  I didn't want the hinge screws to go directly into the drywall (there is no wooden door frame as there was never a door there) because I didn't think that would hold the test of time and dogs and boys.  So instead, I used some more wood - this time 1x2 (so in actuality 0.75 inches by 1.5 inches) - cut to the length of the gate height.  More predrilling and deck screws attaching this new piece to the exact middle of the 6 inch wide drywall, and I was ready to attach the two hinges into nice sturdy wood.  This is, by the way, where the extra 1 inch of width came from.  The 0.75 for the wood, and the rest for the hinges and for a little leeway on the other side of the gate.

Speaking of the other side of the gate, there needed to be some sort of door stop to prevent the gate from getting pulled past where the hinges and hinge screws wanted to go.  So I used another 1x2 board and attached it to the other side of the doorway.  This time, it wasn't exactly in the middle because I wanted to allow the gate to close flush with the first 1x2.  Maybe this diagram can explain better than words.


This is an areal view - the light and dark grays are the top of the gate (color coded!) and the green and purple pieces are the hinge board and the door stop respectively.  While the first diagram is to scale, I had to shorten the width of the gate in this one in order to show the relevant details without making a crazy long image.  If this diagram really were to scale, the doorway would be a little more than one foot wide, which is just crazy.  In real life, the doorway is a little more than TWO feet wide.

So all of this worked great, except for the previously mentioned battle with the hook and eye.  We tried various configurations and angles to try to make it more secure without much success.  It got to the point where the hole the hook screwed into was so stripped that we would routinely find the hook lying somewhere on the floor.  In fact, I looked for the hook just today and was unable to find it.  What good timing that I finally bought a latch that will work!

Old system:


The new latch:


The new latch installed!


This should work great for two significant reasons.  One, the "hook" part goes deep into the "eye" part, so it won't jiggle out with excessive toddler fists or beagle paws.  Two, each piece is attached by four screws into wood (the gate for the hook, the doorstop for the eye).  This should really stay put.  Oh, it's worth noting that my previously mentioned smarts and/or experience took a hiatus when I screwed this latch into place.  I did not predrill screw holes and there are now small cracks in the wood that I hope will stay small.  This will likely bother me literally every single day for many years to come ... or until the gate breaks.


Linking with:
Sunday Showcase Party at Under the Table and Dreaming
Tutorials and Tips at Home Stories A to Z
Stone Gable's Tutorials, Tips, and Tidbits
Hookin' Up With House of Hepworths
The Inspiration Gallery
The Shabby Nest's Frugal Friday
Tatertots and Jello Weekend Wrap-Up Party
Monday Funday

Thursday, March 14, 2013

Sunroom Musings

I like to have at least 2 projects, big or small, to blog about every week (in my head, the goal is 3ish house/decorating/DIY related posts--either stuff we've done, stuff we plan to do, random observations, or whatever--and 1-2 kid/family/life related posts. Just so you know what I'm shooting for so you can judge me when I fall short). Partially because then there are more blog posts and partially because it means we've gotten two things done here. (Sometimes I worry that someday we'll run out of things to blog about. Then I look around the house for a minute and laugh hysterically at the thought).

But that dresser took approximately 47 times longer than I expected to finish and threw me completely off schedule. Then the baby woke up again. He keeps doing that.

Anyway, all of this to say that I, shamefully, don't have a second project to blog about this week. I kept hoping we could get one done during the week, but, thus far, we have not. So what I did for you, dear readers, was I went and took pictures of my neglected sun room. And today I will share them with you and ramble on for awhile about the early stages of our plans to un-neglect the sun room. I would also love any suggestions or ideas you have about said un-neglecting project....I'm having a bit of trouble coming up with a sufficiently amazing vision in my head. And, hey, last time I did one of these "show a messy room in my house and blather on about it" posts I wound up embarking on a much more ambitious than I originally planned tween room makeover. (Of course, the time before that, I showed you my hideous master bathroom....and did nothing about it).

The sun room that made the biggest impression on us when we first saw the house....because our realtor met us at the door and said, "come on in and see the indoor water feature."


See it? Over above the door on the far end there? It was raining the first day we saw the house, and water--lots of it--was coming through that hole. It turned out that this looked a lot worse than it really was: the roof itself was/is in great shape--the culprit appeared to be those skylights (actually just sheet of glass installed by some hapless DIYer). But the house (a foreclosure) had been sitting empty and neglected for 2 years, so once the leak started it just got worse and worse until we came to help.

Fixing the leak is pretty much the only thing we've done to help the sun room, though. Here it is today, same general perspective:


Oh, look: no more leak! And, umm....a bunch of crap that we don't know where else to put!

Let's take a tour.

This is mostly Gable's room, as evidenced by the giant dog crate. Gable's very rarely crated these days (there's a gate across the doorway, so we can lock him in the room when we need to. Like if anyone's eating an apple. He goes insane when he knows there's an apple loose in the house).

Gable generally hangs out on the old, stinky futon when he's in there:


The curtains are drop cloths....good start, right? The room gets VERY hot in summer, so something is definitely needed there. Last year we got the drop cloths and hung them up....on some of the windows. But we never finished. Nor did we cut them in the right places so we could open and close them. Nor did we hem them. They could really use some kind of black-out fabric backing them, too. And sometimes I think about painting or stenciling or otherwise embellishing them. Yep.

And the leak is fixed, but we sure could use some paint in there.

There's the big dresser I bought to paint.

There's my vacuum cleaner, which tends to hang out in there because we don't have a coat closet (or any kind of downstairs closet).

There's the "cat hideout" the kids built a few weeks ago with the neighbor kids. The cat actually goes in there, even:


There are the two remaining Taboret chairs from Overstock that we haven't even unwrapped yet.

There's a big pile of crap on top of Gable's crate. It includes a comforter that's supposed to go in Lucy's crate, but needs to be washed, one of Fiesta's sweaters, and swimsuits that have been sitting there since last summer.

There's some nice but not in especially good shape terra cotta tile:


This is one of the rooms that got a fancy light fixture upgrade at some point:


....only it doesn't work. The fan works, but not the light. We don't know why. An electrician told us we could either replace it or buy a really expensive new remote for it. We are skeptical. the globes are off from when Dave checked it out to see if he could fix it. Now we keep them on the mantel, of course:


You know--the one we lean screens against. What was up with the previous owners and ostentatious fireplaces, by the way?

Here's a nice piece:


It's in here because we couldn't find anywhere else to put it. It's huge! We keep all our board games and, incongruously, our extra set of dishes in here.


Looking the other way. That doorway leads to the kitchen (and the door leads out onto the screen porch and then into the yard); the other end has a door into the den. Both doors are ridiculously narrow, so any wide furniture has to be carried in through the screen porch.

Just for fun, here's a peek at our nasty screen porch:


"Screened porch" is kind of a euphemism, because there's not a whole lot of screen left. Gross carpet. Doors need to be replaced. Everything needs to be pressure washed and probably stained or painted. Then it will be lovely out there!

Okay, so! Now we need to make the sunroom beautiful and useful!

Initial thoughts: I want kind of a multi-purpose hang out room. It's really long, so I'm thinking two areas--a seating area on the end by the fireplace and then a table for crafts/games/whatever on the end by the kitchen. The idea is we'll move the kitchen table out there when Dave builds a farmhouse table for the kitchen. That's the idea.

We have a brown leather sofa that my mom gave us sitting in our garage, waiting to go in there (at which point the futon will leave!) I guess a leather sofa is an unconventional choice for a sun room, but a. it's what we have and 2. I think it will look good with the terra cotta. So leather sofa and then....some other chairs. Maybe big comfy wicker ones? And a coffee table of some sort. 

I'm thinking either turquoise or aqua for the big dresser. And keeping craft stuff and/or extra kitchen stuff in it. And then another piece to go right under the window opening to the kitchen. Something smaller. 

For paint....I'm not sure. I'm thinking of Benjamin Moore's Revere Pewter. I do not usually go so neutral, but the orangey tile limits things and also if I'm going to go painting furniture crazy colors like turquoise then something has to be neutral. And everyone says it's awesome. I'm thinking it will tie in well with the gray grout. Might also do the den the same color. I'm not sure what to do about that greenish fireplace. I cannot imagine I will ever decorate a room that that fireplace would feel fully at home in. But there it is. 

Who wants to imaginary decorate my sun room with me? What would you do in there? 

Thursday, October 11, 2012

Weekend project #2 revealed: DIY wooden baby gate

Update (3/26/13): There is, at long last, a tutorial post, complete with diagrams, on how to make this gate. So if you've arrived here from pinterest or from a google search and are thinking, "uh, huh, that's nice--but how do I make my OWN gate?" ....well, we'll tell you!


We are not proud people. If there is a reasonably priced, reasonably attractive baby/dog gate available for us to purchase, we're happy to let someone else do the work of building it and just buy the damn thing. But. Whoever added our sunroom onto our house made some...creative decisions. Some not entirely up to code decisions. Some decisions that it will take us lots of time and money to fix, ultimately. Like the wiring (note to self: call an electrician, already!) Or the decision to put in plain old sheets of glass in the ceiling instead of actual skylights (massive roof leak: check!)

Some of the decisions are quirky but not actually dangerous or destructive. 26 3/4" wide doorways fall into this category. One of the entrances to the sunroom has an actual (ill-fitting) door. The other is just an open doorway. We need to be able to block that doorway off because the sunroom is where we like to keep dogs when we want to keep them out of the way/out of the kitchen/away from each other. (Lucy the old cattle dog mix and Gable the shaggy sheepdog used to be separated at all times, after a couple of too nasty fights. Things expensive trainers and behaviorists have said about Lucy: "this is the most interesting case of interdog aggression I've ever seen!" and "sometimes a wire just gets crossed somewhere." Sigh. My problem dog. But if you're people, she LOVES you. Anyway, once she hit 13 1/2 or so, she mellowed, and now we live in relative doggy harmony. But, still, we like to be able to shut off the sunroom sometimes, and there might be new reasons to do so once we have a mobile baby).

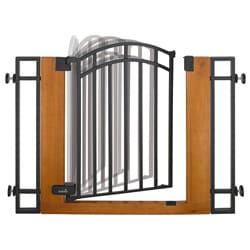
All we wanted was a decent looking metal or wooden gate that would fit in the doorway and swing open. Like this:


Except that that gate fits openings "29.5-40.5 inches." Now, when you look at our sunroom doorway, it looks narrow, but not really freakishly so or anything. Surely, I thought, there was a gate out there for us somewhere. But no. If you want a gate for an opening smaller than around 28" you're pretty much out of luck as far as ready made gates go. I googled "baby gate for narrow doorway" and other similar things, thinking there must be other people with this same dilemma who had come up with brilliant solutions. Not really. If you are a wide doorway person, you can find your people (and your gate) out there; there seem to be maybe 3 other people with narrow doorways they want gated, though. 

The only solution other than making our own gate appeared to be having one custom made. Dave e-mailed a custom gate place for a quote. He filled out an online form giving them the dimensions of or doorway. They wrote back: "Your web form said you had a passageway whose width (from wall to wall above any baseboard) is 26 3/4 inches. That is REALLY narrow! Could you let us know if that is indeed the width?"

Dave assured them it was, and they sent us a quote for a wooden gate with a hook and eye latch for just under $200 with shipping. Ouch. Our budget was more like $60 or $70. 

Onward! Dave would build a gate. He wasn't feeling very confident about this at first, though it sounded simple enough to me, the person who wasn't going to be building it. Online searches turned up remarkably little information about building your own baby gate--maybe because baby gates just aren't that expensive to buy if you have a normal sized doorway. So he winged it. He's planning to write up a complete post about the gate building process at some point, so that there will be a tutorial online of the sort we could not find ourselves, but for now, I will show you the finished product.

***********
Ack! Terrible news! It WASN'T the card reader's fault at all....it's the memory card that's screwed up! Which means that right this second I have no way of getting to all the pictures I need for this post. Eleven year old is upstairs trying the card reader in the desktop computer; our last hope! Didn't work. Sigh. I'm taking new pictures with the iphone, but all the pictures Dave took of the gate building process are, I fear, gone forever!
*************

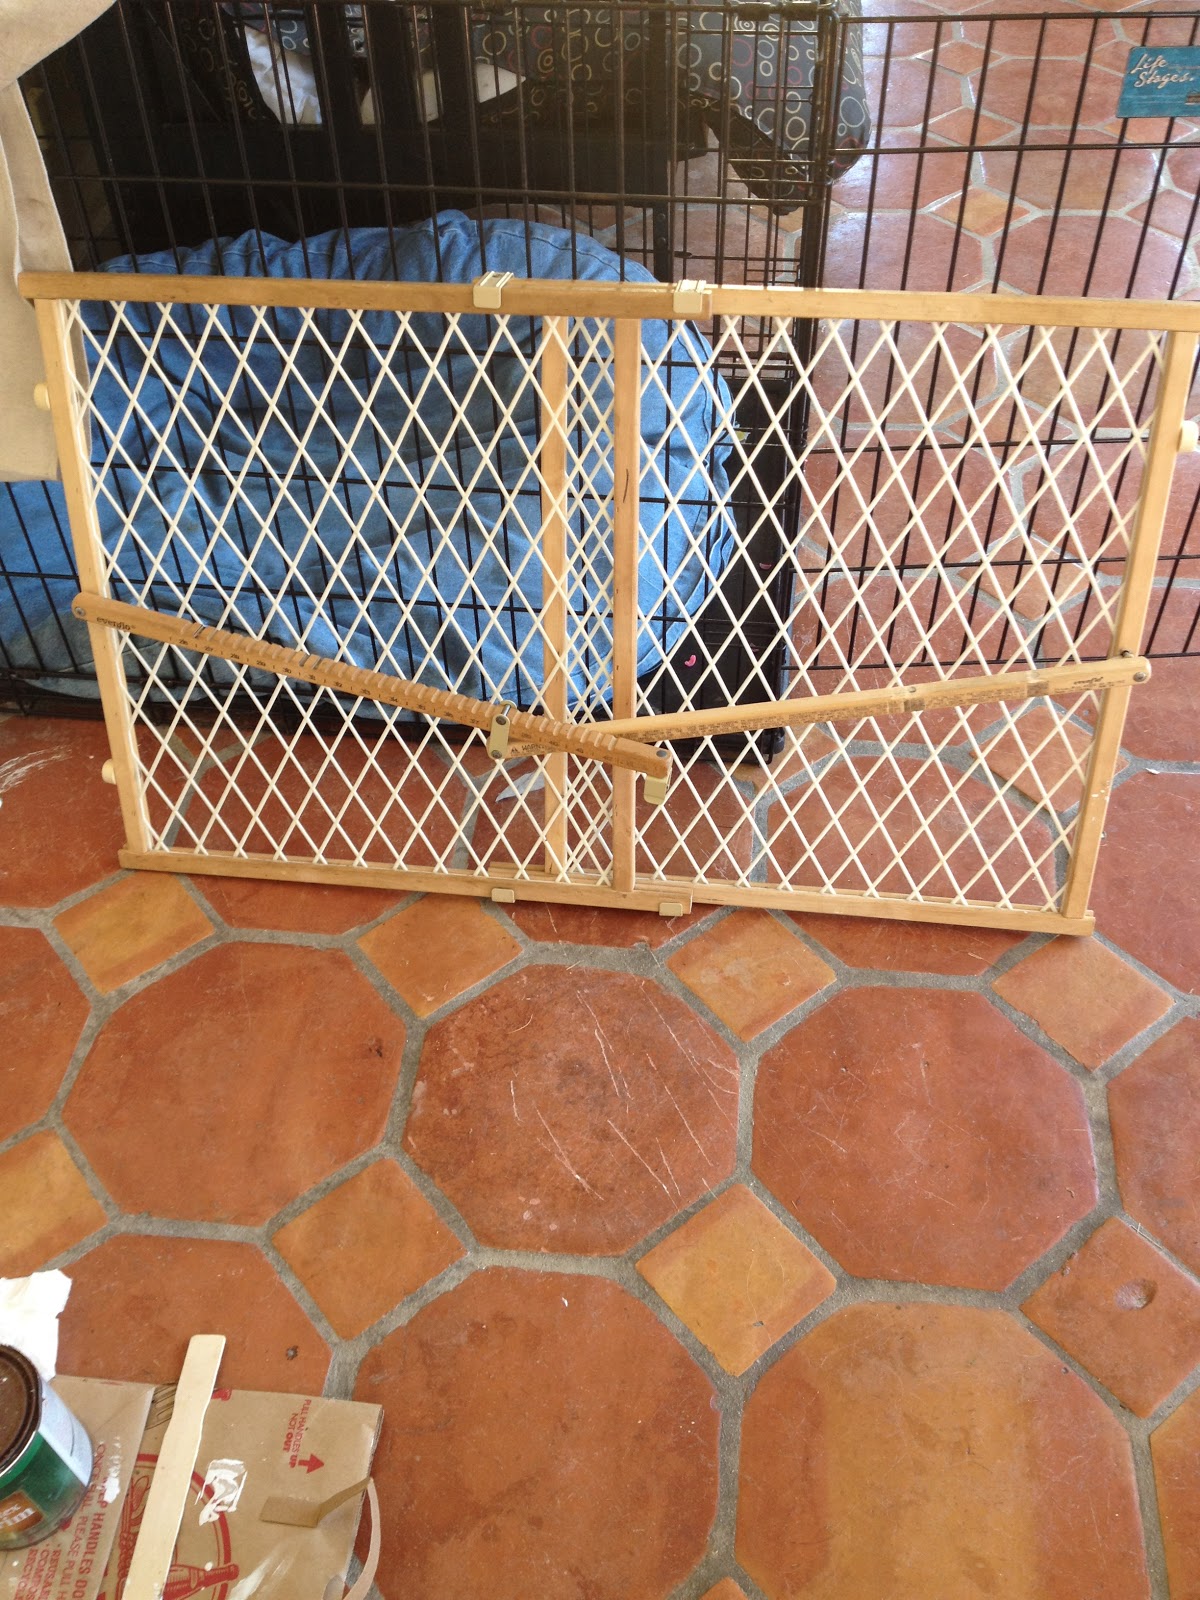
Here is our old solution:


Ain't she purty? But apparently we were super lucky to even HAVE a pressure mounted gate that would go down (barely) to 26 3/4". But you have to climb over it or take it down to go through the door, and it was tearing up the paint on top of that (and on top of being ugly). Also, two of the little rubber things that go against the door jamb were missing or messed up, so it didn't even fit securely anymore.

And here's our new gate!


Notice how Fiesta manages to be in the picture of the gate from both sides, even though they were taken 20 seconds apart. She likes attention. Also, there are Ari's legs. We need to fill in the holes from the screws with putty and repaint, but....we haven't yet.

Okay, so I love my new gate! And remember how the nice looking gate that we couldn't buy because it wouldn't fit was over $80? The materials for this one were....less than $15! So while we would have spent $60 or $70 on a new gate if we could have, I'm pretty glad now that we didn't have the opportunity. Because I can think of more exciting places than a gate to put that extra $45-55.

I am bad at getting buttons to work. I need to figure that out. anyway, linked with House of Hepworths' Hookin' Up with HOHChic on a Shoestring Decorating's Flaunt It Friday, and The Shabby Nest's Frugal Friday