Sunday, October 14, 2012

Our master bedroom needs a lot of help.

I am going to post, probably tomorrow, after I get around to making the bed and straightening up just a little, a shameful before picture of our master bedroom, aka the room where we dump all the stuff we can't figure out another place to put. Because it's really time to get moving on that.

As I've mentioned, the giant (29 feet long, the whole width of the house) master bedroom is going to double as a nursery for the time being. Our old plan, until yesterday-ish, was to have a wall with french doors put up to section off a small, nursery-size area. Then we started to run out of time (and money; I just paid our new, more expensive house and more expensive county property taxes. Ouch. Although people in many states would laugh if I revealed what we in Georgia consider ouch-worthy when it comes to property taxes), so I got to thinking the other night that we might be better off with a more temporary solution.

New plan! A railing along the ceiling to hold a curtain as a room divider and a long term plan to move baby into the now guest room sooner than we previously expected and to finish the basement (with guest room/bath and a big rec room to send loud children to) as soon as we can afford it.

This means I'll be decorating my lovely nursery to use for all of maybe a year or so, but if I'm still totally in love with it, it will be easy to put some paint up in the guest room and move the whole thing over there when the time comes, then redecorate into a big kid room a couple of years down the road. It also means I probably won't be motivated to do a whole lot with the guest room in the meantime, but that's probably fine. I have plenty of rooms that need attention. We might slap a coat of paint up at some point since that only takes a few hours, and I was already thinking we'd probably go with something very neutral for bedding (like maybe all white, and then we can change things out with pillows).

So from here until January--all master bedroom/nursery all the time! Not really. We've got some library tweaking going on this weekend that I'll post about. And an Ikea trip yesterday yielded some stuff for both the kid rooms, so we'll be working on those. And then there's the nasty carpet/ugly paint in the master bath that must also be dealt with before January. And we keep meaning to have mulch delivered for out front and maybe get some berry bushes in so we'll have fruit next summer....But priority: master bedroom and nursery. And nasty carpet in bathroom.

Okay, so part 1: here's the mood board. Part 2 (tomorrowish) will be the shameful before picture and thoughts about what we'll be doing with all the stuff we already have.


1. The oddly named Newburg Green from Benjamin Moore. I've yet to see a picture where this actually looks green, as opposed to blue with some gray in it. I've realized it's pretty close to the color already in Ari's room (which I haven't posted yet), but that's okay. The idea is to pick a color that will work for the nursery and also for the room as a whole. Color schemes will be similar, but I don't think I'm up for the splashes of orange on our half, so more blues and grays with lots of white and some black.

2. Ikat Scroll Duvet Cover from West Elm. They're calling this "dusty blue" on the website. It looks awfully blue-gray to me.

3. There are lots of board and batten tutorials online; this one is from My Blessed Life. Probably just one wall, but maybe we'll go crazy and do the whole room. I'm a little nervous that the Newburg Green is going to look too dark in that room (it has 4 windows, two facing east and two facing west, so it gets natural light all day, but it still seems kind of dark in there), and I've read that it does best with a lot of white and/or natural light, so I'm thinking this will make it work.

4. Aina linen curtains from Ikea. I like the look of the linen, but they have other white curtains that block more light and are cheaper, so we will probably wind up with those. But, anyway, a wall of white curtains on a Kvartal (say it; it's fun!) track across one side of the room. Another way to add brightness, too.

5. How about some bird art? This is from Amber Alexander's Etsy shop. He is very cute.

6. Black and white pendant light from Overstock. We have no overhead light at all in the room right now, just a cheap ceiling fan. I can't stand ceiling fans while I'm sleeping, so we're ripping that sucker out and putting up a light....maybe even this one.

Making decisions and ordering some stuff in the next few days, I think. Because, seriously....deadline looms!

Oh, by the way, this isn't the Kvartal track, but this is basically how I'm envisioning the room divider:


Thursday, October 11, 2012

Weekend project #2 revealed: DIY wooden baby gate

Update (3/26/13): There is, at long last, a tutorial post, complete with diagrams, on how to make this gate. So if you've arrived here from pinterest or from a google search and are thinking, "uh, huh, that's nice--but how do I make my OWN gate?" ....well, we'll tell you!


We are not proud people. If there is a reasonably priced, reasonably attractive baby/dog gate available for us to purchase, we're happy to let someone else do the work of building it and just buy the damn thing. But. Whoever added our sunroom onto our house made some...creative decisions. Some not entirely up to code decisions. Some decisions that it will take us lots of time and money to fix, ultimately. Like the wiring (note to self: call an electrician, already!) Or the decision to put in plain old sheets of glass in the ceiling instead of actual skylights (massive roof leak: check!)

Some of the decisions are quirky but not actually dangerous or destructive. 26 3/4" wide doorways fall into this category. One of the entrances to the sunroom has an actual (ill-fitting) door. The other is just an open doorway. We need to be able to block that doorway off because the sunroom is where we like to keep dogs when we want to keep them out of the way/out of the kitchen/away from each other. (Lucy the old cattle dog mix and Gable the shaggy sheepdog used to be separated at all times, after a couple of too nasty fights. Things expensive trainers and behaviorists have said about Lucy: "this is the most interesting case of interdog aggression I've ever seen!" and "sometimes a wire just gets crossed somewhere." Sigh. My problem dog. But if you're people, she LOVES you. Anyway, once she hit 13 1/2 or so, she mellowed, and now we live in relative doggy harmony. But, still, we like to be able to shut off the sunroom sometimes, and there might be new reasons to do so once we have a mobile baby).

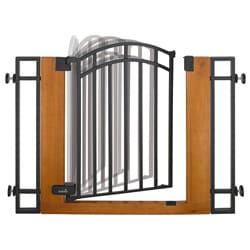
All we wanted was a decent looking metal or wooden gate that would fit in the doorway and swing open. Like this:


Except that that gate fits openings "29.5-40.5 inches." Now, when you look at our sunroom doorway, it looks narrow, but not really freakishly so or anything. Surely, I thought, there was a gate out there for us somewhere. But no. If you want a gate for an opening smaller than around 28" you're pretty much out of luck as far as ready made gates go. I googled "baby gate for narrow doorway" and other similar things, thinking there must be other people with this same dilemma who had come up with brilliant solutions. Not really. If you are a wide doorway person, you can find your people (and your gate) out there; there seem to be maybe 3 other people with narrow doorways they want gated, though. 

The only solution other than making our own gate appeared to be having one custom made. Dave e-mailed a custom gate place for a quote. He filled out an online form giving them the dimensions of or doorway. They wrote back: "Your web form said you had a passageway whose width (from wall to wall above any baseboard) is 26 3/4 inches. That is REALLY narrow! Could you let us know if that is indeed the width?"

Dave assured them it was, and they sent us a quote for a wooden gate with a hook and eye latch for just under $200 with shipping. Ouch. Our budget was more like $60 or $70. 

Onward! Dave would build a gate. He wasn't feeling very confident about this at first, though it sounded simple enough to me, the person who wasn't going to be building it. Online searches turned up remarkably little information about building your own baby gate--maybe because baby gates just aren't that expensive to buy if you have a normal sized doorway. So he winged it. He's planning to write up a complete post about the gate building process at some point, so that there will be a tutorial online of the sort we could not find ourselves, but for now, I will show you the finished product.

***********
Ack! Terrible news! It WASN'T the card reader's fault at all....it's the memory card that's screwed up! Which means that right this second I have no way of getting to all the pictures I need for this post. Eleven year old is upstairs trying the card reader in the desktop computer; our last hope! Didn't work. Sigh. I'm taking new pictures with the iphone, but all the pictures Dave took of the gate building process are, I fear, gone forever!
*************

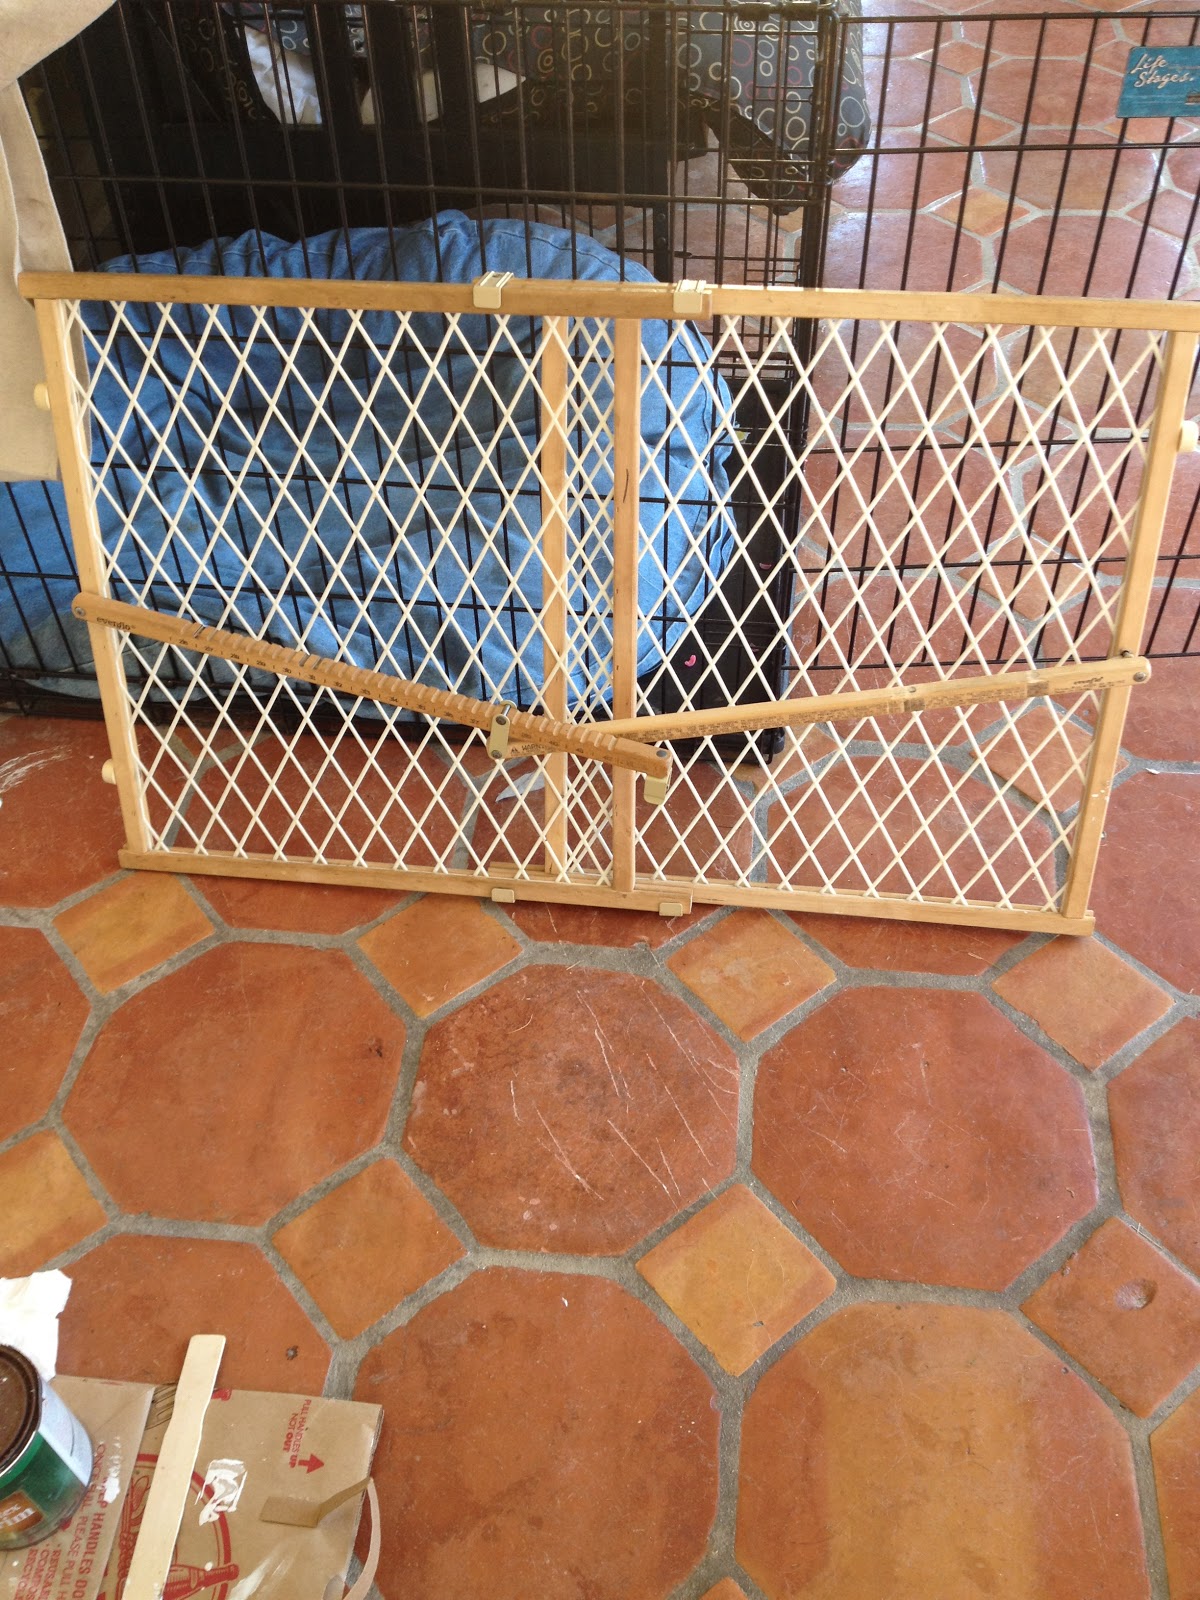
Here is our old solution:


Ain't she purty? But apparently we were super lucky to even HAVE a pressure mounted gate that would go down (barely) to 26 3/4". But you have to climb over it or take it down to go through the door, and it was tearing up the paint on top of that (and on top of being ugly). Also, two of the little rubber things that go against the door jamb were missing or messed up, so it didn't even fit securely anymore.

And here's our new gate!


Notice how Fiesta manages to be in the picture of the gate from both sides, even though they were taken 20 seconds apart. She likes attention. Also, there are Ari's legs. We need to fill in the holes from the screws with putty and repaint, but....we haven't yet.

Okay, so I love my new gate! And remember how the nice looking gate that we couldn't buy because it wouldn't fit was over $80? The materials for this one were....less than $15! So while we would have spent $60 or $70 on a new gate if we could have, I'm pretty glad now that we didn't have the opportunity. Because I can think of more exciting places than a gate to put that extra $45-55.

I am bad at getting buttons to work. I need to figure that out. anyway, linked with House of Hepworths' Hookin' Up with HOHChic on a Shoestring Decorating's Flaunt It Friday, and The Shabby Nest's Frugal Friday


Wednesday, October 10, 2012

DIY flashcards

Last week I posted a link to some free printable alphabet flashcards that I was thinking of using in my dining room. While my natural tendency IS sometimes to decorate as if I were a five year old, I decided these were probably a bit too juvenile for my dining room purposes (heck, I don't even HAVE a five year old right now, my youngest being nearly SEVEN). I thought black and white instead of so much color might be a little more grown up (and also a lot cheaper to print, since I could use the laser printer instead of the ink jet).

I also liked the idea of designing them myself and making several different sets that could be switched out from time to time. I made two sets last weekend: an animal alphabet set and a human anatomy set (for Halloween!).

(I feel a little ridiculous posting anything resembling a tutorial, since I assume anything vaguely crafty that I can manage to figure out, everyone else can, too, but....) Here's what I did:

1. Found free images to download and use. My main source for the alphabet set was The Graphics Fairy, and my source for the anatomy set (and a few of the images for the alphabet) was Clip Art Etc. I wanted vintage-y looking black and white line drawings in both cases. The Clip Art Etc site has nothing but that, as far as I can tell, and lots of it. Graphics Fairy is more diverse, with a great selection of color images, too and wider ranging subject matter, but if you're looking for a line drawing of a quahog for your Q card, Clip Art Etc. is your place.

So like this:


And this:


2. Downloaded a font to use from Fonts 101. I picked Colonial Dame because, you know, Boxy Colonial and all, and also because I thought it had a nice old-time schoolhouse vibe to it:


3. Went into Open Office and made the flashcards. I'm actually still playing around with the format, because they ended up printing kind of off center and that made cutting them out challenging. But I did a landscape page with two columns, centered and sized the images, and then added the text. I'd also like to find a way to have them print with guidelines for curved corners and a regular size when they print, so I can just cut along those.

4. Went to Target and found the cardstock selection woefully inadequate for my needs. They had either plain white or packs with, like, 5 sheets each of a gazillion different colors. What I really wanted was some kind of light brown color, maybe with a little texture to it. But I got white instead. I'm going to find the kind I want elsewhere and reprint I think (or at least do the next set on the different paper), but I didn't have the patience to wait.

5. Printed and cut! Cutting was more complicated than I wanted it to be, owing to the aforementioned formatting issues. Consider this flashcard set as something of a rough draft.

6. Strung twine across a wall of the dining room and hung up the flashcards with clothespins:


Linking with:
My Uncommon Slice of Suburbia


Tuesday, October 9, 2012

Busy weekend

I have not one, but TWO weekend projects to blog about this week. One of them I need to finish up before I can take the pictures (I would normally be too impatient to wait and just go ahead and post it as is, but it's a small enough project that I feel a little sheepish about not just FINISHING it already). And a Home Depot trip is required in order to finish it, so that one will wait until closer to the end of the week, I'm guessing.

Project #2 I could post about right now....except that I'm waiting on a new card reader to get here from Amazon before I can deal with pictures, so I'm operating on a bit of a delay. Truth be told, although I'm writing this post right now, I can't actually post it until said card reader gets here, because there is at least one picture that I need. Oh, wait, two. I forgot about project #3. It is tiny, so I'll put it in here.

Now let's randomly talk about blog traffic, because I find it fascinating. The picture of the metal chair from World Market that I posted back in my "kitchen musings" post? That seems to be my biggest single source of page hits. I have no idea why. I have no idea what people are even searching to get directed here. I wonder if it makes World Market sad that people come here to look at their chair and then I just talk about how much cheaper similar chairs at Overstock.com are....

And then I also get to look at the search terms that bring people here. Right now there are four things listed:

*gray hex floor tile
*use a dining room as a library
*nantucket fog benjamin moore
*old house fire pit

I must be a big disappointment to people searching the first two, since I don't HAVE any gray hex tile and I have only posted about deciding NOT to use my dining room as a library. I'm glad I'm coming up with searches for nantucket fog, as I spent a long time looking up other people's nantucket fog pictures before I picked it. And I'm a little perplexed by the last one...what difference does it make if your house is old when you make a fire pit? Are people concerned about building a fire pit that fits in aesthetically with their old house? Or are they worried that they need to take some extra safety precautions so they don't burn down their old house while toasting marshmallows one night?

(since writing that, another one showed up: "mood board octopus." awesome).

At any rate, if you have wandered here because of chairs or hex tile, feel free to leave a comment and tell me all about it. For, as I mentioned, I'm fascinated. Also, I like comments.

Okay, that little detour took longer than I expected. Moving along. Things that kept us busy this weekend, in addition to projects:

*wedding
*archery for kids
*shopping expedition
*dinner out with friends
*kid friend sleeping over Saturday night
*math club for Ari/Dave

And still! Projects! We are awesome. I am just going to keep pretending like we're going to maintain this level of accomplishing stuff-edness after the baby is born. Yep. Even though this is my 4th kid and I really should know better, I'm going to be one of those "this baby won't change our lives at all!" people. The baby is going to sit around cooing and gazing adoringly at us while we paint and build stuff. It's going to be GREAT. Ahem.

Shopping excursion included a trip to TJ Maxx. I haven't been to TJ Maxx in awhile and apparently I should never go again because I want everything they sell at TJ Maxx. I might have even bought a sweater for The Beagle.


Oops. Busted. I DID buy a sweater for her. Fiesta is a great dog because she doesn't mind wearing clothes.

I also looked at sheets and comforters and whatnot for the guest bed, which needs such things because it will be occupied by the in-laws come Thanksgiving. But I didn't buy anything yet, because I am indecisive.

Mostly, besides Fiesta's Halloween sweater, I bought stuff for my new.....fall centerpiece!


In the kitchen! I moved that twiggy pumpkin in after I decided it didn't work in the dining room. And then I added the pitcher (which a friend of Dave's family made for us for our wedding. Pretty, isn't it? There used to be a matching bowl. Alas, some child broke it at some point) and part of my too big haul of Trader Joe's gourds. But it still looked like a random collection of stuff on a table. And that made me sad. Also, I wanted a more generic fall/less Halloween display (it will probably/maybe move into the dining room after Halloween). So I added the table runner ($12.99, I believe) and the little leaf shaped rice bowls ($7.99) from TJ Maxx. Then filled the rice bowls up with Target dollar section acorns and pinecones. And now I'm not sad anymore! I'm still a little sad, actually, because they had a few nice leaf shaped placemats, and I wanted to get them for Thanksgiving, but they didn't have nearly enough left (we'll have 9 people for Thanksgiving, and I'd probably want 10 for symmetry purposes). There were maybe 3 or 4 there. Oh well.

As you can see, my new card reader arrived (yay cheap one day shipping with Amazon Prime!) so I'll get to work on recapping weekend projects soon!

Saturday, October 6, 2012

Dining room: acquisitions and musings

So, when we last left off, we were hoping to make the dining/schoolroom a little less traditional, a little more fun/whimsical/quirky/etc. Part of this plan involved globes. So look what I found at the thrift store today!


Okay, it is not the quirkiest globe in the world. It is, in fact, pretty....traditional. But I think when he gets together with all his other globe friends, it will be a fun globe party. Also, it was $12.99! Googling suggests it probably cost at least a couple hundred dollars new, so I'm pleased. You can spin it around OR upside down! 

I also picked up two maps, one of the world and one of Georgia. I need to paint the frames before I hang them, though.

And look who learned to make a prettier mood board! It still doesn't have links or captions or anything, because I made it on Olioboard, and apparently I'd need to pay $8.99 a month for fanciness like that. I don't think my mood board needs are great enough to justify that. So I'll go with left to right, top to bottom again. Also, I'm aware that Young House Love did a similarly themed mood board a few days ago--and, yeah, I totally snagged the ceramic airplane from there--but I really, honest to goodness, already had the whole vintage classroom-y thing floating around in my head before that. (See: globes!) So here you go: my whimsify the dining room plan.


This one's better than the last one, because some of the pictures are tilted!

1. Card catalog-esque cabinet from Target:  remember how I was thinking of moving the Old Lady Cabinet out to the foyer? This is what I want in its place. I'd rather have a real one, but I called up my mom (of A Classy Flea fame), and she tells me she doesn't come across them very often. And a quick perusal of Craiglist turned up a few, but all of them above my budget (cheapest one was well over $300, and most of them were closer to $1000). The Target one is $217. I'm not sure what I'll keep in it. It's supposed to be for CDs or DVDs, so maybe I'll actually keep some of those in there. And/or school supplies, little kitchen stuff that needs a home, ?????

2. Ceramic "paper" airplanes from Target: yes, these are the ones that were posted on YHL the other day, and I fell in love instantly. I envisioned a fleet of maybe 3 of them flying in one corner, suspended from the ceiling. But I don't really see anywhere where I could attach a wire. So maybe they could just hang out on top of my card catalog instead? $7.99 each

3. Pull-down map: $129.28 on Amazon. I like the idea of a pull-down map, just like old times, but I'm not sure I like it $129 worth. The regular old maps in frames I bought today were just $5 and $6. But maybe!

4.Free printable vintage alphabet art from Rook No. 17: I'm thinking twine strung across one wall, near the ceiling, with vintage flashcards attached with clothespins (we did this with all math flashcards in Ari's old room, and it always made me happy). Maybe even get a few different sets and swap them out periodically. And FREE printables sounds good, right? Look at that elephant--doesn't get any more whimsical than that! I've also thought about making my own with free clip art. And Etsy always has a bunch of cool ones for sale.

5. Classroom clock: $17.44 on Amazon. It's good to know what time it is.

6. Schoolhouse Electric pendant light fixture: wonder if I could sell the fancy chandelier for enough on Craigslist to pay for this light fixture ($239 plus another $70 for the rainbow shades)? Or close? Or half?

7. Vintage globe on Etsy: there are a gazillion of these for sale on there. I don't really plan on buying any of them, because I or my mother will find them cheaper at yard sales or thrift stores if we are patient. But I like this one because it has a random deer next to it. Maybe I need a forest of random animals hanging out with my globes.

And as for the displaced Old Lady Cabinet....Gus and I want a dollhouse. I think the top of the Old Lady Cabinet, first thing you see when you come in the house, would be a great place for that to live. And the foyer is right next to the dining/schoolroom, so plenty convenient for having all that school stuff inside it still.

Wednesday, October 3, 2012

Kid bath: progress

This is the room that I mentioned needed some very quick help shortly after we moved in, because it didn't have a mirror:


Clearly, it started out with a big ol' frameless builder grade mirror, which meant that just slapping a new mirror up there without at least painting wasn't an option....at least not unless we wanted to buy a huge new builder grade frameless mirror, exactly the same size (or even bigger!).

This meant I didn't have the luxury of months of second guessing and self doubt about paint colors; I realized we had some paint left over from Milo and Gus' room that would probably look good with those awesome light fixtures, and I went for it. The downside of my forced hasty decision making, though, was that it turned out there wasn't really quite enough of the paint left, and we wound up having to buy another quart of it to touch up (although we still haven't gotten around to that yet. but we have the paint!)

Okay, so here it is now. With the fancy light on:


Without the fancy light on:


The mirrors are from Homegoods. I liked the bronze-y color, but these were not my favorite mirrors. They were the only ones where I could find two identical, non-damaged specimans. It looks like I did not do the best job cleaning these. Oops. Cleaning them is really the kids' job, but I did a quick wipe down before I took pictures.

Shower curtain:


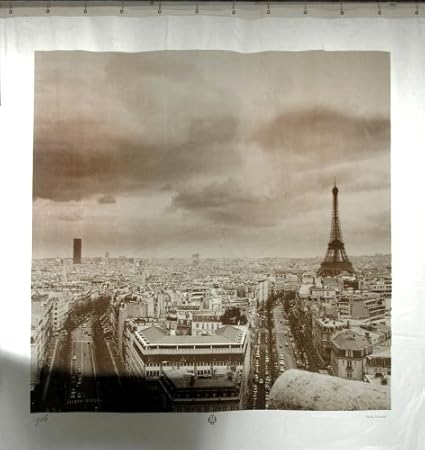
$10 from Target. Ari helped pick it out. What I really wanted, very specifically, was a sepia toned Eiffel tower shower curtain. I don't know why; it's just what I had in my head. I found this one on Amazon, but it was $99, and I don't spend $99 on shower curtains:

...and then this one, which was priced right, but had bad reviews and even looks cruddy in the picture:


What's up with that weird shadow at the bottom? Anyway, so it appears that the shower curtain I want doesn't really exist, so cheap skyline it is. It's not the Eiffel Tower, but it's still....architectural.

And then this is our floor:

Hex tile! It's the same hex tile that's in our bathroom, or at least in the little part that's not carpeted. I like hex tile, although this isn't a particularly exciting example of it.

Okay, so all we've really done in here is paint, hang mirrors, and buy a new shower curtain (oh, and a new toilet. But that needed to be done and wasn't especially exciting).

Still to do:
*touch up paint!
*art for the walls
*a new towel rack for hand towels
*invent sepia-toned Eiffel Tower shower curtain for under $30
*curtains
*do something or other about those cabinets.

ah, yes--the cabinets! Here is the problem: the counter top is cream colored. The tile and all the trim are white. I can paint trim, but I don't see either the counter or the tile (or the tub or toilet, for that matter) going anywhere any time soon.

Here's what I'm thinking, tentatively. The paint color is Martha Stewart's Saguaro. On the paint chip for Saguaro, Martha helpfully suggests a coordinating color for woodwork, called Garden Shed. Garden Shed is a lighter shade of green. So I'm thinking of painting the cabinets and all the trim in Garden Shed and then adding some oil rubbed bronze hardware, and then I'll have myself a bathroom. A bathroom with a counter that doesn't match the floor, but...baby steps. Alternatively, I could just go with a dark stain on the cabinets and leave the trim white. But I'm kind of into the idea of colored cabinets in one room.

Tuesday, October 2, 2012

Nursery update (yes, already!)

I have good news and bad news.

Bad news: you know the fabulous octopus drawer pulls? The ones that were going to be the best thing in the whole nursery? Yeah, well, I had them all in my cart ready to buy, when I decided to check and see how big they are. Turns out they're all of 4 centimeters. That's not very big. So small they had to tell how long they are using the metric system, because if they put it in inches it would just sound too puny to be believed.

So I went with plan two: whale pulls


The good part (but not the good news) is that these were only $2.80 each, nearly $10 less than the octopuses, in addition to several times bigger.

Good news: I have three prints ordered from Studio Tuesday, my new Etsy crush. I only found them the other night, when I needed to grab a couple more nursery things to make my collage look non-funny. But then I went back and looked today, and found that blue with orange sea creature prints seem to be something of a specialty for Studio Tuesday, and also they are super cute. And they have narwhals!