Wednesday, April 17, 2013
Abe at THREE months + Gus pics
It's a little bit incredible how big this baby is getting. He's chubby and delicious. He goes to bed by 7:30 every night, and doesn't wake up until at least 4 or 5 most mornings (and then goes back to sleep after nursing). He almost never takes naps longer than half an hour or so. He loves books, and kicks his legs and squeals in delight when I read to him. He's just starting to grab toys and shake them around. He studies people he doesn't know well intently for a few seconds, then gives them giant grins. We're all pretty into him.
I'm having a harder and harder time picking out pictures as he gets old enough to cooperate with photo shoots a bit more. No crying pictures this month! It was cloudy, so I had a bit of trouble getting a really sharp focus on some of these.
This month's seal picture. He's almost as long as the seal now!
More tummy time pics: cross eyed and drooling--very attractive, no?
I waited until later in the day (when the sun is on the nursery side of the room) and switched to my 50mm fixed lens for these next ones. I've tried using that lens before, but haven't had any luck until today (I think every other picture of Abe posted here has been with the kit lens, oddly). But these I'm pretty pleased with, particularly the last one:
Someday I'll get him to smile for the camera. He's very serious about portraiture, apparently.
And it was Gus' month for pictures. He's kind of at that all teeth stage right now--with his grown-up front teeth in, but still little. I love his one side of his face freckles:
A Weekend Full of Outside
I'll be honest: my primary goal for our yard and "landscaping" is that it look decent enough that the neighbors don't get together and plot ways to try to make us move out. When we walk the dogs, I spend a lot of my time pointing out yards that aren't any better than ours to Dave, to make myself feel better. Fortunately, we have no homeowner's association here, so there are at least a few other yards as incompetently maintained as ours. Not so fortunately, our house happens to be located amongst a little enclave of neighbors who all have a lawn service come out regularly to keep their grass shockingly green year round and their landscaping perfectly maintained. I suspect they probably do this just to make me feel bad.
We both find landscaping overwhelming. And too expensive to turn over to someone who knows what s/he's doing. So. We mow theweeds lawn. And we haven't found any nasty letters taped to our door yet. Since our house was empty and utterly neglected for nearly two years before we bought it, I think that so far everyone's still pretty thrilled that we're mowing the lawn.
But last weekend, or at least the first part of it, was so lovely that we had no excuse not to spend much of it outside, and much of that outside time doing long overdue yard work.
I ordered an electric hedge trimmer off of Amazon last week, and it got here on Friday:
....I'm not sure why no one ever told me how cheap electric hedge trimmers are. I would have bought one years ago! This one was $30. Of course some of them are way more expensive, and I have no idea what the difference is. But the $30 is So.Much.Better than whacking away at the edges with non-electric hedge trimmers, that I don't even care what features I might be missing out on. So fast!
It came in a hedge trimmer shaped box, which, for some reason, I found adorable:
Here it is! Electric!
I got the kind you have to plug in instead of a rechargeable one. Historically, we have bad luck with battery powered things. I think maybe we have some sort of battery-draining genes or something. But we also have a really long extension cord, so it all works out.
Here's Dave, all ready for yard work in his "Here Comes the Metric System" T-shirt. We're not sure what it means, but when I saw it at the thrift shop, I knew he had to have it:
(Googled: apparently it is both a Simpsons reference and a band).
Action shot of hedge clipper:
Okay, so, confession time: we had never trimmed these hedges before. I'm not sure what's up with these hedges; if we neglected the hedges at our old house for that long, we wouldn't be able to see the house anymore. These are some kind of magic hedges that stop growing when they get to the bottom of the windows. Or even shorter, in the case of the ones farther away from the front door. Anyway, here's what they looked like before we took the new hedge trimmers to them:
And here's the after:
It looks more like someone put them there on purpose now.
Trimming did not do much to help the dead ones, though:
We should probably get rid of those.
While Dave was electric trimming, I dealt with the honeysuckle-encrusted bush by the road. I forgot to take a before picture, but you know the honeysuckle's out of control when you ask your husband, in all seriousness, "there's a bush under there?!" There was! A remarkably healthy one, at that.
Here it is when I finally remembered to take a picture, about halfway through yanking honeysuckle off:
Gus was sad at first that I was ripping the honeysuckle out, but I explained that it was, despite all evidence to the contrary, not good for the bush. Once I was finished he announced cheerily, "that DOES look better! I'm never going to sit on that bush again!" Well....good.
Take a look what we're up against here:
Right across the street! And it looks like that ALL WINTER. Lawn service + chemicals=CHEATING, I say! (It's possible the neighbors aren't actually viewing this as a competition, as I apparently am. Which is good, because we're SO losing).
And then, right next door--I've taken this dramatic shot where you can actually see the line between their professionally manicured lawn and our, umm, "lawn:"
And why are their azaleas blooming? My azaleas aren't blooming! (At least I think I have azaleas. And I think those are azaleas over there).
But look! That's the bush that used to be completely covered with honeysuckle. So that's something, right?
Note: those neighbors with the blooming azaleas got a Bagster this weekend, just like a blogger! (I know they're not really just for bloggers, but I had never seen one in real life before--only reviewed on blogs). My observations: it looks very handy and all, but that thing's been there, keeping them from being able to park in their driveway, since Friday. When are they going to come get it?! We want to see the big truck!
Anyway, the neighbors can't claim we're not trying, because look what we had by the end of the weekend:
Also, do any of the neighbors have a baby like this in their yards?
I didn't think so.
Or a rock like this to welcome visitors to their houses?
So, to sum up, we did a lot of yard work this weekend, and we still have a lot left to do. Like:
*pull up dead bushes
*plant something nice to replace dead bushes (maybe some pretty edibles? I have a book about edible landscaping. I should read it!)
*do something about all those dandelions (weed and feed? I hear maybe that's what I want)
*get rid of weeds and put mulch down (I signed up with a site that matches tree services with people who need wood chips. Word is I'll get a call when one is working in our area and they'll bring us a truckload. Not the prettiest mulch, but it'll work, and it's free)
*trim hedges more than once every two years
*reseed lawn someday. (I have a hard time making myself spend money on lawns. I'm more of a food not lawns kind of gal)
*I am still talking about blueberries. But I haven't planted them yet.
And that's just the front yard!
I'm doubling up this week and doing my weekly kid/family photo diary thing in this post, too. Because one of the most exciting things we did this week was build a fire in the fire pit for the first time since fall. Friends came over, kids played, fun was had:
This post contains affiliate links. Well, one.
We both find landscaping overwhelming. And too expensive to turn over to someone who knows what s/he's doing. So. We mow the
But last weekend, or at least the first part of it, was so lovely that we had no excuse not to spend much of it outside, and much of that outside time doing long overdue yard work.
I ordered an electric hedge trimmer off of Amazon last week, and it got here on Friday:
....I'm not sure why no one ever told me how cheap electric hedge trimmers are. I would have bought one years ago! This one was $30. Of course some of them are way more expensive, and I have no idea what the difference is. But the $30 is So.Much.Better than whacking away at the edges with non-electric hedge trimmers, that I don't even care what features I might be missing out on. So fast!
It came in a hedge trimmer shaped box, which, for some reason, I found adorable:
Here it is! Electric!
I got the kind you have to plug in instead of a rechargeable one. Historically, we have bad luck with battery powered things. I think maybe we have some sort of battery-draining genes or something. But we also have a really long extension cord, so it all works out.
Here's Dave, all ready for yard work in his "Here Comes the Metric System" T-shirt. We're not sure what it means, but when I saw it at the thrift shop, I knew he had to have it:
(Googled: apparently it is both a Simpsons reference and a band).
Action shot of hedge clipper:
Okay, so, confession time: we had never trimmed these hedges before. I'm not sure what's up with these hedges; if we neglected the hedges at our old house for that long, we wouldn't be able to see the house anymore. These are some kind of magic hedges that stop growing when they get to the bottom of the windows. Or even shorter, in the case of the ones farther away from the front door. Anyway, here's what they looked like before we took the new hedge trimmers to them:
And here's the after:
It looks more like someone put them there on purpose now.
Trimming did not do much to help the dead ones, though:
We should probably get rid of those.
While Dave was electric trimming, I dealt with the honeysuckle-encrusted bush by the road. I forgot to take a before picture, but you know the honeysuckle's out of control when you ask your husband, in all seriousness, "there's a bush under there?!" There was! A remarkably healthy one, at that.
Here it is when I finally remembered to take a picture, about halfway through yanking honeysuckle off:
Gus was sad at first that I was ripping the honeysuckle out, but I explained that it was, despite all evidence to the contrary, not good for the bush. Once I was finished he announced cheerily, "that DOES look better! I'm never going to sit on that bush again!" Well....good.
Take a look what we're up against here:
Right across the street! And it looks like that ALL WINTER. Lawn service + chemicals=CHEATING, I say! (It's possible the neighbors aren't actually viewing this as a competition, as I apparently am. Which is good, because we're SO losing).
And then, right next door--I've taken this dramatic shot where you can actually see the line between their professionally manicured lawn and our, umm, "lawn:"
And why are their azaleas blooming? My azaleas aren't blooming! (At least I think I have azaleas. And I think those are azaleas over there).
But look! That's the bush that used to be completely covered with honeysuckle. So that's something, right?
Note: those neighbors with the blooming azaleas got a Bagster this weekend, just like a blogger! (I know they're not really just for bloggers, but I had never seen one in real life before--only reviewed on blogs). My observations: it looks very handy and all, but that thing's been there, keeping them from being able to park in their driveway, since Friday. When are they going to come get it?! We want to see the big truck!
Anyway, the neighbors can't claim we're not trying, because look what we had by the end of the weekend:
Also, do any of the neighbors have a baby like this in their yards?
I didn't think so.
Or a rock like this to welcome visitors to their houses?
So, to sum up, we did a lot of yard work this weekend, and we still have a lot left to do. Like:
*pull up dead bushes
*plant something nice to replace dead bushes (maybe some pretty edibles? I have a book about edible landscaping. I should read it!)
*do something about all those dandelions (weed and feed? I hear maybe that's what I want)
*get rid of weeds and put mulch down (I signed up with a site that matches tree services with people who need wood chips. Word is I'll get a call when one is working in our area and they'll bring us a truckload. Not the prettiest mulch, but it'll work, and it's free)
*trim hedges more than once every two years
*reseed lawn someday. (I have a hard time making myself spend money on lawns. I'm more of a food not lawns kind of gal)
*I am still talking about blueberries. But I haven't planted them yet.
And that's just the front yard!
I'm doubling up this week and doing my weekly kid/family photo diary thing in this post, too. Because one of the most exciting things we did this week was build a fire in the fire pit for the first time since fall. Friends came over, kids played, fun was had:
This post contains affiliate links. Well, one.
Monday, April 15, 2013
Dave Tells Us How to Build a Bench with Shoe Storage
Dave's on a roll with this whole writing posts thing! I'm pretty sure this post has the distinction of the most pictures of any post EVER! Pictures are helpful when you're trying to build stuff.
This project was pretty fun. Since we have plans to build a farmhouse table for the kitchen some time (sooner rather than later, hopefully), this was a good warm-up project. While I've built things out of wood before (fence, stairs, baby gate), this bench was the first piece of furniture I've ever done. I really wanted this to look nice, even under close inspection, and I think I succeeded from certain specific angles. "We can just make sure that's the back" was something Gretchen told me maybe five times throughout the process. I finally had to remind her that only one of the sides can be in the back ...
Gretchen got Ana White's book for Christmas: The Handbuilt Home: 34 Simple Stylish and Budget-Friendly Woodworking Projects for Every Room
...and we used the farmhouse bench (project #11) as a guide. I had to modify the plans a bit to fit our needs, though. Firstly, the bench in the book is 59.5" wide and the foyer wall is only 53.5" wide. Secondly, the shelf under the bench in the book is narrower than the bench top. This allows for a few inches of overhang on either side of the bench legs and room for some creativity in the trim. Since our bench needed to be wide enough to hold four shoe baskets, I opted to eliminate the overhang, push the legs out to the full length of the bench top, and maximize shelf space. Finally, I wasn't wild about the curly shape that was cut out at the bottom of the legs, so I changed it to be a simple triangle shape. Added bonus, straight lines are easier to cut!
After reading through the plans in the book, I came up with the following diagram. It's pretty rough and on a piece of old envelope (as is most everything else that I write), but it helped me come up with my cut list. It is, obviously, not drawn to scale. I didn't have enough envelope to make it long enough. So before you ask, no, my bench is not 6 feet tall.
Cut List
1x12 pieces:
One 53.5 inch (bench top)
One 52 inch (shelf)
Two 17.25 inch (side legs)
1x3 pieces:
Two 53.5 inch (top trim)
1x2 pieces:
Two 50.5 inch (shelf trim)
Four 15.5 inch (side trim)
This translated into the following shopping list:
Two 6-foot 1x12s
Two 6-foot 1x3s
Three 6-foot 1x2s
Other materials used:
Molding & Trim Nails (size 8D, whatever that means) that are 2" long
Wood glue
Sandpaper
Tools used:
carpenter square
tape measure
circular saw
jigsaw
pocket hole jig (I have a Kreg jig)
clamps (Kreg 2-3/4-in face clamp and Kreg right angle clamp)
power sander
hammer
power drill
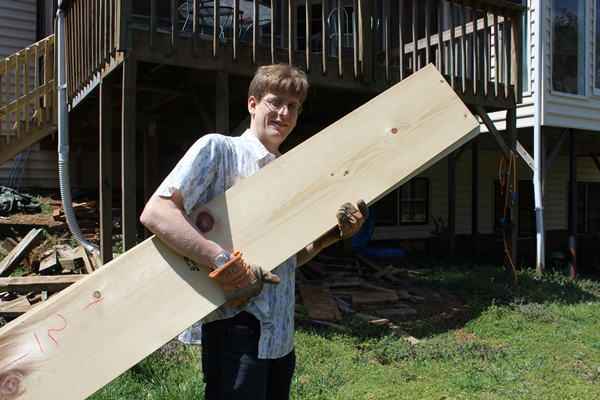
To the workbench! Ari, my eldest son, was my helper on this project and took most of the pictures. Here's me carrying the 1x12s to the basement.
You've heard the saying "Measure twice, cut once"? I'm more of a measure four times, cut once kind of guy.
This project has taught me that it is nigh impossible to cut a straight line with a handheld saw. A neighbor loaned me his miter saw when I was building the fence and I was really missing it here. Eventually, I figured out a way to cut nice straight lines with a guide, but this poor bench got maybe two of these guided cuts. Most of them are a little wobbly upon close inspection. Learning experience!
(I just googled "cutting a straight line with a circular saw" and found that I'm not the first to discover the trick. This video explains it pretty well.)
Here I am inspecting a wobbly cut. I am displeased.
Another job Ari assigned himself during this project was to label each piece of wood I cut. While it was a little silly, it was not entirely pointless. I wasn't going to get these few pieces mixed up (only four 1x12 pieces on the first stage), but I can see this being a useful technique with more complicated projects.
After the bench top, shelf, and two legs were cut, I measured and cut the (simplified) design at the bottom of the legs. The distance from the corner of the wood to the base angles of the triangle are 3/4 inch. The height of the triangle is 4 inches. You can see a small mark at the bottom where I measured the midpoint. I then used the carpenter square to find the apex point of the triangle.
After cutting some wobbly lines with the circular saw, you'll see that the triangle is not detached yet.
If I cut farther, the top of the cut would go into the leg. Ugly! Structurally unsound! This is when the jigsaw comes in handy. Apparently, Ari was off labeling pieces of wood when I was using the jigsaw, so you'll have to use your imagination. Incidentally, I learned this technique when building the deck stairs last fall. This guy talks about it at 7:55 if you want to see it done.
After the 1x12s were cut, we broke out the Kreg jig to get the pocket holes ready for some fine wood joinery. Joinery is my new favorite word. I had used my jig once before to build the very simple garden bed a few weeks back, just to get a feel for how it works, so we were ready to tackle the pocket holes on the bench. We made three holes spaced 4 inches apart per joint. We used 1 1/4 inch screws, as suggested by Ana White. (I actually tested a pocket hole joint with 1 1/2 inch screws on some scrap 1x4s and, sure enough, the tips of the screws poked out. 1 1/4 inch is the way to go when joining 1 by's at right angles with the Kreg jig.
Now would be a good time to mention that I held off on sanding the cut pieces of wood until the bench was assembled. I say this now, because sanding at this stage would have been appropriate. After the wood is joined, there are tough angles to reach with a sander. So I wouldn't spend a ton of time getting everything super smooth before assembling, but a quick sanding the rougher parts would have made future sanding more efficient.
Unfortunately, Ari did the drilling. This meant that he was not available for the documenting. I fell down on the job and we have no pictures of Ari making the pocket holes. But he did this thing where he mimicked the sound of the power drill while he was drilling. I appreciate Ari's sense of humor. Fortunately, if you're really itching to see one of my sons drilling pocket holes, you can see Gus doing so on the garden bed tutorial.
The garden bed didn't require super flush joinery, but as I mentioned, I wanted the bench to hold up to fairly severe scrutiny. This required some sort of tool to help keep everything in place before the screws were doing that job. Enter the right angle clamp!
Once two of the screws were in place, the clamp is removed and the final screw is drilled in.
I remembered to take a picture! We used the weak old battery powered drill that holds a charge for 5 minutes for this part. (The corded drill is not adjustable and is better suited for making holes.) The torque was set on a medium low setting to avoid screw stripping. I didn't remember to glue these joints, but they seem solid without it. Fine wood joinery!
Ari hasn't seen, but would enjoy, the "I'm crushing your head" skits from Kids in the Hall.
So here's the bench thus far.
It looks like a passable bench, but when you sit on it, the top sags. So turns out the trim isn't just for looks, it serves a stabilizing purpose. Back to the circular saw and a few more wobbly cuts. Before gluing and nailing the trim on, I decided to predrill the nail holes on the trim. I figured that would make it easier to keep the trim in place when hammering. I didn't know the best size hole to make, so with some scrap wood and some trial and error, I found a hole size I was comfortable with.
You can see that these nails have practically no head, so it was important to make the hole small enough so that the wood wouldn't just slip off. The 3/32" hole probably would have worked fine, but I opted for the 7/64" drill bit.
I was careful to mark where the holes would go ... measure four times, drill once. The nails were going through the trim and into the 3/4 inch side of the 1x12s. So I used the carpenter square and tape measure to evenly(ish) space 7 nail holes in the top trim pieces, 6 nail holes in the shelf trim pieces, and 2 nail holes in the side trim pieces - each hole being 3/8 inch from the edge of the trim (half of 3/4 inch).
Then to glue and nail the trim on.
(Ari went through a period during this process where he got very concerned about copyright laws and wanted to cover up every single logo with some painter's tape.) When nailing trim on, it is possible to bend the wood so that the wide surface of the bench top (or shelf or leg) is forced flush with the thin surface of the trim. Holding that in place when hammering each nail will help with some fine wood joinery. You may notice the tiny hammer I'm using. It's the kids'. I didn't feel like going upstairs to get the man-sized hammer. I think I preferred the little hammer for this job, actually - it's better for accuracy and I didn't need, or even want, much power.
Once the trim was on, I wanted to neaten up the joints. In two places, there was significant mis-measuring where the trim went past the bench by 1/8 inch or so. Fancy pants me decided to pull out the circular saw to trim off the excess. The first cut was a bit of a disaster, as it ate into the part of the bench I wanted to keep. I was much more careful with the second cut and things worked out better. I was pretty depressed about that first cut, but was pleased to see how several minutes of power sanding can erase such mistakes. I didn't get any before shots, but this is what the corrected edge looks like.
Here are a few more close-ups of fine and not so fine wood joinery.
I was extremely pleased with the efficiency of my wood purchasing. Here is the completed bench with all of the scrap wood. Of particular note are the itty 1x12 slices on the bottom right. Apart from the triangles (which can't be counted as waste, I think), this was the only leftover 1x12.
So there you have it! My first piece of furniture.
He forgot to mention the parts where he sanded it with the power sander and stained it (the color is "weathered gray"). He did all of that, and then it looked like this:
This post contains affiliate links
This project was pretty fun. Since we have plans to build a farmhouse table for the kitchen some time (sooner rather than later, hopefully), this was a good warm-up project. While I've built things out of wood before (fence, stairs, baby gate), this bench was the first piece of furniture I've ever done. I really wanted this to look nice, even under close inspection, and I think I succeeded from certain specific angles. "We can just make sure that's the back" was something Gretchen told me maybe five times throughout the process. I finally had to remind her that only one of the sides can be in the back ...
Gretchen got Ana White's book for Christmas: The Handbuilt Home: 34 Simple Stylish and Budget-Friendly Woodworking Projects for Every Room
After reading through the plans in the book, I came up with the following diagram. It's pretty rough and on a piece of old envelope (as is most everything else that I write), but it helped me come up with my cut list. It is, obviously, not drawn to scale. I didn't have enough envelope to make it long enough. So before you ask, no, my bench is not 6 feet tall.
Cut List
1x12 pieces:
One 53.5 inch (bench top)
One 52 inch (shelf)
Two 17.25 inch (side legs)
1x3 pieces:
Two 53.5 inch (top trim)
1x2 pieces:
Two 50.5 inch (shelf trim)
Four 15.5 inch (side trim)
This translated into the following shopping list:
Two 6-foot 1x12s
Two 6-foot 1x3s
Three 6-foot 1x2s
Other materials used:
Molding & Trim Nails (size 8D, whatever that means) that are 2" long
Wood glue
Sandpaper
Tools used:
carpenter square
tape measure
circular saw
jigsaw
pocket hole jig (I have a Kreg jig)
clamps (Kreg 2-3/4-in face clamp and Kreg right angle clamp)
power sander
hammer
power drill
To the workbench! Ari, my eldest son, was my helper on this project and took most of the pictures. Here's me carrying the 1x12s to the basement.
You've heard the saying "Measure twice, cut once"? I'm more of a measure four times, cut once kind of guy.
This project has taught me that it is nigh impossible to cut a straight line with a handheld saw. A neighbor loaned me his miter saw when I was building the fence and I was really missing it here. Eventually, I figured out a way to cut nice straight lines with a guide, but this poor bench got maybe two of these guided cuts. Most of them are a little wobbly upon close inspection. Learning experience!
(I just googled "cutting a straight line with a circular saw" and found that I'm not the first to discover the trick. This video explains it pretty well.)
Here I am inspecting a wobbly cut. I am displeased.
Another job Ari assigned himself during this project was to label each piece of wood I cut. While it was a little silly, it was not entirely pointless. I wasn't going to get these few pieces mixed up (only four 1x12 pieces on the first stage), but I can see this being a useful technique with more complicated projects.
After the bench top, shelf, and two legs were cut, I measured and cut the (simplified) design at the bottom of the legs. The distance from the corner of the wood to the base angles of the triangle are 3/4 inch. The height of the triangle is 4 inches. You can see a small mark at the bottom where I measured the midpoint. I then used the carpenter square to find the apex point of the triangle.
After cutting some wobbly lines with the circular saw, you'll see that the triangle is not detached yet.
If I cut farther, the top of the cut would go into the leg. Ugly! Structurally unsound! This is when the jigsaw comes in handy. Apparently, Ari was off labeling pieces of wood when I was using the jigsaw, so you'll have to use your imagination. Incidentally, I learned this technique when building the deck stairs last fall. This guy talks about it at 7:55 if you want to see it done.
After the 1x12s were cut, we broke out the Kreg jig to get the pocket holes ready for some fine wood joinery. Joinery is my new favorite word. I had used my jig once before to build the very simple garden bed a few weeks back, just to get a feel for how it works, so we were ready to tackle the pocket holes on the bench. We made three holes spaced 4 inches apart per joint. We used 1 1/4 inch screws, as suggested by Ana White. (I actually tested a pocket hole joint with 1 1/2 inch screws on some scrap 1x4s and, sure enough, the tips of the screws poked out. 1 1/4 inch is the way to go when joining 1 by's at right angles with the Kreg jig.
Now would be a good time to mention that I held off on sanding the cut pieces of wood until the bench was assembled. I say this now, because sanding at this stage would have been appropriate. After the wood is joined, there are tough angles to reach with a sander. So I wouldn't spend a ton of time getting everything super smooth before assembling, but a quick sanding the rougher parts would have made future sanding more efficient.
Unfortunately, Ari did the drilling. This meant that he was not available for the documenting. I fell down on the job and we have no pictures of Ari making the pocket holes. But he did this thing where he mimicked the sound of the power drill while he was drilling. I appreciate Ari's sense of humor. Fortunately, if you're really itching to see one of my sons drilling pocket holes, you can see Gus doing so on the garden bed tutorial.
The garden bed didn't require super flush joinery, but as I mentioned, I wanted the bench to hold up to fairly severe scrutiny. This required some sort of tool to help keep everything in place before the screws were doing that job. Enter the right angle clamp!
Once two of the screws were in place, the clamp is removed and the final screw is drilled in.
I remembered to take a picture! We used the weak old battery powered drill that holds a charge for 5 minutes for this part. (The corded drill is not adjustable and is better suited for making holes.) The torque was set on a medium low setting to avoid screw stripping. I didn't remember to glue these joints, but they seem solid without it. Fine wood joinery!
Ari hasn't seen, but would enjoy, the "I'm crushing your head" skits from Kids in the Hall.
So here's the bench thus far.
It looks like a passable bench, but when you sit on it, the top sags. So turns out the trim isn't just for looks, it serves a stabilizing purpose. Back to the circular saw and a few more wobbly cuts. Before gluing and nailing the trim on, I decided to predrill the nail holes on the trim. I figured that would make it easier to keep the trim in place when hammering. I didn't know the best size hole to make, so with some scrap wood and some trial and error, I found a hole size I was comfortable with.
You can see that these nails have practically no head, so it was important to make the hole small enough so that the wood wouldn't just slip off. The 3/32" hole probably would have worked fine, but I opted for the 7/64" drill bit.
I was careful to mark where the holes would go ... measure four times, drill once. The nails were going through the trim and into the 3/4 inch side of the 1x12s. So I used the carpenter square and tape measure to evenly(ish) space 7 nail holes in the top trim pieces, 6 nail holes in the shelf trim pieces, and 2 nail holes in the side trim pieces - each hole being 3/8 inch from the edge of the trim (half of 3/4 inch).
Then to glue and nail the trim on.
(Ari went through a period during this process where he got very concerned about copyright laws and wanted to cover up every single logo with some painter's tape.) When nailing trim on, it is possible to bend the wood so that the wide surface of the bench top (or shelf or leg) is forced flush with the thin surface of the trim. Holding that in place when hammering each nail will help with some fine wood joinery. You may notice the tiny hammer I'm using. It's the kids'. I didn't feel like going upstairs to get the man-sized hammer. I think I preferred the little hammer for this job, actually - it's better for accuracy and I didn't need, or even want, much power.
Once the trim was on, I wanted to neaten up the joints. In two places, there was significant mis-measuring where the trim went past the bench by 1/8 inch or so. Fancy pants me decided to pull out the circular saw to trim off the excess. The first cut was a bit of a disaster, as it ate into the part of the bench I wanted to keep. I was much more careful with the second cut and things worked out better. I was pretty depressed about that first cut, but was pleased to see how several minutes of power sanding can erase such mistakes. I didn't get any before shots, but this is what the corrected edge looks like.
Here are a few more close-ups of fine and not so fine wood joinery.
I was extremely pleased with the efficiency of my wood purchasing. Here is the completed bench with all of the scrap wood. Of particular note are the itty 1x12 slices on the bottom right. Apart from the triangles (which can't be counted as waste, I think), this was the only leftover 1x12.
So there you have it! My first piece of furniture.
He forgot to mention the parts where he sanded it with the power sander and stained it (the color is "weathered gray"). He did all of that, and then it looked like this:
This post contains affiliate links
Subscribe to:
Posts (Atom)