Monday, September 23, 2013

Halloween Tree with a Tiny Banner


Remember a few weeks ago when I posted about my mini kitchen makeover that included all sorts of blog standards like a chalkboard wall, a farmhouse table, and Revere Pewter walls? Well. I decided to keep it up by doing a craft project involving a banner AND book pages!

And I can totally see why everyone wants to make tiny little banners and things out of book pages, because OMG. This is the most adorable thing I've ever done. In a spooky sort of way, I mean.

Here. I couldn't decide, so I made two pictures with words for this one:


I didn't know which one to lead with, because this is like two projects in one! More for your money: that's what you get here at Boxy Colonial.

Anyway. As evidenced by the raven-embellished planter boxes we made last week, we're gearing up for an Edgar Allan Poe inspired Halloween around these parts. Well, mostly just The Raven. Next year we're getting all Tell Tale Heart and ripping up floor boards! Not really.

I have a whole Halloween display on my buffet with a couple of other crafty-ish projects to show you later this week, but today you only get to see my Halloween tree. It will take me long enough to talk about that part. BELIEVE me.

I found this tree made out of twisted black metal at the thrift store a few weeks ago. Judging from that price tag, I paid $3.03 for it:


Then it sat around for awhile and I tried to decide what to do with it. It has these round things on it that I assume are supposed to hold candles. But I didn't put candles on it.

Then I spotted these mini purple lights at Target the other day:


$3.50, so we're up to $6.53 invested in this thing. I'll just go ahead and say, so that I don't forget later, that the only other thing I bought was some twine for something like $1.25, so we'll round up and call it an $8 project.

I wrapped the lights around the tree and was pleased with the results. And I already had the beginnings of a banner plan swirling around in my head, but I wanted something to hang from it, too. Then, when I was going through the Halloween box in the basement, I found this!


Not the orange kitty, the other thing. I have no idea why I bought this to start with; I can't remember ever doing anything with it. But there it was, festooned with black and orangey gold plastic balls.

So I disassembled it and hung the balls on the tree. And stood back to admire the results. Now all it needed was a tiny little banner.


Ideally I would have cut up some Poe for this, but I didn't have any handy that I didn't mind destroying. So instead I went with this falling apart copy of All the King's Men (don't worry; I have another, not falling apart copy), a book I like to refer to as my favorite book that I've never managed to make it all the way through. Ahem.


It was not a very spooky book, but that Robert Penn Warren did have a bit of a potty mouth, so no one should look too carefully at the text behind my nevermore letters.

I just drew a little banner shape and then folded the pages so that I could cut a bunch out at once:


I just did the letters freehand, figuring it would not be too arduous since they're so tiny:


I fretted for awhile about how I was going to string the letters together. I kept thinking I'd need to punch holes in them and put the string through that and that the book pages were too fragile to handle it....and then I remembered: what can do anything? Scotch tape can do anything! I bought the aforementioned black twine:
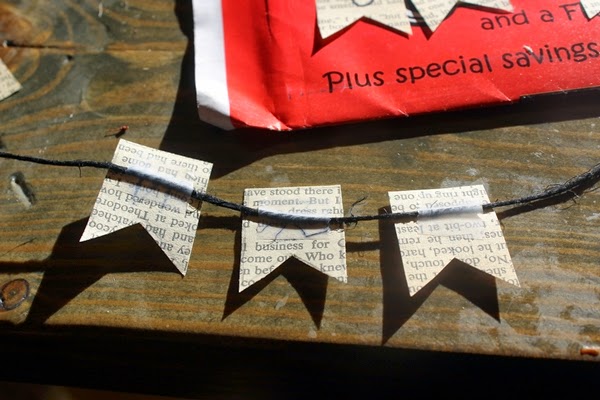

And then I flipped it over, ready to be dazzled by my own handiwork.


Umm. This is why I don't sew. Exceptionally poor spatial reasoning skills. Fortunately, they all came off without ripping.


Much better!

Then I put it on my tree, and it looked so beautiful I almost cried. I love it. I'm going to decorate everything in my house with a tiny banner. Like on my kitchen chairs, I'll just put tiny banners that say "chair." Or whatever.


I haven't plugged in the extension cord yet, so I had to drag it into the kitchen to take this one:


Linking with:


The Lettered Cottage

Thursday, September 19, 2013

Abe at Eight Months


Abe turned eight months old on Tuesday. Tuesdays are the days we run around like mad all day, and, of course, it was cloudy...I almost bagged the whole thing and waited for Wednesday, but I decided to take a few minutes Tuesday evening and see what I could get. And then I took a few more Wednesday (when it was STILL cloudy) for good measure. So in some of these pictures, Abe is actually eight months and ONE DAY old.

This was a very busy month in baby development. When I posted his pictures last month, he was very, very close to crawling. He had it down within a week or so after hitting seven months, and now there's no stopping him. He also gets up on his hands and feet and crawls that way sometimes instead of on his knees. He's pulling up on everything all the time. He claps! Today I could have sworn he said "doggy" very clearly twice, but I can't get him to do it on command, so it's hard to know for sure. But he's doing lots of fun babbling. He's not so quick with the smiles anymore for people he doesn't know well, but he stares intently at them for the longest time and then occasionally decides to bestow a toothy grin. He started his Music Together classes a few weeks ago, and his teacher says he's the best one in his class. I'm just kidding. She didn't say that at all. But I can tell that's what she's thinking ;).

More pictures!


Best toothy grin I've ever gotten. Too bad there wasn't more light so I could have gotten it a little sharper. Five teeth now. He's working on number six, and it's keeping us all from sleeping nearly as much as we'd like. Stupid tooth! Why do they need so many anyway?!


My baby is a goofy baby.


I put this one in for the arched eyebrow. He does that a lot.


Crawling: mastered! He can even do it one handed when he needs to pick up something to put in his mouth. Which is always.


Still time to enter the big giveaway for a $200 Amazon or Home Depot gift card courtesy of Coupons.com. Here!

Wednesday, September 18, 2013

The Ikea Crib Eight Months Later: A Bit of Babyproofing


Abe's crib is the Sundvik crib from Ikea. As I've mentioned before, this selection was motivated primarily by price. The crib is $119, and I like the way it looks just fine. It has clean simple lines that fit in well with the nursery. It's not flashy or exciting, but it does its job without drawing attention to itself.

I wasn't interested in spending more on a crib for a few reasons:

1. Cribs rarely excite me, no matter how much they cost. I just....don't care that much about cribs. They aren't like chairs. I love chairs.

2. I had no idea whether Abe would actually USE his crib much at all. Ari loved the crib. Milo hated sleeping, but didn't much care where he was doing it. Gus HATED the crib with a fiery passion and slept in bed with us until he was three. So, you know, I'm pretty open minded about baby sleeping arrangements. I just want everyone to sleep; I don't care where it happens.

3. Even if babies sleep in cribs, they don't do it for very long, relatively speaking. Abe's my last baby; he and some kid from Craigslist are the only ones who are going to use this thing. I'd rather save my money for something that will stick around longer.

So those are all my reasons for buying the crib to start with.

When we put the crib together, my only concern, looking forward, was that the directions made it look like we'd pretty much need to take the whole damn thing apart again to lower the mattress down once Abe started pulling up on things. But, of course, at the time, that seemed too impossibly far off to even worry about.

But then, somehow, he got bigger. Big enough to start trying to pull up on things. So, a few weeks ago, we had to undertake the daunting task of lowering the mattress. I thought I would report back on this process to make my Ikea crib analysis complete.

Turns out it was pretty easy.

We didn't have to take the whole crib apart; we just had to take one end off and then slide the bottom that the mattress rests on out and put it back in the lower position. Like this:


When we went to this, we learned that we had brilliantly thought to store the instruction manual AND the allen wrench under the mattress so that we'd be able to find them when the time came to lower the mattress:


Our minds were so sharp back before we had a fourth kid!

We opted not to put them back under there once we lowered the mattress, by the way, lest Abe somehow figure out a way to pry up the mattress while sitting on it and pull the choking hazard tools out from under there. Better safe than sorry. (note to future self: they're in the top drawer of Abe's changing table/dresser)


We turned it on its side like so.


Unscrewed all these little things.


And put the bottom back in at the lower position (there are only two positions). This part--fitting the little things into the little thing places--was the hardest part. But not bad. I would say the whole process took the two of us 20 minutes? With a baby crawling around distracting us.

The sad part is that we had to retire the crib skirt I made to match the curtains. I was going to just use heavy duty double sided tape and tape it farther back on the mattress board...but once the board was lowered the gap between it and the side of the crib was too tight to wiggle the fabric through. I might have been able to do it had I been willing to spend more time and get more frustrated. Instead, I'm thinking of making a couple of pillows or something.

I took this picture of it all folded up to commemorate it:


So my take on the crib after eight months of use and after the arduous mattress lowering? Yep, still good with it. And I can even still reach to put Abe down when he's asleep. I was worried I'd have to just drop him the last half a foot or so. And that might wake him up. But no! My arms are just long enough!

Just in time!


(okay, I stood him up there. But this was maybe a month ago. He's pulling up on everything now)

Monday, September 16, 2013

Blogger Fall Project Extravaganza: DIY Planter Boxes + a Giveaway with Coupons.com

Coupons.com provided us with a Home Depot gift card to pay for the materials we used for this project. 


I was very excited when I got the chance to participate in this fall project collaboration, in large part because it came with a deadline, and me and deadlines get along very well. Me and "finish it whenever you get a chance, self: I know how busy you are!" are good friends, too, but not as productive friends. We're the kind of friends who sit around and watch TV all night and drink more wine than we meant to.

So Coupons.com was kind enough to send a  few of us bloggers gift cards to Home Depot or Amazon to use to complete a fall project. Did you know that you can use Coupons.com to search for all kinds of discounts to a gazillion different stores, not just for grocery coupons? I'd had no idea, although I'd been using it and loving it for years for printing out grocery coupons. But, yeah, it's all right there! Printable grocery coupons AND coupon codes and discounts for places like....well, like Home Depot and Amazon. And thousands of other places (not really a gazillion. That's not a real number).

My first vision of this post was a wee bit more ambitious than what you see before you. It involved a very elaborate entire front porch makeover, complete with a painted door and a house number plaque and maybe a DIY door mat of some sort for good measure.

Then we realized that thinking we'd be able to get all that done was completely nuts, and we made these planter boxes and called it a day. Really, we're still planning on all the other stuff (and the leftover paint from this project will play into it, but I won't say exactly where, so as to leave some surprises). But time goes by surprisingly quickly, and it's been way too hot and humid to paint a door anyway.

I'm not going to give a detailed tutorial for how we made the planters, because we pretty much followed these plans from Ana White. Only we didn't use the finials, mostly because we couldn't find ones that looked like the ones they used, and we were kind of undecided about whether we wanted them or not anyway, so that decided for us.

These were pretty simple to put together and would be a great first project for someone who just got a Kreg Jig and is looking for something to knock out in a day. That said, we managed to mess them up a little. Dave made a diagram to show how:

 This is how the planter was supposed to look....with the side boards lined up with the inside of the corner posts.
Instead, it wound up more like this. This was not just an aesthetic problem, it meant that the slats for the bottom were too short to fit. So Dave had to hammer in an extra little board for them to rest on:


But then everything was okay.

I even helped with the woodworking part of this a little. Dave was headed out to the store, and I said, "maybe I'll work on these a little!" My little part involved screwing together some already Kreg Jigged boards. Dave showed me how to do it, and, by the time he was ready to leave, it was not going terribly well. "Do you feel like you're getting the hang of it?" he asked.

"No, I wouldn't say that," I said.

"Okay, bye," said Dave.

"What do we do when I completely screw this up?" I asked him.

"We buy more wood," he told me.

"I kind of have a deadline here," I said, "don't you think it's a little irresponsible of you to let me completely mess up my project when I have a deadline?"

But it all worked out, and we didn't even need more wood.

I wanted to do some kind of seasonal fall/Halloween design on these, with the idea that they can then be turned around to the blank side for the rest of the year and be season-neutral. I'm planning on a Edgar Allan Poe/Raven heavy theme for Halloween around here, so ravens seemed like a natural choice.

I considered making a stencil, but I have an irrational fear of stenciling, so I ended up sketching a raven outline and then tracing it onto the boxes. I just googled images of ravens; they're all black, so it's pretty easy to make them outline-y.

Both the paint for the boxes and for the ravens is semi-gloss exterior latex from Behr. I picked a lighter gray for the boxes and then a deep charcoal gray from the same card for the ravens. I did one coat of the light gray, let them dry, then set to work on the ravens.


After I traced around them with pencil, I filled them in with the two coats of the dark gray paint (using little craft brushes). It occurred to me far too late that I probably should have had them facing opposite directions. Oh well.

The next day, when everything was dry, we hauled them out onto the front porch, lined them with cardboard:


Then filled them up (with mulch from our never ending mulch pile and then with a combo of potting soil and compost on top) and stuck some mums (which were on sale, four for $10 at Home Depot) in there. And then they looked like this:


(I was going to show you what they look like turned around and de-Halloween-ified, but turns out they're really heavy once they're full of dirt. I'm not turning them around just for a picture. Take my word for it: no ravens on the other side!)

Now try to picture it with a freshly painted door and shiny new house numbers!

And now for some EXTRA FUN! There are eight other bloggers who are also showing off their fall projects today. I've seen a few sneaky instagram/facebook glimpses of some of them, but for the most part I have no idea what they are, and I'm very excited to see them all. So make sure to hop over to these other blogs and see what everyone else has come up with.

Here we all are, looking very happy about our fall projects:


....and here's where you can find everyone:


But wait! There's MORE! A giveaway, to be specific. Someone's going to win a $200 gift card to (your choice) Home Depot or Amazon. And between those two places, you can find pretty much anything in the whole world.

You can enter below (up to 10 times!) This giveaway is only open to US residents, and it will close at 12 AM on September 23.

a Rafflecopter giveaway

Sharing with:
The Inspiration Gallery

Thursday, September 12, 2013

More About the Library

So yesterday I left off by saying I couldn't yet tell you about my potential future plans for the library because I had to go watch Doctor Who (I didn't mention that it was Doctor Who. It was). Today I've decided to do something extraordinary and actually write the future post I promised.

Oh, first off: I realized I forgot to mention that we did this when we were moving stuff around in the library:


There's that beagle again. That round rug used to be under the chair in the library. It doesn't work in there anymore, so I tried moving it into the foyer, where my overgrown doormat was going to live if it were bigger.

It's super practical there because I can toss it in the washer easily (and have many times). It's cushy, and the dogs love it. I don't think it will stay there forever, but I'm happy with it for now.  I think it's supposed to be pushed closer to the door than it is in that picture; it's too lined up with the other rug. But I cut down the mat under it go under the blue and purple rug, so now it kind of moves around a lot anyway.

But back to the library with its teeny loveseat:


As I mentioned yesterday, more seating was one of the goals when we bought the loveseat and, if you pull out the chairs because they're suddenly too damn big, you don't get that. I'm thinking about two small chairs on either side of the loveseat and then a low coffee table.

Like maybe these chairs:


I haven't seen them in real life to see if the scale is right. But my experience is that Ikea things are generally smaller than I expect them to be. These would be terribly impractical because of the arms; Milo and Dave need to play guitar in the library chairs, so armless is much better. But this one is so pretty.

Still, I might look instead for some vintage mid-century-esque chairs on Craigslist instead. Armless. Sigh. Or Milo can play guitar somewhere else. We have armless chairs in the dining room. They're not that heavy. He can drag them over to the library (where the amp is).

And then I'm itching to find a place for this rug:


And then I have big DIY project plans for the coffee table. 

Something like this:


Or this:


I feel a little silly pouring all this energy into the library when my back porch is practically falling down. But the porch is way out BACK. The library's the first thing you see. Also it's easier and cheaper to deal with.

Wednesday, September 11, 2013

The Library Gets a Loveseat, or: Perspective Rears its Ugly Head Again

It's been nearly a year since we bought a bunch of Billy shelves for the library. We're still very happy with the shelves, but the armchair in there was always just a placeholder until we could get something nicer. We picked up the chair for $40 on Craigslist, and I think we've gotten $40 worth of use out of it. By "we" I mostly mean the dogs. They love that chair. You can tell from looking at/smelling it.

Here's what the library looked like until last weekend:


There's a beagle wearing a sweater in that chair.

So the chair was fine. Very basic. A little more traditional than I wanted. It wasn't in terrific shape even before our dogs slept in it for a year. My plans for replacing it changed over time. There was a period where I really, really wanted a Strandmon chair from Ikea for example. But one of the nice things about sticking a cheap placeholder chair in your library for awhile is that it gives you time to figure out what you really want. And it became clear over time that one thing we wanted was a bit more seating in that room. It's a lovely room; we all like being in there, but there was only room for three people to sit down before. I thought a full size sofa would be too much for the space, but a small loveseat might be perfect.

I started casually eyeing Craigslist awhile back. And then, sometime last week, I spotted the one we finally wound up with. When I first saw it, it was priced at $150. I wasn't in a rush, and I wasn't totally sold, so I didn't make a move for a few more days. By the time I did get around to showing it to Dave and then e-mailing the seller, it had been sitting on Craigslist for...maybe a week? And she was eager to sell. "Make me an offer; it needs to go!" she told me. So I offered her $100, and she said yes.

Here it is:


As you can see, foster beagle Bella already loves the new seating. When I'm not taking pictures, there's a sheet on it, though. Spot the baby! (hint: he really loves electrical cords)

It's a pretty basic, dark gray, velvet-ish loveseat. I'm really liking it in front of the shelves. I thought it was going to go in front of the windows, but no. It definitely wants to live in front of the shelves.

But here is my problem.

It is so...petite that it makes the green chairs and chess table look ENORMOUS. Like a giant might sit in them, while chatting with the elves who hang out on the loveseat.

Let me show you:


It actually doesn't look quite as ridiculous in the picture as I expected. But still not what I want. (The chess table I had to just shove in another room entirely. I think it's going on Craigslist itself very soon).

So that's the story of how my $100 Craigslist loveseat means I have to buy new chairs. And a coffee table. Maybe also a rug. I kind of love it with just the loveseat. So dramatic! Shelves pop! But the whole point of the loveseat was more seating. So.

I have some ideas for that, but it's late and I need to go watch TV, so I'll save them for another post. Let's just say that I think I need to ask for Ikea gift cards for Christmas.

What do you guys think? What else would you put in this room with the world's most miniature loveseat? Besides more beagles?