Showing posts with label outside. Show all posts

Monday, September 16, 2013

Blogger Fall Project Extravaganza: DIY Planter Boxes + a Giveaway with Coupons.com

Coupons.com provided us with a Home Depot gift card to pay for the materials we used for this project. 


I was very excited when I got the chance to participate in this fall project collaboration, in large part because it came with a deadline, and me and deadlines get along very well. Me and "finish it whenever you get a chance, self: I know how busy you are!" are good friends, too, but not as productive friends. We're the kind of friends who sit around and watch TV all night and drink more wine than we meant to.

So Coupons.com was kind enough to send a  few of us bloggers gift cards to Home Depot or Amazon to use to complete a fall project. Did you know that you can use Coupons.com to search for all kinds of discounts to a gazillion different stores, not just for grocery coupons? I'd had no idea, although I'd been using it and loving it for years for printing out grocery coupons. But, yeah, it's all right there! Printable grocery coupons AND coupon codes and discounts for places like....well, like Home Depot and Amazon. And thousands of other places (not really a gazillion. That's not a real number).

My first vision of this post was a wee bit more ambitious than what you see before you. It involved a very elaborate entire front porch makeover, complete with a painted door and a house number plaque and maybe a DIY door mat of some sort for good measure.

Then we realized that thinking we'd be able to get all that done was completely nuts, and we made these planter boxes and called it a day. Really, we're still planning on all the other stuff (and the leftover paint from this project will play into it, but I won't say exactly where, so as to leave some surprises). But time goes by surprisingly quickly, and it's been way too hot and humid to paint a door anyway.

I'm not going to give a detailed tutorial for how we made the planters, because we pretty much followed these plans from Ana White. Only we didn't use the finials, mostly because we couldn't find ones that looked like the ones they used, and we were kind of undecided about whether we wanted them or not anyway, so that decided for us.

These were pretty simple to put together and would be a great first project for someone who just got a Kreg Jig and is looking for something to knock out in a day. That said, we managed to mess them up a little. Dave made a diagram to show how:

 This is how the planter was supposed to look....with the side boards lined up with the inside of the corner posts.
Instead, it wound up more like this. This was not just an aesthetic problem, it meant that the slats for the bottom were too short to fit. So Dave had to hammer in an extra little board for them to rest on:


But then everything was okay.

I even helped with the woodworking part of this a little. Dave was headed out to the store, and I said, "maybe I'll work on these a little!" My little part involved screwing together some already Kreg Jigged boards. Dave showed me how to do it, and, by the time he was ready to leave, it was not going terribly well. "Do you feel like you're getting the hang of it?" he asked.

"No, I wouldn't say that," I said.

"Okay, bye," said Dave.

"What do we do when I completely screw this up?" I asked him.

"We buy more wood," he told me.

"I kind of have a deadline here," I said, "don't you think it's a little irresponsible of you to let me completely mess up my project when I have a deadline?"

But it all worked out, and we didn't even need more wood.

I wanted to do some kind of seasonal fall/Halloween design on these, with the idea that they can then be turned around to the blank side for the rest of the year and be season-neutral. I'm planning on a Edgar Allan Poe/Raven heavy theme for Halloween around here, so ravens seemed like a natural choice.

I considered making a stencil, but I have an irrational fear of stenciling, so I ended up sketching a raven outline and then tracing it onto the boxes. I just googled images of ravens; they're all black, so it's pretty easy to make them outline-y.

Both the paint for the boxes and for the ravens is semi-gloss exterior latex from Behr. I picked a lighter gray for the boxes and then a deep charcoal gray from the same card for the ravens. I did one coat of the light gray, let them dry, then set to work on the ravens.


After I traced around them with pencil, I filled them in with the two coats of the dark gray paint (using little craft brushes). It occurred to me far too late that I probably should have had them facing opposite directions. Oh well.

The next day, when everything was dry, we hauled them out onto the front porch, lined them with cardboard:


Then filled them up (with mulch from our never ending mulch pile and then with a combo of potting soil and compost on top) and stuck some mums (which were on sale, four for $10 at Home Depot) in there. And then they looked like this:


(I was going to show you what they look like turned around and de-Halloween-ified, but turns out they're really heavy once they're full of dirt. I'm not turning them around just for a picture. Take my word for it: no ravens on the other side!)

Now try to picture it with a freshly painted door and shiny new house numbers!

And now for some EXTRA FUN! There are eight other bloggers who are also showing off their fall projects today. I've seen a few sneaky instagram/facebook glimpses of some of them, but for the most part I have no idea what they are, and I'm very excited to see them all. So make sure to hop over to these other blogs and see what everyone else has come up with.

Here we all are, looking very happy about our fall projects:


....and here's where you can find everyone:


But wait! There's MORE! A giveaway, to be specific. Someone's going to win a $200 gift card to (your choice) Home Depot or Amazon. And between those two places, you can find pretty much anything in the whole world.

You can enter below (up to 10 times!) This giveaway is only open to US residents, and it will close at 12 AM on September 23.

a Rafflecopter giveaway

Sharing with:
The Inspiration Gallery

Monday, September 9, 2013

Amazing Back Porch Reveal

I have an incredible before and after to show you today. Ready?

I'll start with the after:


No, really: that's the after.

"But," you might be thinking, "that's a crappy screened porch with a plywood floor and a patio set that needs painting. Also, your fan is ugly." 

That's right! That's what it is. And I love it SO much right now. 

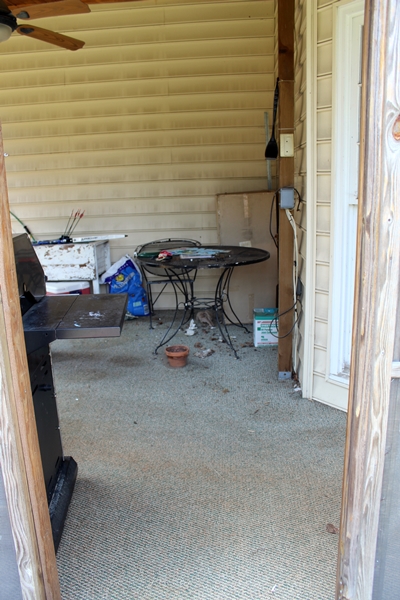
The terrifying before pictures will show you why:


I'm not sure why putting crappy carpet down in an area that is, essentially, outside ever seemed like a good idea to someone. But, then, carpet never really seems like a good idea to me, even in places where it makes sense. 

And we did have the house pressure washed last year, but I guess the porch was considered inside enough that it got skipped? Maybe because of the carpet. 

I'd been pretending this porch didn't exist ever since we moved in. Dave did rebuild the dangerous steps awhile back, but other than that there was just so much that needed doing that it was overwhelming to even think about where to start. 

It turns out the carpet was a great place to start. 

You can tell from the picture that the carpet was nasty, but you really couldn't get the full effect without seeing/smelling it in person. We live in Georgia. It rains lots and lots here, and when it's not raining it's still very humid, and, basically, if you want to carpet your outdoor areas for some reason, you should live somewhere else. IMHO.

Dave's been saying we should go ahead and rip up the carpet for months and months now, but I always shut him down. I was worried we'd get started, and it would turn out to be much more complicated and involved than we'd anticipated, and we'd have to spend the rest of our lives dealing with it. Pretending it wasn't there for the foreseeable future seemed like a much more reasonable plan to me.

But then, a couple of weeks ago, Dave suddenly announced, in an uncharacteristically assertive way, "I'm going to go rip that carpet up." And then he did. And it was super fast and easy (if disgusting). It's nice when things turn out that way. 


The carpet was glued down, but the glue had long since lost all of its adhesive abilities, so the carpet pulled right up. The glue residue is still there on the plywood, but it's not a big deal for now. It's not worth trying to sand it down or whatever until we figure out what we're going to do out there long term. 

The carpet is mostly still sitting on the ground next to the porch, by the way. Our big disposal plan is cutting it into sections that fit in the trash barrels and throwing it out a bit at a time every trash day. 

Inspired by Dave's ambition, the kids and I did a little more sprucing up. We cleaned all the siding that we could reach:


And I took a broom to all the cobwebs. And we did some general clearing out of the crap that's accumulated on the porch over time. 

And now it's BEAUTIFUL!


Well. For now we're settling for less awful. 

We have big plans out here that go beyond ripping up gross carpet. 


The deck part probably needs to be completely rebuilt, and I think we've decided it should not be rebuilt by us. So we're hoping we can afford to have that done sometime in the nearish future. There's kind of a weird gap right now where the deck ends a few feet away from the sunroom, so we'd like to extend it to close up that gap.

And then we're thinking we're probably going to take all the screens down, leaving a covered open air porch opening up onto the deck. Right now we have a little deck and a little sunroom; I think turning it into one unified space would be more practical. And with the sunroom right there, we don't feel an overwhelming need to also have a screened porch. 

We think/hope that the screened porch is basically structurally sound, so we should be able to deal with fixing that part up mostly ourselves. Painting will be involved. 

Going back to take another look at this picture:

 
....you can see what I was talking about when I fantasized about a kitchen remodel, only from the outside. See that bay window there? I want that gone, and to push the kitchen out to where the current edge of the porch is, on the right up there. So that one wall where the weird pole with wires and boxes on it is (I have no idea what all that mess is) would extend out and would have a door leading in to the newly expanded kitchen in the corner. And then the new exterior wall would look out on the deck and have a couple of big windows. I should make an actual diagram of all this at some point. Picture's worth a thousand words and all that. 

Anyway. It's a humble start to the big porch redo, but having that nasty carpet gone is immensely satisfying.

Tuesday, December 11, 2012

Oh! Also! The LAST Christmas Decorating Post

I totally forgot!

Our house has a weird....kid? cherub? ghost? hanging out above the front door. He's actually a little bit creepy. I don't think any other house in the neighborhood has one; I'm not sure why anyone ever thought it was a great idea to put him there.

But, at any rate, there he is. And as soon as we saw him, when we first looked at the house, the kids decided he needed to wear a Santa hat for Christmas. So, on the very same day that I did not buy a fabulous white Christmas tree, we found a lovely Santa hat at the thrift store, and got our creepy doorway kid all ready for the holidays (oh, look--wings. I guess definitely a cherub):


Saturday, October 27, 2012

Weekend projects/updates/previews of exciting things to come

This weekend was supposed to be the weekend for starting the tile in the master bathroom. But, after having a few people over for some backyard firepit fun last weekend for Dave's birthday, we decided that replacing the rickety old back porch steps before we have people here for Thanksgiving was a higher priority. Safety first! Nasty germy carpet second.

Dave rebuilt the front steps at our old house shortly before we moved, so he has some experience.  But  he went into this a little nervous anyway. For one thing, that step building project at the old house did not go entirely smoothly. For another thing, this is a longer flight of stairs. For one more thing, this stair building project requires tearing out the old, falling apart brick landing and figuring out how to have the stairs land nicely on the unlevel ground underneath. Whoever built the old stairs dealt with the uneven landing by sticking a little block of wood under one of the stringers. Not so stable. I envisioned emergency room trips and/or lawsuits every time someone walked down those steps.

So far things are going smoothly, though, and Dave's in much better spirits now than he was before he started this morning. Demolition went well, and tearing out the old brick landing turned out to be something that could be done with bare hands, so old and decrepit was it. And now we have a big pile of bricks that we can use to further beagle proof that back fence! We spend a lot of time thinking about beagle proofing fences around here. We live one house down from a very busy road, which The Beagle has actually run across on one of her little adventures. This, dear little Fiesta, is why I did not want a beagle! She's lucky she's irresistible. I am used to dogs that I wouldn't be able to lose if I tried.

Not sure how long the full step building project will take. Dave is hoping to finish tomorrow, but I suspect that's being a little optimistic. But here's a preview:


You can still see the block of wood they attached to the bottom of the steps on one side for leveling purposes! You can also see a little bit of what a giant disaster the whole deck/screened porch is. I'm not sure when that's all getting tackled. I get overwhelmed just thinking about it, and I'm not even sure where to start. Well, I guess we're starting with new steps. I think if we do that and then either replace or reattach the railing on the deck (not shown) then it will all at least be safe, if still incredibly ugly.

Other weekend plans involve tackling some of the little projects that we've been meaning to get around to for forever. I would like, for example, to hang a few more pictures and do some little painting projects so that I can finally call the library done....enough for now. So I'm mostly working on that today.

I'd also like to start working on the little counter/desk area in our kitchen, next to the garage, and turn it into a "command center" as people say. I feel silly saying command center. But, you know. This is what it looks like now:


And that's not even showing you the mess inside that cabinet there. I'm trying to think what all I need to make places for....I'm thinking calendars, menus, coupons, incoming mail, small tools we use a lot, reusable grocery bags.....and probably not so much cans of primer and shoes (although, to be fair, the shoes belong to a visiting kid, so they don't stay here all the time).  I am pinning things in preparation!

What exciting projects is everyone else up to this weekend?

Monday, September 24, 2012

Fire Pit Weekend Revealed!

Our yard is very big (we have a half acre lot) and very empty. We have the only non-wooded lot in the (small) neighborhood. The story we got from neighbors is that a tornado a few years back hit our house and took out a bunch of trees, and the former owner went with clearing out the whole backyard as the least expensive way to clean things up.

It's a huge change from the super wooded lot at our old house. I'm excited about the possibilities involved with gardening with the help of actual sunlight, but truth be told the totally empty yard was kind of....boring. It's not even especially useful as a flat surface for, like, sports and stuff (you know, if we were a sporty people), because there are all kinds of surprising dips and holes where trees used to be, excellent for spraining ankles.

We have a dome climber, like this one:
I thought it would get more use from our older kids than a swingset, and then I found a great deal on one on Craigslist and snatched it up. So picture a giant, flat, grassy yard with a dome climber in one corner. That's what we had.

Until today!

We had a cheap little metal fire pit from Wal-mart or wherever that we used on the driveway at the old house. The kids have always LOVED having fires (and the accompanying marshmallows); firepit evenings often started with marshmallows and ended with kids running around catching fireflies and all that sort of thing. So idyllic!

So I knew I wanted a more substantial/permanent/pretty firepit here. I did my usual Pinterest research:

http://www.diynetwork.com/outdoors/8-easy-to-build-fire-pit-designs/pictures/index.html

http://www.thisoldhouse.com/toh/how-to/intro/0,,1636191,00.html

And settled on this $30 firepit from Always Chasing Life as my primary inspiration.

Ours was more than $30, for a few reasons. For one thing, we lacked a nice patio to put it on, so we decided to clear out a circle in the yard and put gravel down first. And we wound up with slightly more expensive stones, for reasons that I will reveal as our story continues.

Okay! Firepit weekend arrived, and we headed off to Lowes, where we discovered that they were having a 20% off sale on landscaping stones! What luck!


We picked out this pea gravel to use as the base. We wound up with 22 bags (and could probably use a couple more for better coverage) at  $3.37/bag (after our 5% Lowes card discount), already blowing a $30 budget out of the water. But cheaper than a patio!


We were planning to get these "castle blocks:"


....but then Dave did some fancy mathematical figurin' about radii and whatnot and decided that we could make a smaller circle by buying the more expensive (but also prettier) flagstone. In the end, we decided that the castle block would probably have been fine; Dave didn't really think about how in firepit building, unlike in geometry, you can play around with the spacing between the blocks and make circles smaller with barely noticeable aesthetic ramifications.

I'm glad we went with the flagstone, though; I'm very pleased with how it looks.

I'm conflating various Lowes trips, interrupted by sleep and eating and birthday parties and August's performance as Colonel Hathi in The Jungle Book, for the sake of the narrative. Had we bought everything at once, it would have killed the minivan, I think. In the end, though, we bought 22 bags of pea gravel and 30 flagstones, at $1.86 each.

We came home with all the stuff and set to work. We even had an extra kid over for the afternoon, so we got him going with some manual labor, too:


Helping!


Resting!

By the way, see that fence? My husband built that fence all by himself! Well, my brother helped with digging the post holes. But, mostly, all by himself. Which took a long time and was a sucky job, and saved us a bunch of money, and looks AWESOME. Go Dave! (not that crappy fence along the back; that was already there. That's the fence The Beagle sneaks out under whenever she gets a chance. Not Dave's fence; it's like Fort Knox, I tell you!)

Digging the circle was the most time consuming and unfun part. But then came....the gravel spreading!


And then....the rock stacking!


Dave took all the dirt/grass he dug out of the circle and piled against the crappy fence for Beagle-proofing purposes:


I am, again, condensing for dramatic effect. The whole process took parts of 3 days, start to finish, although only a substantial part of the first day. It probably could have been completed in one long day, had that been absolutely necessary. Really, the part he did today took about 15 minutes (finishing stacking the stones from the last minivan-load).

We opted for cheapo plastic Adirondack chairs. We wanted 6 of them, and paying for six nice chairs just wasn't going to happen. It being the end of the season and all, white was the only color Lowes had left. We have big plans to spray paint them and make them more beautiful, though. Sometime.

The finished project:


And here it is in action:


Fire! Pretty!

So there you have it. Total, more than $30, cost: $129.94 for the gravel and flagstones, plus another $102.48 for the Adirondack chairs.

Editing to add.....the metal bowl is just the bowl from our old firepit, recycled. In case anyone was wondering :)

Linking with:
Summer Spruce Up Series

Saturday, September 22, 2012

Fire pit sneak preview

You know what you need when you're digging a circle for a fire pit? The most important part? A beagle.