I'm always on the lookout for crafts even I
....and then, a couple of days ago, I did something even better: I actually MADE some! Crazy idea, right? You pin something and then you make it.
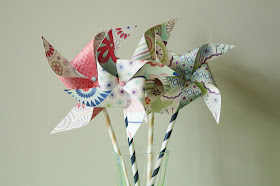
As part of my ongoing attempt to become a seasonal decorator, I decided to crank out some 4th of July themed pinwheels. I went to Hobby Lobby and came home with this stuff:
4th of July-y scrapbook paper, decorative brads, and paper straws. I wanted just plain blue or red straws, but the most neutral I could find were these black chevron ones. Now I can have a fashionable and environmentally friendly kids' birthday party with the extras!
I just followed along with the Circusberry tutorial. If I don't make any sense, go over there and see what she says!
1. Cut out a 4 or 5 inch square from your scrapbook paper. This is where I realized that the tutorial called for double sided scrapbook paper. Oops. More on that later. This first pinwheel was not double sided.
2. Draw lines diagonally across your square.
3. Cut along the lines toward the middle, leaving about 1/2 inch uncut.
4. Poke a hole through the middle and in the left corner of each triangle section. I wasn't sure what to poke holes with, so I, uhh, found this thing in my silverware drawer and used it. It worked pretty well. Be careful; it's sharp!
5. Fold each hole-poked corner down toward the center, one at a time, inserting the brad through each layer (so you're kind of tucking each new layer under the one that comes before it, working the brad from the outside in). Once you have all the triangles folded down, poke the brad through the center hole.
6. Hardest part! Paper straws are tougher than they look! Flatten one end of the straw and poke a hole through it. Insert brad through this hole to attach the pinwheel, spread the tabs out, and you're done!
Okay, so then I thought, "you know what's pretty much the same as double sided scrapbook paper? Two sheets of scrapbook paper taped together with double sided tape!"
So I did the rest of them like that. Same process, only taping the two sheets together first.
Super easy! Once I got going, I could do one in maybe 5 minutes.
Then I tossed some other stuff together (stack of books!) and made a display. Said display is supposed to be in the dining room, but I was too lazy to clean off the buffet before I took pictures. I'm pacing myself.


Well aren't those cute!
ReplyDeleteThanks, Emma :)
DeleteThese are so fun! Maybe I'll have to make some Canadian ones for Canada Day on July 1
ReplyDeleteDo it--they're fun! :)
DeleteLove your pin wheels! Thanks for the detailed tutorial. I have never made one, but now I totally think I could :) I actually love that you glued together your own two patterns. That is such a great contrast. Also: you found chevron paper straws? They look awesome!!!
ReplyDeleteChevron was actually just about the only choice at Hobby Lobby! I kind of wanted solid since there was so much pattern in the scrapbook paper, but no. There was chevron and then....some kind of little flowers, I think.
DeleteVery cute! I've been thinking about making pinwheels for the boys' next birthday. Love the patterns you chose for yours.
ReplyDeleteThanks, Anu--pinwheels for a b-day party would be super cute!
DeleteThe pinwheels turned out cute! I love the RW&B papers:@)
ReplyDeleteI want to be a cute mom like you! Those pin wheels are adorbs.
ReplyDeleteI am so glad you found the pinwheel tutorial helpful...and I love the patriotism.
ReplyDeleteThanks for visiting Circus Berry and spreading the love.
Anne
Thanks for the inspiration--I've been meaning to make them for awhile now :)
DeleteSo adorable! I'll be making some of these!
ReplyDeleteTherena @ littlebitofpaint.blogspot.com
thanks, therena!
DeleteThese are so cute, and well done! :) Visiting from Brenda's Welcome Wagon! :)
ReplyDeleteThanks so much Debra!
DeleteHi, I like your origami.I also make origami but I didn't knew about this one.Thank you.
ReplyDeletehttp://moonshineandsunlight.blogspot.in/
Thanks for stopping by!
Delete